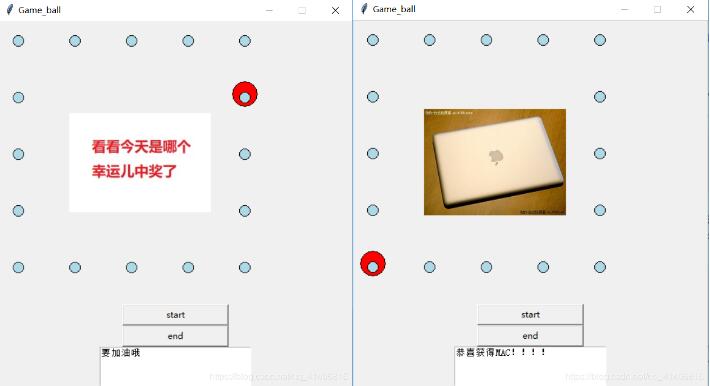
最近老师在讲 tkinter,所以我做了一个抽奖小游戏。
一、效果图
先上效果图。红色的小球会围绕蓝色小球做环形运动。我设置的四个角是奖品,其余的都是再接再厉。

二、方法
基于tkinter中的button,text,pil ,time.canvas
drawpath():用于画蓝色的小球
ball类 初始化画布、运动小球大小、运动的起点。
ball类-》draw() 控制小球的运动。这里用到一个方法叫canvas.coords。这个方法可以获取运动小球当前在画布上的坐标。并返回一个数组。比如 pos=self.canvas.coords 。左边:pos[0],右边pos[2],上边:pos[1],下边:pos[3].用if和pos 可以控制小球的上下左右运动。
|
1
2
3
4
5
6
7
8
9
10
11
12
13
14
15
16
17
18
19
20
21
22
23
24
25
26
27
28
|
self.canvas.move(self.id,self.x,self.y)#获取某个对象在画布的坐标,返回一个数组(两个坐标,左上角的坐标和右下角的两个坐标) pos = self.canvas.coords(self.id) getnowpoint(pos[0],pos[1],pos[2],pos[3]) #打印获取的坐标 #如果最上面的纵轴坐标在顶上,则往下移动一个像素 if pos[1] <=30 and self.y==-80: self.x = 80 self.y=0 print("pos1" + str(self.x) + ":pos1:" + str(self.y)) #如果最下面的纵轴坐标在底上,则向左移动 elif pos[3] > 300 and self.x==0 and self.y==80: self.x = -80 self.y=0 print("pos3" + str(self.x) + ":pos3:" + str(self.y)) #宽度控制# #如果在左边框了,那么向右边移动3像素 elif pos[0] <30 and self.x== -80: self.x = 0 self.y= -80 print("pos0" + str(self.x) + ":pos0:" + str(self.y)) #如果到右边框了,左移动3像素 elif pos[2] > 300 and self.y==0: self.x = 0 self.y=80 print("pos2:" + str(self.x) + "pos2:" + str(self.y)) |
getnowpoint()当前红色运动小球的位置。
放图片的函数:
|
1
2
3
|
img44 = image.open("px.jpg")img_file44 = imagetk.photoimage(img44)canvas.create_image(200, 200, image=img_file44)(参数1,2 图片的位置x,y,参数3是图片) |
三、遇到的问题
老师教的显示canvas上的内容要用mainloop(),所以一开始不知道怎么让小球动起来,最后查阅了很多资料发现。其实不用mainloop也行。可以使用tk.update() 刷新tk上的内容。所以这里我们要用一个while让小球每动一次窗体就刷新一次。time.sleep()控制小球运动速度。
四、代码
|
1
2
3
4
5
6
7
8
9
10
11
12
13
14
15
16
17
18
19
20
21
22
23
24
25
26
27
28
29
30
31
32
33
34
35
36
37
38
39
40
41
42
43
44
45
46
47
48
49
50
51
52
53
54
55
56
57
58
59
60
61
62
63
64
65
66
67
68
69
70
71
72
73
74
75
76
77
78
79
80
81
82
83
84
85
86
87
88
89
90
91
92
93
94
95
96
97
98
99
100
101
102
103
104
105
106
107
108
109
110
111
112
113
114
115
116
117
118
119
120
121
122
123
124
125
126
127
128
129
130
131
132
133
134
135
136
137
138
139
140
141
142
143
144
145
146
147
148
149
150
151
152
153
154
155
156
157
158
159
160
161
162
163
164
165
166
167
168
169
170
171
172
173
174
175
176
177
178
179
180
|
from tkinter import *import randomimport timefrom pil import image, imagetk##创建一个类,这个类含有两个参数,一个是画布,一个是球的颜色#count = 0#a = eval(input('time:'))#b = aglobal isstopglobal numisstop=0 def stopplay(): global isstop isstop=1def startplay(): global isstop isstop = 0class ball: def __init__(self,canvas,color): self.canvas = canvas self.id = canvas.create_oval(0,0,35,35,fill=color) self.canvas.move(self.id,10,5) self.x = 80 self.y = 0 def draw(self): if isstop==0: self.canvas.move(self.id,self.x,self.y) #获取某个对象在画布的坐标,返回一个数组(两个坐标,左上角的坐标和右下角的两个坐标) pos = self.canvas.coords(self.id) getnowpoint(pos[0],pos[1],pos[2],pos[3]) #打印获取的坐标 #如果最上面的纵轴坐标在顶上,则往下移动一个像素 if pos[1] <=30 and self.y==-80: self.x = 80 self.y=0 print("pos1" + str(self.x) + ":pos1:" + str(self.y)) #如果最下面的纵轴坐标在底上,则向左移动 elif pos[3] > 300 and self.x==0 and self.y==80: self.x = -80 self.y=0 print("pos3" + str(self.x) + ":pos3:" + str(self.y)) #宽度控制# #如果在左边框了,那么向右边移动3像素 elif pos[0] <30 and self.x== -80: self.x = 0 self.y= -80 print("pos0" + str(self.x) + ":pos0:" + str(self.y)) #如果到右边框了,左移动3像素 elif pos[2] > 300 and self.y==0: self.x = 0 self.y=80 print("pos2:" + str(self.x) + "pos2:" + str(self.y)) if isstop==1: print("停止") self.canvas.move(self.id, self.x, self.y) # 获取某个对象在画布的坐标,返回一个数组(两个坐标,左上角的坐标和右下角的两个坐标) pos = self.canvas.coords(self.id) print(pos) def getnowpoint(x1,y1,x2,y2): global num print("现在在") print(x1,y1,x2,y2) row=(x1-10)/80 line=(y1-5)/80 num=str(int(row))+str(int(line)) print("点"+str(int(row))+str(int(line))) #return num def drawpath(): for i in range(5): for j in range(5): if i==0 or i==4: point = (20+80*j, 20+ 80 * i, 35+80*j, 35+ 80 * i) oil = canvas.create_oval(point, fill='lightblue') elif j==0 or j==4: # print("$") point = (20+80*j,20+ 80 * i, 35+80*j , 35+ 80 * i) oil = canvas.create_oval(point, fill='lightblue') #创建画布 tk = tk() tk.title("game_ball")tk.resizable(0,0)tk.wm_attributes("-topmost",1)#bd=0,highlightthickness=0 画布之外没有边框 canvas = canvas(tk,width=500,height=400,bd=0,highlightthickness=0) canvas.pack() tk.update() point=(30,30,45,45) #创建对象ball = ball(canvas,'red')drawpath()#一直保持循环btn_start = button(tk,text='start',width='20',command=startplay)btn_start.pack()btn_end=button(tk,text='end',width='20',command=stopplay)btn_end.pack()global txttxt=""text1=text(tk,width=30,height=4)while 1: if isstop==0: txt = " " text1.insert(insert, txt) text1.delete(0.0,insert) imgtt = image.open("tt.jpg") img_filett = imagetk.photoimage(imgtt) canvas.create_image(200, 200, image=img_filett) while 1: ball.draw() #快速刷新屏幕 tk.update_idletasks() tk.update() time.sleep(0.1) if isstop==1: break if isstop==1: txt="要加油哦" print("num" + num) print(type(num)) print(type("04")) if num=="00" or num=="40" or num== "04" or num== "44": if num=="00": img00=image.open("3.jpg") img_file00=imagetk.photoimage(img00) canvas.create_image(200,200,image=img_file00) text1.insert(insert,"恭喜获得键盘!!!!") text1.tag_configure('bold',font=('arial', 20, 'bold', 'italic')) elif num=="40": img40 = image.open("4.jpg") img_file40 = imagetk.photoimage(img40) canvas.create_image(200, 200, image=img_file40) text1.insert(insert, "恭喜获得耳机!!!!") text1.tag_configure('bold', font=('arial', 20, 'bold', 'italic')) text1.pack() elif num=="04": img04 = image.open("mac.jpg") img_file04 = imagetk.photoimage(img04) canvas.create_image(200, 200, image=img_file04) text1.insert(insert, "恭喜获得mac!!!!") text1.tag_configure('bold', font=('arial', 20, 'bold', 'italic')) text1.pack() elif num=="44": img44 = image.open("px.jpg") img_file44 = imagetk.photoimage(img44) canvas.create_image(200, 200, image=img_file44) text1.insert(insert, "恭喜获得iphone xs max!!!!") text1.tag_configure('bold', font=('arial', 20, 'bold', 'italic')) text1.pack() else: #l1 = label(tk, text=txt, font=('宋体', '28')) #l1.pack() text1.insert(insert,txt) text1.tag_configure('bold', font=('arial', 20, 'bold', 'italic')) text1.pack() while 1: #ball.draw() # 快速刷新屏幕 tk.update_idletasks() tk.update() time.sleep(0.1) #print("num"+num) if isstop == 0: break |
以上就是本文的全部内容,希望对大家的学习有所帮助,也希望大家多多支持服务器之家。
原文链接:https://blog.csdn.net/qq_41406816/article/details/84594397


