相信对于手机的时间日期设置大家一定都不陌生吧,今天举一个关于时间日期设置的示例,其中有些许不完善之处,例如如何使设置的时间日期和手机系统同步等。感兴趣的读者可以根据自身经验加以完善。
现来看看具体示例,希望对大家有所帮助。
首先是时间设置:
.java文件(mainactivity.java)代码如下:
|
1
2
3
4
5
6
7
8
9
10
11
12
13
14
15
16
17
18
19
20
21
22
23
24
25
26
27
28
29
30
31
32
33
34
35
36
37
38
39
40
41
42
43
44
45
46
47
48
49
50
51
52
53
54
55
56
57
58
59
60
61
62
63
64
65
66
67
68
69
70
71
72
73
74
75
76
|
package com.example.activity_time_date;import java.util.calendar;import android.app.activity;import android.app.dialog;import android.app.timepickerdialog;import android.content.intent;import android.os.bundle;import android.view.menu;import android.view.menuitem;import android.view.view;import android.view.view.onclicklistener;import android.widget.button;import android.widget.textview;import android.widget.timepicker;public class mainactivity extends activity { private textview mytext = null; private button mybutton1 = null; private button mybutton2 = null; private int mhour; private int mminute; static final int time_dialog_id = 0; private timepickerdialog.ontimesetlistener mtimesetlistener = new timepickerdialog.ontimesetlistener() { @override public void ontimeset(timepicker view, int hourofday, int minute) { // todo auto-generated method stub mhour = hourofday; mminute = minute; updatedisplay(); } }; @override protected void oncreate(bundle savedinstancestate) { super.oncreate(savedinstancestate); setcontentview(r.layout.activity_main); mytext = (textview)findviewbyid(r.id.textview); mybutton1 = (button)findviewbyid(r.id.button1); mybutton2 = (button)findviewbyid(r.id.button2); mybutton1.setonclicklistener(new onclicklistener() { @override public void onclick(view v) { // todo auto-generated method stub showdialog(time_dialog_id); } }); mybutton2.setonclicklistener(new onclicklistener() { @override public void onclick(view v) { // todo auto-generated method stub mainactivity.this.startactivity(new intent(mainactivity.this, dateactivity.class)); } }); final calendar cal = calendar.getinstance(); mhour = cal.get(calendar.hour_of_day); mminute = cal.get(calendar.minute); updatedisplay(); } private void updatedisplay(){ mytext.settext(new stringbuilder().append(pad(mhour)).append(":") .append(pad(mminute))); } private static string pad(int i){ if (i >= 10) return string.valueof(i); else return "0" + string.valueof(i); } @override protected dialog oncreatedialog(int id) { switch (id) { case time_dialog_id: return new timepickerdialog(this, mtimesetlistener, mhour, mminute, false); } return null; }} |
布局文件(activity_main.xml)代码如下:
|
1
2
3
4
5
6
7
8
9
10
11
12
13
14
15
16
17
18
19
20
21
22
23
24
25
26
27
28
29
30
|
<relativelayout xmlns:android="http://schemas.android.com/apk/res/android" xmlns:tools="http://schemas.android.com/tools" android:layout_width="match_parent" android:layout_height="match_parent" tools:context="${relativepackage}.${activityclass}" ><linearlayout android:layout_width="fill_parent" android:layout_height="fill_parent" android:orientation="vertical" > <textview android:id="@+id/textview" android:layout_width="wrap_content" android:layout_height="wrap_content" /> <button android:id="@+id/button1" android:layout_width="fill_parent" android:layout_height="wrap_content" android:text="设置时间" /> <button android:id="@+id/button2" android:layout_width="fill_parent" android:layout_height="wrap_content" android:text="下一页" /></linearlayout></relativelayout> |
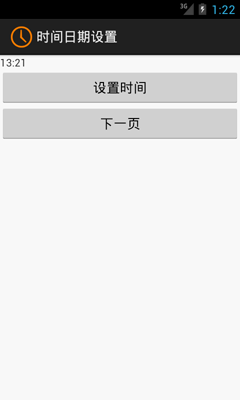
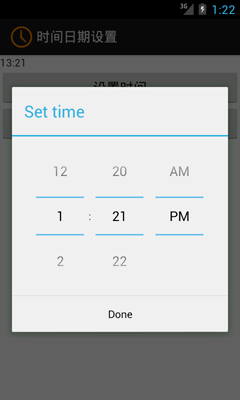
运行效果如下图所示:


日期设置和时间设置基本一致,在此不再赘述。读者可以调试并改进本文示例代码,相信会有新的收获!


