本文实例介绍的是android的tab控件,tab控件可以达到分页的效果,让一个屏幕的内容尽量丰富,当然也会增加开发的复杂程度,在有必要的时候再使用。android的tab控件使用起来有点奇怪,必须包含和按照以下的顺序:

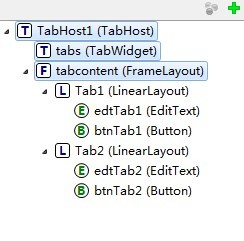
tabhost控件->tabwidget(必须命名为tabs)->framelayout(必须命名为tabcontent)。
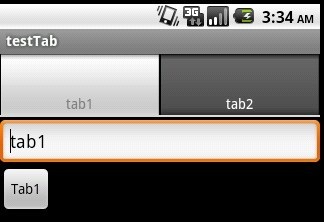
先来贴出本例运行的截图:

main.xml的源码如下:
|
1
2
3
4
5
6
7
8
9
10
11
12
13
14
15
16
17
|
<?xml version="1.0" encoding="utf-8"?><tabhost android:layout_width="fill_parent" android:layout_height="fill_parent" xmlns:android="http://schemas.android.com/apk/res/android" android:id="@android:id/tabhost1"> <tabwidget android:id="@android:id/tabs" android:layout_height="wrap_content" android:layout_width="fill_parent"></tabwidget> <framelayout android:id="@android:id/tabcontent" android:paddingtop="65px" android:layout_width="fill_parent" android:layout_height="fill_parent"> <linearlayout android:layout_height="wrap_content" android:id="@+id/tab1" android:orientation="vertical" android:layout_width="fill_parent"> <edittext android:layout_height="wrap_content" android:id="@+id/edttab1" android:layout_width="fill_parent"></edittext> <button android:layout_width="wrap_content" android:layout_height="wrap_content" android:id="@+id/btntab1" android:text="tab1"></button> </linearlayout> <linearlayout android:layout_height="wrap_content" android:id="@+id/tab2" android:layout_width="fill_parent" android:orientation="horizontal"> <edittext android:layout_height="wrap_content" android:id="@+id/edttab2" android:layout_width="wrap_content" android:layout_weight="300"></edittext> <button android:layout_width="wrap_content" android:layout_height="wrap_content" android:id="@+id/btntab2" android:text="tab2"></button></linearlayout> </framelayout></tabhost> |
java程序源码如下:
|
1
2
3
4
5
6
7
8
9
10
11
12
13
14
15
16
17
18
19
20
21
22
23
24
25
26
27
28
29
30
31
32
33
34
35
36
37
38
39
40
41
42
43
44
45
46
47
48
49
50
51
52
53
54
55
56
57
|
package com.testtab;import android.app.tabactivity;import android.os.bundle;import android.view.view;import android.widget.button;import android.widget.edittext;import android.widget.tabhost;import android.widget.tabhost.tabspec;public class testtab extends tabactivity {//基于tabactivity构建 button btntab1,btntab2; edittext edttab1,edttab2; /** called when the activity is first created. */ @override public void oncreate(bundle savedinstancestate) { super.oncreate(savedinstancestate); setcontentview(r.layout.main); tabhost tabs = gettabhost(); //设置tab1 tabspec tab1 = tabs.newtabspec("tab1"); tab1.setindicator("tab1"); // 设置tab1的名称 tab1.setcontent(r.id.tab1); // 关联控件 tabs.addtab(tab1); // 添加tab1 btntab1=(button)this.findviewbyid(r.id.btntab1); edttab1=(edittext)this.findviewbyid(r.id.edttab1); btntab1.setonclicklistener(new clickevent()); //设置tab2 tabspec tab2 = tabs.newtabspec("tab2"); tab2.setindicator("tab2"); tab2.setcontent(r.id.tab2); tabs.addtab(tab2); btntab2=(button)this.findviewbyid(r.id.btntab2); edttab2=(edittext)this.findviewbyid(r.id.edttab2); btntab2.setonclicklistener(new clickevent()); tabs.setcurrenttab(0); } class clickevent implements view.onclicklistener { @override public void onclick(view v) { if(v==btntab1) { edttab1.settext("tab1"); } else if(v==btntab2) { edttab2.settext("tab2"); } } }} |


