“摇一摇”功能的实现:
iPhone对 “摇一摇”有很好的支持,总体说来就两步:
在视图控制器中打开接受“摇一摇”的开关;
|
1
2
3
4
5
6
|
- (void)viewDidLoad { // 设置允许摇一摇功能 [UIApplication sharedApplication].applicationSupportsShakeToEdit = YES; // 并让自己成为第一响应者 [self becomeFirstResponder];} |
在“摇一摇”触发的制定的方法中实现需要实现的功能(”摇一摇“检测方法)。
|
1
2
3
4
5
6
7
8
9
10
11
12
13
14
15
16
17
18
19
20
21
22
23
|
// 摇一摇开始摇动 - (void)motionBegan:(UIEventSubtype)motion withEvent:(UIEvent *)event { NSLog(@"开始摇动"); //添加“摇一摇”动画 [self addAnimations]; //音效 AudioServicesPlaySystemSound (soundID); return; } // “摇一摇”取消摇动 - (void)motionCancelled:(UIEventSubtype)motion withEvent:(UIEvent *)event { NSLog(@"取消摇动"); return; } // “摇一摇”摇动结束 - (void)motionEnded:(UIEventSubtype)motion withEvent:(UIEvent *)event { if (event.subtype == UIEventSubtypeMotionShake) { // 判断是否是摇动结束 NSLog(@"摇动结束"); } return; } |
”摇一摇“的动画效果:
|
1
2
3
4
5
6
7
8
9
10
11
12
13
14
15
16
17
18
19
20
21
22
23
24
|
- (void)addAnimations { //音效 AudioServicesPlaySystemSound (soundID); //让上面图片的上下移动 CABasicAnimation *translation2 = [CABasicAnimation animationWithKeyPath:@"position"]; translation2.timingFunction = [CAMediaTimingFunction functionWithName:kCAMediaTimingFunctionEaseInEaseOut]; translation2.fromValue = [NSValue valueWithCGPoint:CGPointMake(160, 115)]; translation2.toValue = [NSValue valueWithCGPoint:CGPointMake(160, 40)]; translation2.duration = 0.4; translation2.repeatCount = 1; translation2.autoreverses = YES; //让下面的图片上下移动 CABasicAnimation *translation = [CABasicAnimation animationWithKeyPath:@"position"]; translation.timingFunction = [CAMediaTimingFunction functionWithName:kCAMediaTimingFunctionEaseInEaseOut]; translation.fromValue = [NSValue valueWithCGPoint:CGPointMake(160, 345)]; translation.toValue = [NSValue valueWithCGPoint:CGPointMake(160, 420)]; translation.duration = 0.4; translation.repeatCount = 1; translation.autoreverses = YES; [imgDown.layer addAnimation:translation forKey:@"translation"]; [imgUp.layer addAnimation:translation2 forKey:@"translation2"]; } |
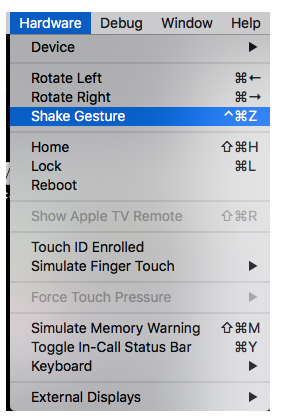
注意:在模拟器中运行时,可以通过「Hardware」-「Shake Gesture」来测试「摇一摇」功能。如下:

“扫一扫”功能的实现:
基于AVCaptureDevice做的二维码扫描器,基本步骤如下:
初始化相机,生成扫描器
设置参数
|
1
2
3
4
5
6
7
8
9
10
11
12
13
14
15
16
17
18
19
20
21
22
23
24
25
26
27
28
29
30
31
32
33
34
35
36
|
- (void)setupCamera { dispatch_async(dispatch_get_global_queue(DISPATCH_QUEUE_PRIORITY_DEFAULT, 0), ^{ _device = [AVCaptureDevice defaultDeviceWithMediaType:AVMediaTypeVideo]; _input = [AVCaptureDeviceInput deviceInputWithDevice:_device error:nil]; _output = [[AVCaptureMetadataOutput alloc]init]; [_output setMetadataObjectsDelegate:self queue:dispatch_get_main_queue()]; _session = [[AVCaptureSession alloc]init]; [_session setSessionPreset:AVCaptureSessionPresetHigh]; if ([_session canAddInput:self.input]) { [_session addInput:self.input]; } if ([_session canAddOutput:self.output]) { [_session addOutput:self.output]; } // 条码类型 AVMetadataObjectTypeQRCode _output.metadataObjectTypes = [NSArray arrayWithObjects:AVMetadataObjectTypeEAN13Code, AVMetadataObjectTypeEAN8Code, AVMetadataObjectTypeCode128Code, AVMetadataObjectTypeQRCode, nil]; dispatch_async(dispatch_get_main_queue(), ^{ //更新界面 _preview =[AVCaptureVideoPreviewLayer layerWithSession:self.session]; _preview.videoGravity = AVLayerVideoGravityResizeAspectFill; _preview.frame = CGRectMake(0, 0, CGRectGetWidth(self.centerView.frame), CGRectGetHeight(self.centerView.frame)); [self.centerView.layer insertSublayer:self.preview atIndex:0]; [_session startRunning]; }); });} |
在viewWillAppear和viewWillDisappear里对session做优化(timer是个扫描动画的计时器)
|
1
2
3
4
5
6
7
8
9
10
11
12
13
14
15
16
|
- (void)viewWillAppear:(BOOL)animated { [super viewWillAppear:animated]; if (_session && ![_session isRunning]) { [_session startRunning]; } timer = [NSTimer scheduledTimerWithTimeInterval:0.02 target:self selector:@selector(scanningAnimation) userInfo:nil repeats:YES]; [self setupCamera];} - (void)viewWillDisappear:(BOOL)animated { [super viewWillDisappear:animated]; _count = 0; [timer invalidate]; [self stopReading];} |
处理扫描结果
|
1
2
3
4
5
6
7
8
9
10
11
12
13
14
15
16
|
- (void)captureOutput:(AVCaptureOutput *)captureOutput didOutputMetadataObjects:(NSArray *)metadataObjects fromConnection:(AVCaptureConnection *)connection { NSString *stringValue; if ([metadataObjects count] >0){ AVMetadataMachineReadableCodeObject * metadataObject = [metadataObjects objectAtIndex:0]; stringValue = metadataObject.stringValue; NSLog(@"%@",stringValue); } [_session stopRunning]; [timer invalidate]; _count ++ ; [self stopReading]; if (stringValue && _count == 1) { //扫描完成 }} |
用二维码扫描器扫描自己的二维码:
|
1
2
3
4
5
|
NSString *url = [NSURL URLWithString:@"html/judgement.html" relativeToURL:[ZXApiClient sharedClient].baseURL].absoluteString; if ([stringValue hasPrefix:url]) { //如果扫出来的url是自己的域名开头的,那么做如下的处理 } |
最后附上自己完整的源码:
|
1
2
3
4
5
6
7
8
9
10
11
12
13
14
15
16
17
18
19
20
21
22
23
24
25
26
27
28
29
30
31
32
33
34
35
36
37
38
39
40
41
42
43
44
45
46
47
48
49
50
51
52
53
54
55
56
57
58
59
60
61
62
63
64
65
66
67
68
69
70
71
72
73
74
75
76
77
78
79
80
81
82
83
84
85
86
87
88
89
90
91
92
93
94
95
96
97
98
99
100
101
102
103
104
105
106
107
108
109
110
111
112
113
114
115
116
117
118
119
120
121
122
123
124
125
126
127
128
129
130
131
132
133
134
135
136
137
138
139
140
141
142
143
144
145
146
147
148
149
150
151
152
153
154
155
156
157
158
159
160
161
162
163
164
165
166
167
168
169
170
171
172
173
174
175
176
177
178
179
180
181
182
183
184
185
186
187
188
189
190
191
192
193
194
195
196
197
198
199
200
201
202
203
204
205
206
207
208
209
210
211
212
|
// Created by Ydw on 16/3/15. // Copyright © 2016年 IZHUO.NET. All rights reserved. //import “ViewController.h” import <AVFoundation/AVFoundation.h>@interface ViewController () { int number; NSTimer *timer; NSInteger _count; BOOL upOrdown; AVCaptureDevice *lightDevice; }@property (nonatomic,strong) UIView *centerView;//扫描的显示视图/** * 二维码扫描参数 */@property (strong,nonatomic) AVCaptureDevice *device; @property (strong,nonatomic) AVCaptureDeviceInput *input; @property (strong,nonatomic) AVCaptureMetadataOutput *output; @property (strong,nonatomic) AVCaptureSession *session; @property (strong,nonatomic) AVCaptureVideoPreviewLayer *preview; @property (nonatomic,retain) UIImageView *imageView;//扫描线(void)setupCamera;(void)stopReading;@end @implementation ViewController- (void)viewWillAppear:(BOOL)animated { [super viewWillAppear:animated]; if (_session && ![_session isRunning]) { [_session startRunning]; } timer = [NSTimer scheduledTimerWithTimeInterval:0.02 target:self selector:@selector(scanningAnimation) userInfo:nil repeats:YES]; [self setupCamera];}- (void)viewDidLoad { [super viewDidLoad]; self.view.backgroundColor = [UIColor clearColor]; self.automaticallyAdjustsScrollViewInsets = NO; _count = 0 ; //初始化闪光灯设备 lightDevice = [AVCaptureDevice defaultDeviceWithMediaType:AVMediaTypeVideo]; //扫描范围 _centerView = [[UIView alloc]initWithFrame:CGRectMake(0, 0, CGRectGetWidth(self.view.frame), CGRectGetHeight(self.view.frame))]; _centerView.backgroundColor = [UIColor clearColor]; [self.view addSubview:_centerView]; //扫描的视图加载 UIView *scanningViewOne = [[UIView alloc]initWithFrame:CGRectMake(0, 0, self.view.frame.size.width, 120)]; scanningViewOne.backgroundColor= [[UIColor blackColor] colorWithAlphaComponent:0.4]; [self.centerView addSubview:scanningViewOne]; UIView *scanningViewTwo = [[UIView alloc]initWithFrame:CGRectMake(0, 120, (self.view.frame.size.width-300)/2, 300)]; scanningViewTwo.backgroundColor= [[UIColor blackColor] colorWithAlphaComponent:0.4]; [self.centerView addSubview:scanningViewTwo]; UIView *scanningViewThree = [[UIView alloc]initWithFrame:CGRectMake(CGRectGetWidth(self.view.frame)/2+150, 120, (self.view.frame.size.width-300)/2, 300)]; scanningViewThree.backgroundColor= [[UIColor blackColor] colorWithAlphaComponent:0.4]; [self.centerView addSubview:scanningViewThree]; UIView *scanningViewFour = [[UIView alloc]initWithFrame:CGRectMake(0, 420, self.view.frame.size.width,CGRectGetHeight(self.view.frame)- 420)]; scanningViewFour.backgroundColor= [[UIColor blackColor] colorWithAlphaComponent:0.4]; [self.centerView addSubview:scanningViewFour]; UILabel *labIntroudction= [[UILabel alloc] initWithFrame:CGRectMake(15, 430, self.view.frame.size.width - 30, 30)]; labIntroudction.backgroundColor = [UIColor clearColor]; labIntroudction.textAlignment = NSTextAlignmentCenter; labIntroudction.textColor = [UIColor whiteColor]; labIntroudction.text = @"请将企业邀请码放入扫描框内"; [self.centerView addSubview:labIntroudction]; UIButton *openLight = [[UIButton alloc]initWithFrame:CGRectMake(CGRectGetWidth(self.view.frame)/2-25, 470, 50, 50)]; [openLight setImage:[UIImage imageNamed:@"灯泡"] forState:UIControlStateNormal]; [openLight setImage:[UIImage imageNamed:@"灯泡2"] forState:UIControlStateSelected]; [openLight addTarget:self action:@selector(openLightWay:) forControlEvents:UIControlEventTouchUpInside]; [self.centerView addSubview:openLight]; //扫描线 _imageView = [[UIImageView alloc] initWithFrame:CGRectMake(CGRectGetWidth(self.view.frame)/2-110, 130, 220, 5)]; _imageView.image = [UIImage imageNamed:@"scanning@3x"]; [self.centerView addSubview:_imageView];}- (void)viewWillDisappear:(BOOL)animated { _count= 0; [timer invalidate]; [self stopReading];}pragma mark -- 设置参数- (void)setupCamera { dispatch_async(dispatch_get_global_queue(DISPATCH_QUEUE_PRIORITY_DEFAULT, 0), ^{ _device = [AVCaptureDevice defaultDeviceWithMediaType:AVMediaTypeVideo]; _input = [AVCaptureDeviceInput deviceInputWithDevice:_device error:nil]; _output = [[AVCaptureMetadataOutput alloc]init]; [_output setMetadataObjectsDelegate:self queue:dispatch_get_main_queue()]; _session = [[AVCaptureSession alloc]init]; [_session setSessionPreset:AVCaptureSessionPresetHigh]; if ([_session canAddInput:self.input]) { [_session addInput:self.input]; } if ([_session canAddOutput:self.output]) { [_session addOutput:self.output]; } // 条码类型 AVMetadataObjectTypeQRCode _output.metadataObjectTypes = [NSArray arrayWithObjects:AVMetadataObjectTypeEAN13Code, AVMetadataObjectTypeEAN8Code, AVMetadataObjectTypeCode128Code, AVMetadataObjectTypeQRCode, nil]; dispatch_async(dispatch_get_main_queue(), ^{ //更新界面 _preview =[AVCaptureVideoPreviewLayer layerWithSession:self.session]; _preview.videoGravity = AVLayerVideoGravityResizeAspectFill; _preview.frame = CGRectMake(0, 0, CGRectGetWidth(self.centerView.frame), CGRectGetHeight(self.centerView.frame)); [self.centerView.layer insertSublayer:self.preview atIndex:0]; [_session startRunning]; }); });}//扫描动画- (void)scanningAnimation { if (upOrdown == NO) { number ++; _imageView.frame = CGRectMake(CGRectGetWidth(self.view.frame)/2-115, 130+2*number, 230, 5); if (2*number == 280) { upOrdown = YES; } } else { number --; _imageView.frame = CGRectMake(CGRectGetWidth(self.view.frame)/2-115, 130+2*number, 230, 5); if (number == 0) { upOrdown = NO; } }}- (void)stopReading { [_session stopRunning]; _session = nil; [_preview removeFromSuperlayer]; [timer invalidate]; timer = nil ;}-(void)openLightWay:(UIButton *)sender { if (![lightDevice hasTorch]) {//判断是否有闪光灯 UIAlertController *alert = [UIAlertController alertControllerWithTitle:@"当前设备没有闪光灯,不能提供手电筒功能" message:nil preferredStyle:UIAlertControllerStyleAlert]; UIAlertAction *sureAction = [UIAlertAction actionWithTitle:@"确定" style:UIAlertActionStyleCancel handler:nil]; [alert addAction:sureAction]; [self presentViewController:alert animated:YES completion:nil]; return; } sender.selected = !sender.selected; if (sender.selected == YES) { [lightDevice lockForConfiguration:nil]; [lightDevice setTorchMode:AVCaptureTorchModeOn]; [lightDevice unlockForConfiguration]; } else { [lightDevice lockForConfiguration:nil]; [lightDevice setTorchMode: AVCaptureTorchModeOff]; [lightDevice unlockForConfiguration]; }}pragma mark -- AVCaptureMetadataOutputObjectsDelegate- (void)captureOutput:(AVCaptureOutput *)captureOutput didOutputMetadataObjects:(NSArray *)metadataObjects fromConnection:(AVCaptureConnection *)connection { NSString *stringValue; if ([metadataObjects count] >0){ AVMetadataMachineReadableCodeObject * metadataObject = [metadataObjects objectAtIndex:0]; stringValue = metadataObject.stringValue; NSLog(@"%@",stringValue); } [_session stopRunning]; [timer invalidate]; _count ++ ; [self stopReading]; if (stringValue && _count == 1) { //扫描完成 }}- (void)didReceiveMemoryWarning { [super didReceiveMemoryWarning]; // Dispose of any resources that can be recreated.}@end |
以上就是本文的全部内容,希望对大家的学习有所帮助,也希望大家多多支持服务器之家。
原文链接:http://blog.csdn.net/forever_wj/article/details/50890903


