看到标题你可能会觉得奇怪 推送消息提示框不是系统自己弹出来的吗? 为什么还要自己自定义呢?
因为项目需求是这样的:最近需要做 远程推送通知 和一个客服系统 包括店铺客服和官方客服两个模块 如果有新的消息推送的时候 如果用户当前不在客服界面的时候 要求无论是在app前台 还是app退到后台 顶部都要弹出系统的那种消息提示框
这样的需求 我们就只能自定义一个在app内 弹出消息提示框
实现步骤如下:
1.我们自定义一个view 为 stpushview 推送消息的提示框view
|
1
2
3
4
5
6
7
8
9
10
11
12
13
|
#import <uikit/uikit.h>#import "stpushmodel.h"@interface stpushview : uiview/** *推送数据模型 */@property(nonatomic,strong) stpushmodel *model;+(instancetype)shareinstance;+ (void)show;+ (void)hide;@end |
|
1
2
3
4
5
6
7
8
9
10
11
12
13
14
15
16
17
18
19
20
21
22
23
24
25
26
27
28
29
30
31
32
33
34
35
36
37
38
39
40
41
42
43
44
45
46
47
48
49
50
51
52
53
54
55
56
57
58
59
60
61
62
63
64
65
66
67
68
69
70
71
72
73
74
75
76
77
78
79
80
81
82
83
84
85
86
87
88
89
90
91
92
93
94
95
96
97
98
99
100
101
102
103
104
105
106
107
108
109
110
111
112
113
114
115
116
117
118
119
120
121
122
123
124
125
126
127
128
129
130
131
132
133
134
135
136
137
138
139
140
141
142
143
144
145
146
147
148
149
150
151
152
153
154
155
156
157
158
159
160
161
162
163
164
165
166
167
168
169
|
#import "stpushview.h"#import "appdelegate.h"@interface stpushview()@property (nonatomic, weak) uiimageview *imagev;@property (nonatomic,weak ) uilabel *timlabel;@property (nonatomic,weak ) uilabel *content;@end@implementation stpushviewstatic stpushview *_instance = nil;+(instancetype)shareinstance{ static dispatch_once_t oncetoken; dispatch_once(&oncetoken, ^{ _instance = [[stpushview alloc] init]; }); return _instance;}+(instancetype) allocwithzone:(struct _nszone *)zone{ if (!_instance) { _instance = [super allocwithzone:zone]; } return _instance ;}- (instancetype)initwithframe:(cgrect)frame{ if (self = [super initwithframe:frame]) { self.backgroundcolor = customcolor(15, 14, 12); cgfloat margin = 12; uiimageview *imagev = [[uiimageview alloc] init]; imagev.userinteractionenabled = no; imagev.image = [uiimage imagenamed:@"logo"]; imagev.layer.cornerradius = 5; [self addsubview:imagev]; self.imagev = imagev; [imagev mas_makeconstraints:^(masconstraintmaker *make) { make.left.equalto(self).offset(margin); make.centery.equalto(self.mas_centery); make.width.mas_equalto(30); make.height.mas_equalto(30); }]; uilabel *titlelabel = [[uilabel alloc] init]; titlelabel.textcolor = [uicolor whitecolor]; titlelabel.font = [uifont boldsystemfontofsize:12]; titlelabel.text = @"121店官方客服"; [self addsubview:titlelabel]; [titlelabel mas_makeconstraints:^(masconstraintmaker *make) { make.left.equalto(imagev.mas_right).offset(margin); make.top.equalto(self.mas_top).offset(margin); make.height.mas_equalto(16); }]; [titlelabel sizetofit]; uilabel *timlabel = [[uilabel alloc] init]; timlabel.font = [uifont systemfontofsize:12]; timlabel.userinteractionenabled = no; timlabel.textcolor = [uicolor whitecolor]; timlabel.text = @"刚刚"; timlabel.textcolor = [uicolor lightgraycolor]; [self addsubview:timlabel]; self.timlabel = timlabel; [timlabel mas_makeconstraints:^(masconstraintmaker *make) { make.left.equalto(titlelabel.mas_right).offset(margin); make.top.equalto(self.mas_top).offset(margin); make.width.mas_lessthanorequalto(40); make.height.mas_equalto(16); }]; uilabel *content = [[uilabel alloc] init]; content.numberoflines = 2; content.font = [uifont systemfontofsize:13]; content.textcolor = [uicolor whitecolor]; content.userinteractionenabled = no; [self addsubview:content]; self.content = content; [content mas_makeconstraints:^(masconstraintmaker *make) { make.left.equalto(imagev.mas_right).offset(margin); make.top.equalto(titlelabel.mas_bottom).offset(-3); make.right.equalto(self.mas_right).offset(-margin); make.height.mas_equalto(35); }]; uiview *toolbar = [[uiview alloc] init]; toolbar.backgroundcolor = customcolor(121, 101, 81); toolbar.layer.cornerradius = 3; [self addsubview:toolbar]; [toolbar mas_makeconstraints:^(masconstraintmaker *make) { make.width.mas_equalto(35); make.height.mas_equalto(6); make.centerx.equalto(self.mas_centerx); make.bottom.equalto(self.mas_bottom).offset(-2); }]; } return self;}- (void)setmodel:(stpushmodel *)model{ _model = model; self.timlabel.text = @"刚刚"; self.content.text = model.content;}+ (void)show{ [uiapplication sharedapplication].statusbarhidden = yes; stpushview *pushview = [stpushview shareinstance]; pushview.hidden = no; appdelegate *app = (appdelegate*)[uiapplication sharedapplication].delegate; [app.window bringsubviewtofront:pushview]; [uiview animatewithduration:0.25 animations:^{ pushview.frame = cgrectmake(0, 0, screen_width, pushviewheight); dispatch_after(dispatch_time(dispatch_time_now, (int64_t)(5 * nsec_per_sec)), dispatch_get_main_queue(), ^{ [uiview animatewithduration:0.25 animations:^{ pushview.frame = cgrectmake(0, -pushviewheight, screen_width, pushviewheight); } completion:^(bool finished) { [uiapplication sharedapplication].statusbarhidden = no; pushview.hidden = yes; }]; }); }];}+ (void)hide{ stpushview *pushview = [stpushview shareinstance]; [uiview animatewithduration:0.25 animations:^{ pushview.frame = cgrectmake(0, -pushviewheight, screen_width, pushviewheight); } completion:^(bool finished) { [uiapplication sharedapplication].statusbarhidden = no; pushview.hidden = yes; }];}@end |
上面pushview需要一个模型 实现代码如下
|
1
2
3
4
5
6
7
8
9
10
11
12
13
14
15
16
17
18
19
20
21
22
23
24
25
26
27
28
29
30
|
// push 推送的model推送过来的数据如下:/** content = dsfdsnfds; id = 5077; mid = 1270339; title = dsfdsnfds; url = "3?_from=push"; urltype = 3; **/#import <foundation/foundation.h>@interface stpushmodel : stbasemodel<nscoding> //stbasemodel 是一个继承自nsobject的类 我主要是在这个类中实现了字典转模型的功能 你可以直接修改为nsobject/***id**/@property (copy,nonatomic) nsstring* recordid;/***标题**/@property (copy, nonatomic) nsstring *title;/***url**/@property (copy, nonatomic) nsstring *url;/***url 类型**/@property (copy, nonatomic) nsstring* urltype;/***图标的高度**/@property (assign,nonatomic) nsstring * mid;/***推送内容**/@property (copy, nonatomic) nsstring* content;@end |
因为涉及到好几个页面需要使用同样的推送消息数据 进行判断而处理相应的业务 所有我对此模型做了归档处理
|
1
2
3
4
5
6
7
8
9
10
11
12
13
14
15
16
17
18
19
20
21
22
23
24
25
26
27
28
29
30
31
32
33
34
35
36
37
38
39
40
41
42
|
#import "stpushmodel.h"@implementation stpushmodel/** * 保存对象到文件中 * * @param acoder <#acoder description#> */-(void)encodewithcoder:(nscoder *)acoder{ [acoder encodeobject:self.recordid forkey:@"recordid"]; [acoder encodeobject:self.title forkey:@"title"]; [acoder encodeobject:self.url forkey:@"url"]; [acoder encodeobject:self.urltype forkey:@"urltype"]; [acoder encodeobject:self.mid forkey:@"mid"]; [acoder encodeobject:self.content forkey:@"content"];}/** * 从文件中读取对象 * * @param adecoder <#adecoder description#> * * @return <#return value description#> */-(id)initwithcoder:(nscoder *)adecoder{ //注意:在构造方法中需要先初始化父类的方法 if (self=[super init]) { self.recordid=[adecoder decodeobjectforkey:@"recordid"]; self.title=[adecoder decodeobjectforkey:@"title"]; self.url=[adecoder decodeobjectforkey:@"url"]; self.urltype=[adecoder decodeobjectforkey:@"urltype"]; self.mid=[adecoder decodeobjectforkey:@"mid"]; self.content= [adecoder decodeobjectforkey:@"content"]; } return self;}@end |
做好了上面的准备工作之后 接下来我们就需要 appdelegate里面注册远程推送通知 并且监听推送消息
这里以个推为例子:
第一步在下面的方法中 实现个推的注册方法
|
1
2
3
4
5
6
7
|
- (bool)application:(uiapplication *)application didfinishlaunchingwithoptions:(nsdictionary *)launchoptions { // 注册个推推送服务 [[getuiapilmpl sharedinstance] getuiregister];} |
getuiapilmpl 是一个单例类 专门用于注册个推的推送方法 实现代码如下:
|
1
2
3
4
5
6
7
8
9
|
#import <foundation/foundation.h>#import "getuisdk.h"@interface getuiapilmpl : nsobject <getuisdkdelegate>+ (getuiapilmpl *) sharedinstance;- (void) getuiregister;@end |
|
1
2
3
4
5
6
7
8
9
10
11
12
13
14
15
16
17
18
19
20
21
22
23
24
25
26
27
28
29
30
31
32
33
34
35
36
37
38
39
40
41
42
43
44
45
46
47
48
49
50
51
52
53
54
55
56
57
58
59
60
61
62
63
64
65
66
67
68
69
70
71
72
73
74
75
76
77
78
79
80
81
82
83
84
|
#import "getuiapilmpl.h"@implementation getuiapilmpl+ (getuiapilmpl *) sharedinstance{ static id instance = nil; static dispatch_once_t oncetoken; dispatch_once(&oncetoken, ^{ instance = [[self alloc] init]; }); return instance;}- (id)init { self = [super init]; if (self) { nsstring *path = [[nsbundle mainbundle] pathforresource:@"libgexin" oftype:@"plist"]; nsdictionary *dic = [nsdictionary dictionarywithcontentsoffile:path]; [getuisdk startsdkwithappid:[dic objectforkey:@"gt_appid"] appkey:[dic objectforkey:@"gt_appkey"] appsecret:[dic objectforkey:@"gt_appsecret"] delegate:self]; } return self;}#pragma mark - getuisdkdelegate/** sdk启动成功返回cid */- (void)getuisdkdidregisterclient:(nsstring *)clientid { // [4-ext-1]: 个推sdk已注册,返回clientid nslog(@"\n>>>[getuisdk registerclient]:%@\n\n", clientid);}/** sdk遇到错误回调 */- (void)getuisdkdidoccurerror:(nserror *)error { // [ext]:个推错误报告,集成步骤发生的任何错误都在这里通知,如果集成后,无法正常收到消息,查看这里的通知。 nslog(@"\n>>>[gexinsdk error]:%@\n\n", [error localizeddescription]);}/** sdk收到透传消息回调 */- (void)getuisdkdidreceivepayload:(nsstring *)payloadid andtaskid:(nsstring *)taskid andmessageid:(nsstring *)amsgid andoffline:(bool)offline fromapplication:(nsstring *)appid { // [4]: 收到个推消息 nsdata *payload = [getuisdk retrivepayloadbyid:payloadid]; nsstring *payloadmsg = nil; if (payload) { payloadmsg = [[nsstring alloc] initwithbytes:payload.bytes length:payload.length encoding:nsutf8stringencoding]; } nsstring *msg = [nsstring stringwithformat:@" payloadid=%@,taskid=%@,messageid:%@,payloadmsg:%@%@", payloadid, taskid, amsgid, payloadmsg, offline ? @"<离线消息>" : @""]; nslog(@"\n>>>[gexinsdk receivepayload]:%@\n\n", msg); /** *汇报个推自定义事件 *actionid:用户自定义的actionid,int类型,取值90001-90999。 *taskid:下发任务的任务id。 *msgid: 下发任务的消息id。 *返回值:bool,yes表示该命令已经提交,no表示该命令未提交成功。注:该结果不代表服务器收到该条命令 **/ [getuisdk sendfeedbackmessage:90001 taskid:taskid msgid:amsgid];}/** sdk收到sendmessage消息回调 */- (void)getuisdkdidsendmessage:(nsstring *)messageid result:(int)result { // [4-ext]:发送上行消息结果反馈 nsstring *msg = [nsstring stringwithformat:@"sendmessage=%@,result=%d", messageid, result]; nslog(@"\n>>>[gexinsdk didsendmessage]:%@\n\n", msg);}/** sdk运行状态通知 */- (void)getuisdkdidnotifysdkstate:(sdkstatus)astatus { // [ext]:通知sdk运行状态 nslog(@"\n>>>[gexinsdk sdkstate]:%u\n\n", astatus);}/** sdk设置推送模式回调 */- (void)getuisdkdidsetpushmode:(bool)ismodeoff error:(nserror *)error { if (error) { nslog(@"\n>>>[gexinsdk setmodeoff error]:%@\n\n", [error localizeddescription]); return; } nslog(@"\n>>>[gexinsdk setmodeoff]:%@\n\n", ismodeoff ? @"开启" : @"关闭");}-(void)getuiregister{ } |
然后再appdelegate 调用注册远程推送的方法
|
1
2
3
4
5
6
7
8
9
10
11
12
13
14
15
16
17
18
19
20
21
22
23
|
/** 注册用户通知 */- (void)registerusernotification { /* 注册通知(推送) 申请app需要接受来自服务商提供推送消息 */ // 判读系统版本是否是“ios 8.0”以上 if ([[[uidevice currentdevice] systemversion] floatvalue] >= 8.0 || [uiapplication instancesrespondtoselector:@selector(registerusernotificationsettings:)]) { // 定义用户通知类型(remote.远程 - badge.标记 alert.提示 sound.声音) uiusernotificationtype types = uiusernotificationtypealert | uiusernotificationtypebadge | uiusernotificationtypesound; // 定义用户通知设置 uiusernotificationsettings *settings = [uiusernotificationsettings settingsfortypes:types categories:nil]; // 注册用户通知 - 根据用户通知设置 [[uiapplication sharedapplication] registerusernotificationsettings:settings]; [[uiapplication sharedapplication] registerforremotenotifications]; } else { // ios8.0 以前远程推送设置方式 // 定义远程通知类型(remote.远程 - badge.标记 alert.提示 sound.声音) uiremotenotificationtype mytypes = uiremotenotificationtypebadge | uiremotenotificationtypealert | uiremotenotificationtypesound; // 注册远程通知 -根据远程通知类型 [[uiapplication sharedapplication] registerforremotenotificationtypes:mytypes]; }} |
然后再设置了窗口的跟控制器 之后 调用:addpushview方法 添加 消息提示框stpushview: addpushview实现代码如下
|
1
2
3
4
5
6
7
8
9
10
11
12
13
14
15
16
17
18
19
20
21
22
23
24
25
26
27
28
29
30
31
32
33
34
35
36
37
38
39
40
41
42
43
44
45
46
47
48
49
50
51
52
53
54
55
56
57
58
|
#pragma mark 推送信息展示//添加推送view- (void)addpushview{ stpushview *topview = [stpushview shareinstance]; topview.frame = cgrectmake(0, -pushviewheight, screen_width, pushviewheight); [_window addsubview:topview]; self.topview = topview; topview.hidden = yes; uitapgesturerecognizer *tap = [[uitapgesturerecognizer alloc] initwithtarget:self action:@selector(hudclick)]; uipangesturerecognizer *pan = [[uipangesturerecognizer alloc] initwithtarget:self action:@selector(pan:)]; [topview addgesturerecognizer:tap]; [tap requiregesturerecognizertofail:pan]; topview.gesturerecognizers = @[tap,pan]; }#pragma mark addpushview相关事件- (void)hudclick{ self.topview.userinteractionenabled = no; [uiview animatewithduration:0.25 animations:^{ self.topview.frame = cgrectmake(0, -pushviewheight, screen_width, pushviewheight); }completion:^(bool finished) { [uiapplication sharedapplication].statusbarhidden = no; [self hudclickoperation]; }];}- (void)hudclickoperation{ [self push:nil]; dispatch_after(dispatch_time(dispatch_time_now, (int64_t)(1 * nsec_per_sec)), dispatch_get_main_queue(), ^{ self.topview.userinteractionenabled = yes; });}- (void)pan:(uipangesturerecognizer*)pan{ cgfloat distance = pushviewheight-(pushviewheight-[pan translationinview:self.window].y); if (distance<-20) { [uiview animatewithduration:0.25 animations:^{ self.topview.frame = cgrectmake(0, -pushviewheight, screen_width, pushviewheight); }completion:^(bool finished) { [uiapplication sharedapplication].statusbarhidden = no; }]; }}//显示pushview- (void)displaypushview{ [stpushview show];} |
上面push方法的实现代码如下: 处理逻辑 是根据我自己的项目中需求定的 在这里实现你需要处理的代码
|
1
2
3
4
5
6
7
8
9
10
11
12
13
14
15
16
17
18
19
20
21
22
23
24
25
26
27
28
29
30
31
32
33
34
35
36
37
38
39
40
41
42
43
44
45
46
47
48
49
50
51
52
53
54
55
56
57
58
59
60
61
62
63
64
65
66
67
68
69
70
71
72
73
74
75
76
77
78
79
80
81
82
83
84
85
86
87
88
89
90
91
92
93
94
95
96
97
98
99
100
101
102
103
104
105
106
|
- (void)push:(nsdictionary *)params{ stpushmodel *model = [ nskeyedunarchiver unarchiveobjectwithfile:krapi_push_data]; //如果是h5 if ([model.urltype isequaltostring:@"h5"]) { bool isstore = [[analysisurl sharedinstance] analysisweburl:model.url]; bool isgoods = [[analysisurl sharedinstance] analysisgoodsidweburl:model.url]; bool isredbag =[[analysisurl sharedinstance] analyredbagweburl:model.url]; bool istrace =[[analysisurl sharedinstance] analytracewebur:model.url]; bool islog =[[analysisurl sharedinstance] analylogweburl:model.url]; if (isstore || isgoods) { [[wypagemanager sharedinstance] pushviewcontrollerwithurlstring:model.url currenturlstring:traker_url_index]; }else if (isredbag) { redbageviewcontroller * regbag =[[redbageviewcontroller alloc]init]; nsarray *array = [model.url componentsseparatedbystring:@"="]; nsstring * string = [array lastobject]; regbag.messageid = string; regbag.redtype = @"coupon"; uitabbarcontroller *tabvc = (uitabbarcontroller *)self.window.rootviewcontroller; uinavigationcontroller *pushclassstance = (uinavigationcontroller *)tabvc.viewcontrollers[tabvc.selectedindex]; // 跳转到对应的控制器 regbag.hidesbottombarwhenpushed = yes; [pushclassstance pushviewcontroller:regbag animated:yes]; return; }else if (istrace) { redbageviewcontroller * regbag =[[redbageviewcontroller alloc]init]; nsstring * string = [strutils getidfromurlstring:model.url interceptstring:@"/trace/"]; regbag.messageid = string; regbag.redtype = @"trace"; uitabbarcontroller *tabvc = (uitabbarcontroller *)self.window.rootviewcontroller; uinavigationcontroller *pushclassstance = (uinavigationcontroller *)tabvc.viewcontrollers[tabvc.selectedindex]; // 跳转到对应的控制器 regbag.hidesbottombarwhenpushed = yes; [pushclassstance pushviewcontroller:regbag animated:yes]; return; }else if (islog) { redbageviewcontroller * regbag =[[redbageviewcontroller alloc]init]; nsstring * string = [strutils getidfromurlstring:model.url interceptstring:@"/log/"]; regbag.messageid = string; regbag.redtype = @"log"; uitabbarcontroller *tabvc = (uitabbarcontroller *)self.window.rootviewcontroller; uinavigationcontroller *pushclassstance = (uinavigationcontroller *)tabvc.viewcontrollers[tabvc.selectedindex]; // 跳转到对应的控制器 regbag.hidesbottombarwhenpushed = yes; [pushclassstance pushviewcontroller:regbag animated:yes]; return; } else{ if (![model.url isequaltostring:@""]) { uistoryboard *setstoryboard = [uistoryboard storyboardwithname:@"usercenter" bundle:nil]; totalwebviewcontroller *setvc = [setstoryboard instantiateviewcontrollerwithidentifier:@"totalwebviewcontroller"]; setvc.shopurl = model.url; setvc.shoptitle = [model.title isequaltostring:@""] ? @"121店" : model.title; uitabbarcontroller *tabvc = (uitabbarcontroller *)self.window.rootviewcontroller; uinavigationcontroller *pushclassstance = (uinavigationcontroller *)tabvc.viewcontrollers[tabvc.selectedindex]; setvc.hidesbottombarwhenpushed = yes; [pushclassstance pushviewcontroller:setvc animated:yes]; } } }else if ([model.urltype isequaltostring:@"native"]){ if ([model.url isequaltostring:@"1"]) { //一元体验购 已经删除 }else if ([model.url isequaltostring:@"2"]){ if (([[stcommoninfo getauthtype] intvalue] != 1)) { [self creategroundglass]; }else{ stprofitviewcontroller *vc = [[stprofitviewcontroller alloc] init]; uitabbarcontroller *tabvc = (uitabbarcontroller *)self.window.rootviewcontroller; uinavigationcontroller *pushclassstance = (uinavigationcontroller *)tabvc.viewcontrollers[tabvc.selectedindex]; vc.hidesbottombarwhenpushed = yes; [pushclassstance pushviewcontroller:vc animated:yes]; } }else if ([model.url isequaltostring:@"3"]){ if (([[stcommoninfo getauthtype] intvalue] != 1)) { [self creategroundglass]; }else{ messagemainvc *messagevc = [[messagemainvc alloc] init]; messagevc.hidesbottombarwhenpushed = yes; uitabbarcontroller *tabvc = (uitabbarcontroller *)self.window.rootviewcontroller; uinavigationcontroller *pushclassstance = (uinavigationcontroller *)tabvc.viewcontrollers[tabvc.selectedindex]; [pushclassstance pushviewcontroller:messagevc animated:yes]; } }else if ([model.url hasprefix:@"http://"]&&([model.url rangeofstring:@"client"].location!=nsnotfound)){ //跳转到客服接 界面 nsstring *orgidstring =[[analysisurl sharedinstance] extractorgid:model.url]; nsstring *siteidstring = [[analysisurl sharedinstance] extractorgidstoreid:model.url]; [[wypagemanager sharedinstance] pushviewcontroller:@"tlchatviewcontroller" withparam: @{ @"title_namestring":@"官方客服", @"orgidstring":orgidstring, @"siteidstring":siteidstring, @"currenturl":model.url } animated:yes]; } }} |
然后再appdelegate 实现以下方法
|
1
2
3
4
5
6
7
8
9
10
11
12
13
14
15
16
17
18
19
20
21
22
23
24
25
26
27
28
29
30
31
32
33
34
35
36
37
38
39
40
41
42
43
44
45
46
47
48
49
50
51
52
53
54
55
56
57
58
59
60
61
62
63
64
65
66
67
68
69
|
/** 自定义:app被“推送”启动时处理推送消息处理(app 未启动--》启动)*/- (void)receivenotificationbylaunchingoptions:(nsdictionary *)launchoptions { if (!launchoptions) return; /* 通过“远程推送”启动app uiapplicationlaunchoptionsremotenotificationkey 远程推送key */ nsdictionary *userinfo = [launchoptions objectforkey:uiapplicationlaunchoptionsremotenotificationkey]; if (userinfo) { nslog(@"\n>>>[launching remotenotification]:%@", userinfo); }}#pragma mark - 用户通知(推送)回调 _ios 8.0以上使用/** 已登记用户通知 */- (void)application:(uiapplication *)application didregisterusernotificationsettings:(uiusernotificationsettings *)notificationsettings { // 注册远程通知(推送) [application registerforremotenotifications];}#pragma mark - 远程通知(推送)回调/** 远程通知注册成功委托 */- (void)application:(uiapplication *)application didregisterforremotenotificationswithdevicetoken:(nsdata *)devicetoken { nsstring *mytoken = [[devicetoken description] stringbytrimmingcharactersinset:[nscharacterset charactersetwithcharactersinstring:@"<>"]]; mytoken = [mytoken stringbyreplacingoccurrencesofstring:@" " withstring:@""]; nsuserdefaults *kr = [nsuserdefaults standarduserdefaults]; [kr setvalue:mytoken forkey:@"devicetoken"]; [kr synchronize]; [getuisdk registerdevicetoken:mytoken]; [[postdevicetoken sharedinstance] postupdevicetoken]; nslog(@"\n>>>[devicetoken success]:%@\n\n", mytoken);}/** 远程通知注册失败委托 */- (void)application:(uiapplication *)application didfailtoregisterforremotenotificationswitherror:(nserror *)error { [getuisdk registerdevicetoken:@""]; nslog(@"\n>>>[devicetoken error]:%@\n\n", error.description);}#pragma mark - app运行中接收到通知(推送)处理/** app已经接收到“远程”通知(推送) - 透传推送消息 */- (void)application:(uiapplication *)application didreceiveremotenotification:(nsdictionary *)userinfo fetchcompletionhandler:(void (^)(uibackgroundfetchresult result))completionhandler { // 处理apn nslog(@"\n>>>[receive remotenotification - background fetch]:%@\n\n", userinfo); completionhandler(uibackgroundfetchresultnewdata); nsstring *payloadstring = [[myprevent sharedinstance] dictionary:userinfo objectforkey:@"payload"]; [[spotpunch sharedinstance] spotpunch:@"999.999.1" pointtwo:@"21" info:payloadstring]; // nsuserdefaults *kr = [nsuserdefaults standarduserdefaults]; if (!([[stcommoninfo getauthtype] intvalue] != 1)) { nsdata *jsondata = [payloadstring datausingencoding:nsutf8stringencoding]; nsdictionary *jsondic = [nsjsonserialization jsonobjectwithdata:jsondata options:nsjsonreadingmutablecontainers error:nil]; stpushmodel *model = [stpushmodel modelobjectwithdict:jsondic]; [nskeyedarchiver archiverootobject:model tofile:krapi_push_data];//如果应用程序在前台 就显示客服提示框 if (application.applicationstate == uiapplicationstateactive) { self.topview.model = model; [self displaypushview]; //此方法 的实现 在上一步中 就是展示提示框出来 } }} |
然后这些工作做好了之后 就是你需要在个推的后台 配置推送证书 这个配置的步骤 大家可以到个推官网去参考文档 配置
这里我假设 你已经配置到证书了 经过上面的步骤 我们的远程推送通知的方法 基本完成 现在我们运行 测试下 你会发现即使在前台 有新消息推送的时候 顶部也会弹出和系统一样的提示框 点击 跳转到对应的页面的方法逻辑根据你的需要 去做跳转处理
测试效果如下:
用户在后台 收到的消息提示如下:
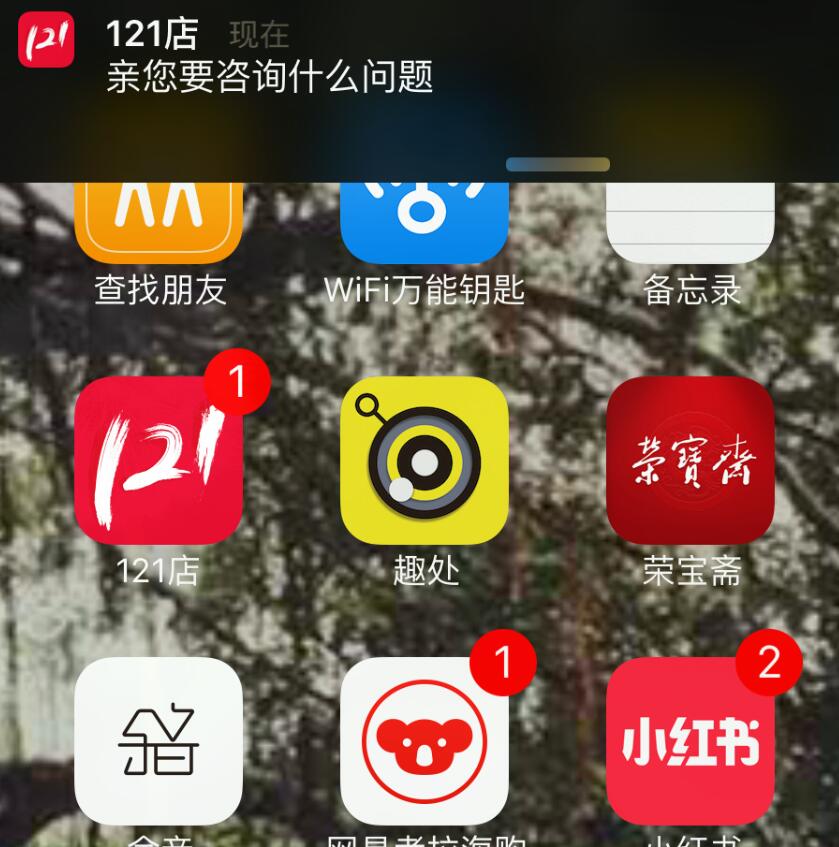
用户在前台 收到的消息提示如下:
以上就是本文的全部内容,希望对大家的学习有所帮助,也希望大家多多支持服务器之家。


