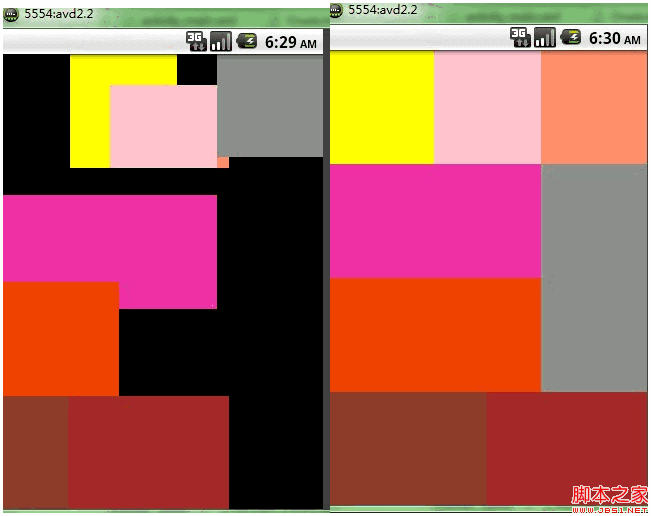
今天继续说一下安卓的菜单,之前介绍了:相信大家对于Metro风格并不陌生,下面就在安卓平台上实现一下这个效果,如图:

实现思路:
利用动画来实现移动的效果,使用的是TranslateAnimation这个方法。先看一下布局文件:
activity_main.xml
复制代码 代码如下:
<?xml version="1.0" encoding="utf-8"?>
<LinearLayout xmlns:android="http://schemas.android.com/apk/res/android"
android:layout_width="fill_parent"
android:layout_height="fill_parent"
android:background="#000000"
android:orientation="vertical" >
<!-- 第一层 -->
<LinearLayout
android:layout_width="fill_parent"
android:layout_height="fill_parent"
android:layout_weight="1"
android:orientation="horizontal" >
<!-- 第一层 横向 -->
<!-- 第一层 横向左 -->
<LinearLayout
android:layout_width="fill_parent"
android:layout_height="fill_parent"
android:layout_weight="1"
android:orientation="vertical" >
<LinearLayout
android:layout_width="fill_parent"
android:layout_height="fill_parent"
android:layout_weight="1"
android:orientation="horizontal" >
<!-- 1 -->
<RelativeLayout
android:id="@+id/nine_one"
android:layout_width="fill_parent"
android:layout_height="fill_parent"
android:layout_weight="1"
android:background="#FFFF00" >
</RelativeLayout>
<!-- 2 -->
<RelativeLayout
android:id="@+id/nine_two"
android:layout_width="fill_parent"
android:layout_height="fill_parent"
android:layout_weight="1"
android:background="#FFC0CB" >
</RelativeLayout>
</LinearLayout>
<!-- 4 -->
<RelativeLayout
android:id="@+id/nine_four"
android:layout_width="fill_parent"
android:layout_height="fill_parent"
android:layout_weight="1"
android:background="#EE30A7" >
</RelativeLayout>
<!-- 5 -->
<RelativeLayout
android:id="@+id/nine_five"
android:layout_width="fill_parent"
android:layout_height="fill_parent"
android:layout_weight="1"
android:background="#EE4000" >
</RelativeLayout>
</LinearLayout>
<!-- 第一层 横向右 -->
<LinearLayout
android:layout_width="fill_parent"
android:layout_height="fill_parent"
android:layout_weight="2"
android:orientation="vertical" >
<!-- 3 -->
<RelativeLayout
android:id="@+id/nine_three"
android:layout_width="fill_parent"
android:layout_height="fill_parent"
android:layout_weight="2"
android:background="#FF8C69" >
</RelativeLayout>
<!-- 6 -->
<RelativeLayout
android:id="@+id/nine_six"
android:layout_width="fill_parent"
android:layout_height="fill_parent"
android:layout_weight="1"
android:background="#8C8C8C" >
</RelativeLayout>
</LinearLayout>
</LinearLayout>
<!-- 第二层 -->
<LinearLayout
android:layout_width="fill_parent"
android:layout_height="fill_parent"
android:layout_weight="3"
android:baselineAligned="false"
android:orientation="horizontal" >
<!-- 7 -->
<RelativeLayout
android:id="@+id/nine_seven"
android:layout_width="fill_parent"
android:layout_height="fill_parent"
android:layout_weight="1"
android:background="#8B3E2F" >
</RelativeLayout>
<!-- 8 -->
<!-- 9 -->
<RelativeLayout
android:id="@+id/nine_nine"
android:layout_width="fill_parent"
android:layout_height="fill_parent"
android:layout_weight="1"
android:background="#A52A2A" >
</RelativeLayout>
</LinearLayout>
</LinearLayout>
它的效果是这样的:

之后在MainActivity里面对每一个Layout进行动画移动就可以实现平移的效果了。
MainActivity.java:
复制代码 代码如下:
import android.app.Activity;
import android.content.Intent;
import android.os.Bundle;
import android.util.DisplayMetrics;
import android.view.LayoutInflater;
import android.view.Menu;
import android.view.View;
import android.view.View.OnClickListener;
import android.view.Window;
import android.view.animation.TranslateAnimation;
import android.widget.RelativeLayout;
import android.widget.Toast;
/**
*
*/
public class MainActivity extends Activity {
private View viewNine;
private LayoutInflater inflater;
private RelativeLayout nine_one, nine_two, nine_three, nine_four,
nine_five, nine_six, nine_seven, nine_nine;
private TranslateAnimation myAnimation_Right, myAnimation_Bottom;
private TranslateAnimation myAnimation_Left, myAnimation_Top;
@Override
protected void onCreate(Bundle savedInstanceState) {
super.onCreate(savedInstanceState);
requestWindowFeature(Window.FEATURE_NO_TITLE);
inflater = LayoutInflater.from(this);
viewNine = inflater.inflate(R.layout.activity_main, null);
nine_one = (RelativeLayout) viewNine.findViewById(R.id.nine_one);
nine_two = (RelativeLayout) viewNine.findViewById(R.id.nine_two);
nine_three = (RelativeLayout) viewNine.findViewById(R.id.nine_three);
nine_four = (RelativeLayout) viewNine.findViewById(R.id.nine_four);
nine_five = (RelativeLayout) viewNine.findViewById(R.id.nine_five);
nine_six = (RelativeLayout) viewNine.findViewById(R.id.nine_six);
nine_seven = (RelativeLayout) viewNine.findViewById(R.id.nine_seven);
nine_nine = (RelativeLayout) viewNine.findViewById(R.id.nine_nine);
setContentView(viewNine);
nine_four.setOnClickListener(new OnClickListener() {
@Override
public void onClick(View v) {
Intent intent=new Intent(MainActivity.this,OneActivity.class);
startActivity(intent);
}
});
nine_six.setOnClickListener(new OnClickListener() {
@Override
public void onClick(View v) {
}
});
myAnimation();
addAnimation();
}
// 启动动画
private void addAnimation() {
nine_one.startAnimation(myAnimation_Right);
nine_two.startAnimation(myAnimation_Bottom);
nine_three.startAnimation(myAnimation_Left);
nine_four.startAnimation(myAnimation_Bottom);
nine_five.startAnimation(myAnimation_Left);
nine_six.startAnimation(myAnimation_Top);
nine_seven.startAnimation(myAnimation_Left);
nine_nine.startAnimation(myAnimation_Left);
}
// 动画定义
private void myAnimation() {
DisplayMetrics displayMetrics = new DisplayMetrics();
displayMetrics = this.getResources().getDisplayMetrics();
// 获得屏幕宽度
int screenWidth = displayMetrics.widthPixels;
// 获得屏幕高度
int screenHeight = displayMetrics.heightPixels;
myAnimation_Right = new TranslateAnimation(screenWidth, 0, 0, 0);
myAnimation_Right.setDuration(1800);
myAnimation_Bottom = new TranslateAnimation(0, 0, screenHeight, 0);
myAnimation_Bottom.setDuration(1500);
myAnimation_Left = new TranslateAnimation(-screenWidth, 0, 0, 0);
myAnimation_Left.setDuration(2000);
myAnimation_Top = new TranslateAnimation(0, 0, -screenHeight, 0);
myAnimation_Top.setDuration(2500);
}
@Override
public boolean onCreateOptionsMenu(Menu menu) {
// Inflate the menu; this adds items to the action bar if it is present.
// getMenuInflater().inflate(R.menu.activity_main, menu);
return true;
}
}
虽然效果还可以,但是布局文件由于使用嵌套,这样毁造成绘制窗口时性能的问题。所以你对程序要求很严格,那么建议使用RelativewLayout来布局,并且减少使用嵌套。
下载地址


