为了方便向大家展示,先给出简短的定义:
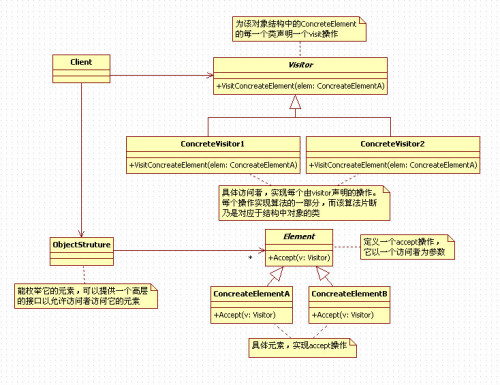
访问者模式(visitor),表示一个作用于某对象结构中的各元素的操作。它使你可以在不改变各元素的类的前提下定义作用于这些元素的新操作。
紧接着,给出其类结构图。

访问者模式适用于数据结构相对稳定的系统,它把数据结构和作用于结构上的操作之间的耦合解脱开,使得操作结合可以相对自由地演化。
访问者模式的目的是要把处理从数据结构分离出来。很多系统可以按照算法和数据结构分开,如果这样的系统有比较稳定的数据结构,又有易于变化的算法的话,使用访问者模式就是比较合适的,因为访问者模式使得算法操作的增加变得容易。
访问者模式的优点就是增加新的操作很容易,因为增加新的操作就意味着增加一个新的访问者。访问者模式将有关的行为集中到一个访问者对象中。
那其实,访问者模式的缺点也就是使增加新的数据结构变得苦难了。所以,gof四人中的一个作者增经说过,‘大多时候你并不需要访问者模式,但当一旦你需要访问者模式的时候,那就是真的需要它了'。
那么下面还是老惯例,给大家展示一下简单的实现。
一个简单的car模型,含有1台engine、4个wheel,使用访问者模式添加对car的升级与维修操作。
定义engine类:
#import <foundation/foundation.h>
#import "nimocomponentvisitor.h"
@interface nimoengine : nsobject
@property (nonatomic, copy) nsstring *modelname;
- (id)initwithmodelname:(nsstring *)modelname;
@end
#import "nimoengine.h"
@implementation nimoengine
- (id)initwithmodelname:(nsstring *)modelname
{
self = [super init];
if (self) {
_modelname = [modelname copy];
}
return self;
}
- (id) init
{
return [self initwithmodelname:@"slant 6"];
}
- (nsstring *)description
{
return [nsstring stringwithformat:@"engine: %@", _modelname];
}
@end
定义wheel类:
#import <foundation/foundation.h>
@interface nimowheel : nsobject
@property (nonatomic, assign) float diameter; //车轮直径
@end
#import "nimowheel.h"
@implementation nimowheel
- (id)init
{
self = [super init];
if (self) {
_diameter = 400.0f;
}
return self;
}
-(nsstring *)description
{
return [nsstring stringwithformat:@"wheel: %f mm", _diameter];
}
@end
定义car类:
#import <foundation/foundation.h>
@class nimoengine, nimowheel;
@interface nimocar : nsobject
@property (nonatomic) nimoengine *engine;
@property (nonatomic, readonly) nsarray *arrayofwheels;
- (void)addwheel:(nimowheel *)wheel atindex:(nsuinteger) index;
@end
@interface nimocar()
@property (nonatomic, readwrite) nsmutablearray *mutablearrayofwheels;
@end
@implementation nimocar
- (id)init
{
if (self = [super init]) {
_mutablearrayofwheels = [[nsmutablearray alloc] initwithcapacity:4];
}
return self;
}
- (void)addwheel:(nimowheel *)wheel atindex:(nsuinteger) index
{
[_mutablearrayofwheels insertobject:wheel atindex:index];
}
- (nsarray *)arrayofwheels
{
return [_mutablearrayofwheels copy];
}
- (nsstring *)description
{
return [nsstring stringwithformat:@"my car: %@", [nsdictionary dictionarywithobjects:@[_engine, self.arrayofwheels] forkeys:@[@"engine", @"wheels"]]];
}
@end
我们的汽车结构很简单,只包含1个引擎,4个车轮,并且各个类也没有复杂的实现,仅仅覆写了description,让其输出简要的信息。
好,实例化一辆car, 看看效果:
#import <foundation/foundation.h>
#import "nimocar.h"
#import "nimoengine.h"
#import "nimowheel.h"
int main(int argc, const char * argv[]) {
@autoreleasepool {
nimocar *car = [[nimocar alloc] init];
nimoengine *engine = [[nimoengine alloc] initwithbrandname:@"v8"];
nimowheel *wheela = [[nimowheel alloc] init];
nimowheel *wheelb = [[nimowheel alloc] init];
nimowheel *wheelc = [[nimowheel alloc] init];
nimowheel *wheeld = [[nimowheel alloc] init];
car.engine = engine;
[car addwheel:wheela atindex:0];
[car addwheel:wheelb atindex:1];
[car addwheel:wheelc atindex:2];
[car addwheel:wheeld atindex:3];
nslog(@"%@", car);
}
return 0;
}

控制台跟意料中一样输出了car的信息。至此,准备工作做好了。
访问者模式:表示一个作用于某对象结构中的各元素的操作。它让我们可以在不改变各元素的类的前提下定义作用于这些元素的新操作。---《设计模式》(addison-wesley, 1994)
这段话比较拗口,不太好理解。拿刚刚完成的car类来举例,nimocar类就是对象结构,其中包含的元素为:nimoengine类和nimowheel类。如果现在需要对car进行全面升级(新操作),通常的做法是nimoengine与nimowheel都向外提供“升级”的接口。如果还需要对car进行维修呢?那又得向外提供“维修”的接口。随着类似的需求越多,nimoengine与nimowheel向外提供的接口就越多,类也变得越复杂。有没有简单的方法呢?有!把这些琐事都交给访问者来做吧,nimoengine与nimowheel只要同意被访问就成。
定义访问者协议:
@class nimoengine, nimowheel;
@protocol nimocomponentvisitor <nsobject>
- (void) visitengine:(nimoengine *) engine;
- (void) visitwheel:(nimowheel *) wheel;
@end
修改我们的类,使其能够接受访问
添加访问支持的engine类:
#import <foundation/foundation.h>
#import "nimocomponentvisitor.h"
@interface nimoengine : nsobject
@property (nonatomic, copy) nsstring *modelname;
- (id)initwithmodelname:(nsstring *)modelname;
- (void)acceptcomponentvisitor:(id<nimocomponentvisitor>) visitor;
@end
#import "nimoengine.h"
@implementation nimoengine
- (id)initwithmodelname:(nsstring *)modelname
{
self = [super init];
if (self) {
_modelname = [modelname copy];
}
return self;
}
- (id) init
{
return [self initwithmodelname:@"slant 6"];
}
- (void)acceptcomponentvisitor:(id<nimocomponentvisitor>) visitor
{
[visitor visitengine:self];
}
- (nsstring *)description
{
return [nsstring stringwithformat:@"engine: %@", _modelname];
}
@end
添加访问支持的wheel类:
#import <foundation/foundation.h>
#import "nimocomponentvisitor.h"
@interface nimowheel : nsobject
@property (nonatomic, assign) float diameter; //直径
- (void)acceptcomponentvisitor:(id<nimocomponentvisitor>) visitor;
@end
#import "nimowheel.h"
@implementation nimowheel
- (id)init
{
self = [super init];
if (self) {
_diameter = 400.0f;
}
return self;
}
- (void)acceptcomponentvisitor:(id<nimocomponentvisitor>) visitor
{
[visitor visitwheel:self];
}
-(nsstring *)description
{
return [nsstring stringwithformat:@"wheel: %f mm", _diameter];
}
@end
添加访问支持的car类
#import <foundation/foundation.h>
#import "nimocomponentvisitor.h"
@class nimoengine, nimowheel;
@interface nimocar : nsobject
@property (nonatomic) nimoengine *engine;
@property (nonatomic, readonly) nsarray *arrayofwheels;
- (void)addwheel:(nimowheel *)wheel atindex:(nsuinteger) index;
- (void)acceptcomponentvisitor:(id<nimocomponentvisitor>) visitor;
@end
#import "nimocar.h"
#import "nimoengine.h"
#import "nimowheel.h"
@interface nimocar()
@property (nonatomic, readwrite) nsmutablearray *mutablearrayofwheels;
@end
@implementation nimocar
- (id)init
{
if (self = [super init]) {
_mutablearrayofwheels = [[nsmutablearray alloc] initwithcapacity:4];
}
return self;
}
- (void)addwheel:(nimowheel *)wheel atindex:(nsuinteger) index
{
[_mutablearrayofwheels insertobject:wheel atindex:index];
}
- (nsarray *)arrayofwheels
{
return [_mutablearrayofwheels copy];
}
- (void)acceptcomponentvisitor:(id<nimocomponentvisitor>) visitor
{
[_engine acceptcomponentvisitor:visitor];
for (nimowheel *wheel in self.arrayofwheels) {
[wheel acceptcomponentvisitor:visitor];
}
}
- (nsstring *)description
{
return [nsstring stringwithformat:@"my car: %@", [nsdictionary dictionarywithobjects:@[_engine, self.arrayofwheels] forkeys:@[@"engine", @"wheels"]]];
}
@end
我们在类中添加了-(void)acceptcomponentvisitor:(id<nimocomponentvisitor>)visitor接口,同意实现了访问者协议的visitor访问。(我家大门常打开,啦啦啦啦啦)
让我们来看下第一位访问者是谁?刚刚上面我们有提到一个需求,想对汽车各组件进行全面升级。那么就让这位专业的访问者来做吧!
定义具体访问者:此访问者具备升级汽车各组件的能力
#import <foundation/foundation.h>
#import "nimocomponentvisitor.h"
@interface nimocomponentupgrade : nsobject <nimocomponentvisitor>
- (void) visitengine:(nimoengine *) engine;
- (void) visitwheel:(nimowheel *) wheel;
@end
#import "nimocomponentupgrade.h"
@implementation nimocomponentupgrade
- (void) visitengine:(nimoengine *) engine
{
nslog(@"我是升级人员,正在对引擎<%@>进行升级", engine);
}
- (void) visitwheel:(nimowheel *) wheel
{
nslog(@"我是升级人员,正在对车轮<%@>进行升级", wheel);
}
@end
让我们来看看这位访问者的工作能力如何
#import <foundation/foundation.h>
#import "nimocar.h"
#import "nimoengine.h"
#import "nimowheel.h"
#import "nimocomponentmaintenance.h"
#import "nimocomponentupgrade.h"
int main(int argc, const char * argv[]) {
@autoreleasepool {
nimocar *car = [[nimocar alloc] init];
nimoengine *engine = [[nimoengine alloc] initwithmodelname:@"v8"];
nimowheel *wheela = [[nimowheel alloc] init];
nimowheel *wheelb = [[nimowheel alloc] init];
nimowheel *wheelc = [[nimowheel alloc] init];
nimowheel *wheeld = [[nimowheel alloc] init];
car.engine = engine;
[car addwheel:wheela atindex:0];
[car addwheel:wheelb atindex:1];
[car addwheel:wheelc atindex:2];
[car addwheel:wheeld atindex:3];
nslog(@"%@", car);
//对组建进行“升级”
nimocomponentupgrade *upgradevisitor = [[nimocomponentupgrade alloc] init];
[car acceptcomponentvisitor:upgradevisitor];
}
return 0;
}

看来这位访问者的工作很出色。
如果我们还需要对汽车各组件进行维修呢?那就定义一个专职维修的访问者
#import <foundation/foundation.h>
#import "nimocomponentvisitor.h"
@interface nimocomponentmaintenance : nsobject <nimocomponentvisitor>
- (void) visitengine:(nimoengine *) engine;
- (void) visitwheel:(nimowheel *) wheel;
@end
#import "nimocomponentmaintenance.h"
@implementation nimocomponentmaintenance
- (void) visitengine:(nimoengine *) engine
{
nslog(@"我是维修人员,正在对引擎<%@>进行维修", engine);
}
- (void) visitwheel:(nimowheel *) wheel
{
nslog(@"我是维修人员,正在对车轮<%@>进行维修", wheel);
}
@end
//main.m
...
//对组建进行“维修”
nimocomponentmaintenance *maintenancevisitor = [[nimocomponentmaintenance alloc] init];
[car acceptcomponentvisitor:maintenancevisitor];
...
使用访问者模式后,添加操作,只需实现具体的访问者,不会对类的结构造成破坏。


