使用xib自定义uitableviewcell实现一个简单的团购应用界面布局
一、项目文件结构和plist文件
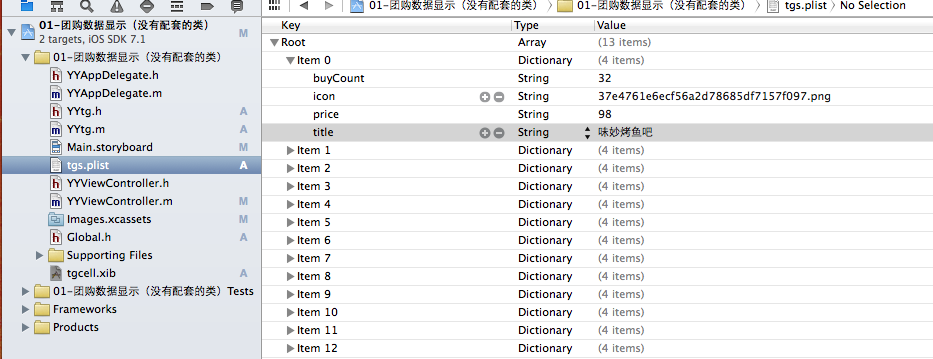
二、实现效果
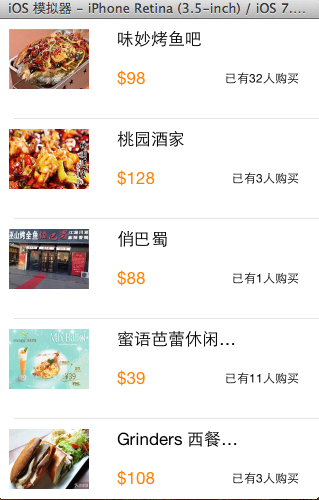
三、代码示例
1.没有使用配套的类,而是直接使用xib文件控件tag值操作
数据模型部分:
yytg.h文件
//
// yytg.h
// 01-团购数据显示(没有配套的类)
//
// created by apple on 14-5-29.
// copyright (c) 2014年 itcase. all rights reserved.
//
#import <foundation/foundation.h>
#import "global.h"
@interface yytg : nsobject
@property(nonatomic,copy)nsstring *buycount;
@property(nonatomic,copy)nsstring *icon;
@property(nonatomic,copy)nsstring *price;
@property(nonatomic,copy)nsstring *title;
yyinith(tg)
@end
yytg.m文件
//
// yytg.m
// 01-团购数据显示(没有配套的类)
//
// created by apple on 14-5-29.
// copyright (c) 2014年 itcase. all rights reserved.
//
#import "yytg.h"
@implementation yytg
yyinitm(tg)
@end
主控制器
yyviewcontroller.m文件
//
// yyviewcontroller.m
// 01-团购数据显示(没有配套的类)
//
// created by apple on 14-5-29.
// copyright (c) 2014年 itcase. all rights reserved.
//
#import "yyviewcontroller.h"
#import "yytg.h"
@interface yyviewcontroller ()<uitableviewdatasource>
@property(nonatomic,strong)nsarray *tg;
@property (strong, nonatomic) iboutlet uitableview *tableview;
@end
@implementation yyviewcontroller
- (void)viewdidload
{
[super viewdidload];
self.tableview.rowheight=100;
}
#pragma mark- 懒加载
-(nsarray *)tg
{
if (_tg==nil) {
nsstring *fullpath=[[nsbundle mainbundle]pathforresource:@"tgs.plist" oftype:nil];
nsarray *temparray=[nsarray arraywithcontentsoffile:fullpath];
nsmutablearray *arraym=[nsmutablearray arraywithcapacity:temparray.count];
for (nsdictionary *dict in temparray) {
yytg *tg=[yytg tgwithdict:dict];
[arraym addobject:tg];
}
_tg=[arraym mutablecopy];
}
return _tg;
}
#pragma mark-数据显示
-(nsinteger)numberofsectionsintableview:(uitableview *)tableview
{
return 1;
}
-(nsinteger)tableview:(uitableview *)tableview numberofrowsinsection:(nsinteger)section
{
return self.tg.count;
}
-(uitableviewcell *)tableview:(uitableview *)tableview cellforrowatindexpath:(nsindexpath *)indexpath
{
//读取xib中的数据
// nsarray *arraym=[[nsbundle mainbundle]loadnibnamed:@"tgcell" owner:nil options:nil];
// uitableviewcell *cell=[arraym firstobject];
static nsstring *identifier=@"tg";
uitableviewcell *cell=[tableview dequeuereusablecellwithidentifier:identifier];
if (cell==nil) {
// cell=[[uitableviewcell alloc]initwithstyle:uitableviewcellstyledefault reuseidentifier:identifier];
cell= [[[nsbundle mainbundle]loadnibnamed:@"tgcell" owner:nil options:nil] firstobject];
}
yytg *tg=self.tg[indexpath.row];
//设置数据
//使用tag
uiimageview *imgv=(uiimageview *)[cell viewwithtag:1];
imgv.image=[uiimage imagenamed:tg.icon];
uilabel *buycount=(uilabel *)[cell viewwithtag:4];
buycount.text=[nsstring stringwithformat:@"已有%@人购买",tg.buycount];
uilabel *title=(uilabel *)[cell viewwithtag:2];
title.text=tg.title;
uilabel *price=(uilabel *)[cell viewwithtag:3];
price.text=[nsstring stringwithformat:@"$%@",tg.price];
//返回cell
return cell;
}
//隐藏状态栏
-(bool)prefersstatusbarhidden
{
return yes;
}
@end
使用xib自定义的uitableviewcell

代码分析:
上面的代码通过使用xib文件中各个控件的tag值,完成对每个部分数据的赋值和刷新。但是,作为主控制器,它应该知道xib文件中各个控件的tag值,它知道的是不是太多了呢?
为了解决上面的问题,我们可以为自定义的cell设置一个配套的类,让这个类来操作这个xib,对外提供接口,至于内部的数据处理,外界不需要关心,也不用关心。
改造后的代码如下:
2.使用xib和对应的类完成自定义cell的数据展示
新建一个类,用来管理对应的xib文件
注意类的继承类,并把该类和xib文件进行关联

yytgcell.h文件代码:
//
// yytgcell.h
// 02-团购(使用xib和类完成数据展示)
//
// created by apple on 14-5-29.
// copyright (c) 2014年 itcase. all rights reserved.
//
#import <uikit/uikit.h>
#import "yytg.h"
@interface yytgcell : uitableviewcell
@property(nonatomic,strong)yytg *yytg;
@end
yytgcell.m文件
//
// yytgcell.m
// 02-团购(使用xib和类完成数据展示)
//
// created by apple on 14-5-29.
// copyright (c) 2014年 itcase. all rights reserved.
//
#import "yytgcell.h"
//私有扩展
@interface yytgcell()
@property (strong, nonatomic) iboutlet uiimageview *img;
@property (strong, nonatomic) iboutlet uilabel *titlelab;
@property (strong, nonatomic) iboutlet uilabel *pricelab;
@property (strong, nonatomic) iboutlet uilabel *buycountlab;
@end
@implementation yytgcell
#pragma mark 重写set方法,完成数据的赋值操作
-(void)setyytg:(yytg *)yytg
{
_yytg=yytg;
self.img.image=[uiimage imagenamed:yytg.icon];
self.titlelab.text=yytg.title;
self.pricelab.text=[nsstring stringwithformat:@"$%@",yytg.price];
self.buycountlab.text=[nsstring stringwithformat:@"已有%@人购买",yytg.buycount];
}
@end
主控制器
yyviewcontroller.m文件
//
// yyviewcontroller.m
// 02-团购(使用xib和类完成数据展示)
//
// created by apple on 14-5-29.
// copyright (c) 2014年 itcase. all rights reserved.
//
#import "yyviewcontroller.h"
#import "yytg.h"
#import "yytgcell.h"
@interface yyviewcontroller ()<uitableviewdatasource,uitableviewdelegate>
@property (strong, nonatomic) iboutlet uitableview *tableview;
@property(strong,nonatomic)nsarray *tg;
@end
@implementation yyviewcontroller
- (void)viewdidload
{
[super viewdidload];
self.tableview.rowheight=80.f;
}
#pragma mark- 懒加载
-(nsarray *)tg
{
if (_tg==nil) {
nsstring *fullpath=[[nsbundle mainbundle]pathforresource:@"tgs.plist" oftype:nil];
nsarray *temparray=[nsarray arraywithcontentsoffile:fullpath];
nsmutablearray *arraym=[nsmutablearray arraywithcapacity:temparray.count];
for (nsdictionary *dict in temparray) {
yytg *tg=[yytg tgwithdict:dict];
[arraym addobject:tg];
}
_tg=[arraym mutablecopy];
}
return _tg;
}
#pragma mark- xib创建cell数据处理
#pragma mark 多少组
-(nsinteger)numberofsectionsintableview:(uitableview *)tableview
{
return 1;
}
#pragma mark多少行
-(nsinteger)tableview:(uitableview *)tableview numberofrowsinsection:(nsinteger)section
{
return self.tg.count;
}
#pragma mark设置每组每行
-(uitableviewcell *)tableview:(uitableview *)tableview cellforrowatindexpath:(nsindexpath *)indexpath
{
static nsstring *identifier= @"tg";
yytgcell *cell=[tableview dequeuereusablecellwithidentifier:identifier];
if (cell==nil) {
//如何让创建的cell加个戳
//对于加载的xib文件,可以到xib视图的属性选择器中进行设置
cell=[[[nsbundle mainbundle]loadnibnamed:@"tgcell" owner:nil options:nil]firstobject];
nslog(@"创建了一个cell");
}
//设置cell的数据
//获取当前行的模型
yytg *tg=self.tg[indexpath.row];
cell.yytg=tg;
return cell;
}
-(bool)prefersstatusbarhidden
{
return yes;
}
@end
3.对上述代码进行进一步的优化和调整(mvc)
优化如下:
(1)把主控制器中创建cell的过程抽取到yytgcell中完成,并对外提供一个接口。
yytgcell.h文件(提供接口)
#import <uikit/uikit.h>
#import "yytgmodel.h"
@interface yytgcell : uitableviewcell
@property(nonatomic,strong)yytgmodel *yytg;
//把加载数据(使用xib创建cell的内部细节进行封装)
+(instancetype)tgcellwithtableview:(uitableview *)tableview;
@end
yytgcell.m文件(把创建自定义cell的部分进行封装)
//
// yytgcell.m
// 02-团购(使用xib和类完成数据展示)
//
// created by apple on 14-5-29.
// copyright (c) 2014年 itcase. all rights reserved.
//
#import "yytgcell.h"
//私有扩展
@interface yytgcell()
@property (strong, nonatomic) iboutlet uiimageview *img;
@property (strong, nonatomic) iboutlet uilabel *titlelab;
@property (strong, nonatomic) iboutlet uilabel *pricelab;
@property (strong, nonatomic) iboutlet uilabel *buycountlab;
@end
@implementation yytgcell
#pragma mark 重写set方法,完成数据的赋值操作
-(void)setyytg:(yytgmodel *)yytg
{
_yytg=yytg;
self.img.image=[uiimage imagenamed:yytg.icon];
self.titlelab.text=yytg.title;
self.pricelab.text=[nsstring stringwithformat:@"$%@",yytg.price];
self.buycountlab.text=[nsstring stringwithformat:@"已有%@人购买",yytg.buycount];
}
+(instancetype)tgcellwithtableview:(uitableview *)tableview
{
static nsstring *identifier= @"tg";
yytgcell *cell=[tableview dequeuereusablecellwithidentifier:identifier];
if (cell==nil) {
//如何让创建的cell加个戳
//对于加载的xib文件,可以到xib视图的属性选择器中进行设置
cell=[[[nsbundle mainbundle]loadnibnamed:@"tgcell" owner:nil options:nil]firstobject];
nslog(@"创建了一个cell");
}
return cell;
}
@end
主控器中的业务逻辑更加清晰,yyviewcontroller.m文件代码如下
//
// yyviewcontroller.m
// 02-团购(使用xib和类完成数据展示)
//
// created by apple on 14-5-29.
// copyright (c) 2014年 itcase. all rights reserved.
//
#import "yyviewcontroller.h"
#import "yytgmodel.h"
#import "yytgcell.h"
@interface yyviewcontroller ()<uitableviewdatasource,uitableviewdelegate>
@property (strong, nonatomic) iboutlet uitableview *tableview;
@property(strong,nonatomic)nsarray *tg;
@end
@implementation yyviewcontroller
- (void)viewdidload
{
[super viewdidload];
self.tableview.rowheight=80.f;
}
#pragma mark- 懒加载
-(nsarray *)tg
{
if (_tg==nil) {
nsstring *fullpath=[[nsbundle mainbundle]pathforresource:@"tgs.plist" oftype:nil];
nsarray *temparray=[nsarray arraywithcontentsoffile:fullpath];
nsmutablearray *arraym=[nsmutablearray arraywithcapacity:temparray.count];
for (nsdictionary *dict in temparray) {
yytgmodel *tg=[yytgmodel tgwithdict:dict];
[arraym addobject:tg];
}
_tg=[arraym mutablecopy];
}
return _tg;
}
#pragma mark- xib创建cell数据处理
#pragma mark 多少组
-(nsinteger)numberofsectionsintableview:(uitableview *)tableview
{
return 1;
}
#pragma mark多少行
-(nsinteger)tableview:(uitableview *)tableview numberofrowsinsection:(nsinteger)section
{
return self.tg.count;
}
#pragma mark设置每组每行
-(uitableviewcell *)tableview:(uitableview *)tableview cellforrowatindexpath:(nsindexpath *)indexpath
{
//1.创建cell
yytgcell *cell=[yytgcell tgcellwithtableview:tableview];
//2.获取当前行的模型,设置cell的数据
yytgmodel *tg=self.tg[indexpath.row];
cell.yytg=tg;
//3.返回cell
return cell;
}
#pragma mark- 隐藏状态栏
-(bool)prefersstatusbarhidden
{
return yes;
}
@end
四、推荐调整的项目文件结构
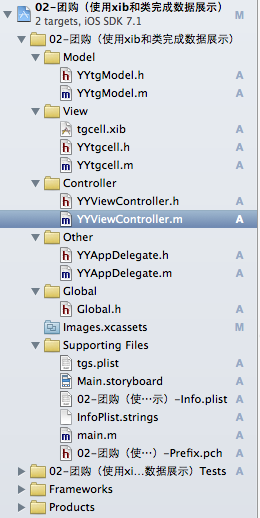
这是调整后的文件结构,完整的mvc架构。
注意:注意文件的命名规范。
提示技巧:批量改名,操作如下:
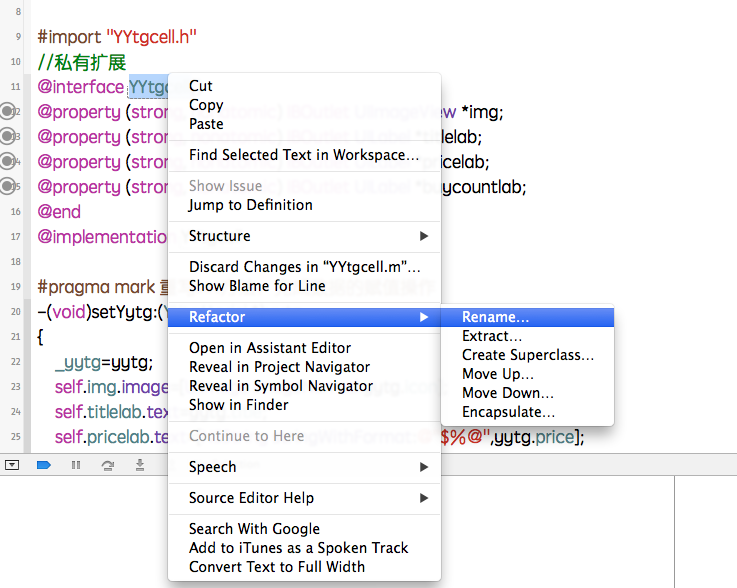
修改为想要的名称:

实现一个简单的微博界面布局
一、实现效果

二、使用纯代码自定义一个tableview的步骤
1.新建一个继承自uitableviewcell的类
2.重写initwithstyle:reuseidentifier:方法
添加所有需要显示的子控件(不需要设置子控件的数据和frame, 子控件要添加到contentview中)
进行子控件一次性的属性设置(有些属性只需要设置一次, 比如字体\固定的图片)
3.提供2个模型
数据模型: 存放文字数据\图片数据
frame模型: 存放数据模型\所有子控件的frame\cell的高度
4.cell拥有一个frame模型(不要直接拥有数据模型)
5.重写frame模型属性的setter方法: 在这个方法中设置子控件的显示数据和frame
6.frame模型数据的初始化已经采取懒加载的方式(每一个cell对应的frame模型数据只加载一次)
三、文件结构和实现代码
1.文件结构
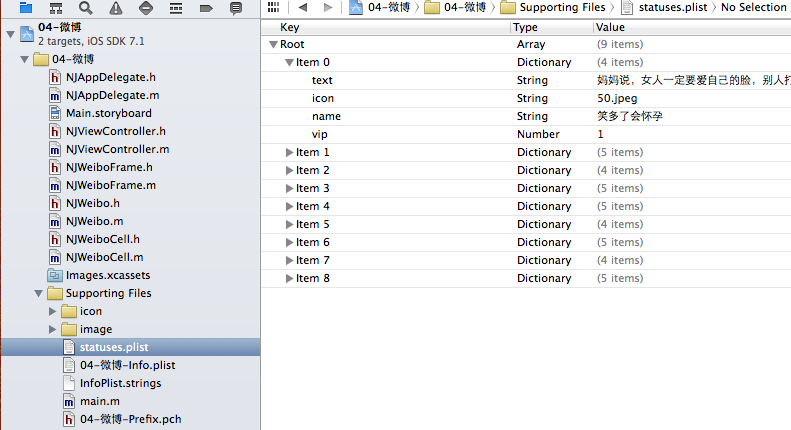
2.实现代码:
njweibo.h文件
#import <foundation/foundation.h>
@interface njweibo : nsobject
@property (nonatomic, copy) nsstring *text; // 内容
@property (nonatomic, copy) nsstring *icon; // 头像
@property (nonatomic, copy) nsstring *name; // 昵称
@property (nonatomic, copy) nsstring *picture; // 配图
@property (nonatomic, assign) bool vip;
- (id)initwithdict:(nsdictionary *)dict;
+ (id)weibowithdict:(nsdictionary *)dict;
@end
njweibo.m文件
#import "njweibo.h"
@implementation njweibo
- (id)initwithdict:(nsdictionary *)dict
{
if (self = [super init]) {
[self setvaluesforkeyswithdictionary:dict];
}
return self;
}
+ (id)weibowithdict:(nsdictionary *)dict
{
return [[self alloc] initwithdict:dict];
}
@end
njweibocell.h文件
#import <uikit/uikit.h>
@class njweiboframe;
@interface njweibocell : uitableviewcell
/**
* 接收外界传入的模型
*/
//@property (nonatomic, strong) njweibo *weibo;
@property (nonatomic, strong) njweiboframe *weiboframe;
+ (instancetype)cellwithtableview:(uitableview *)tableview;
@end
njweibocell.m文件
#import "njweibocell.h"
#import "njweibo.h"
#import "njweiboframe.h"
#define njnamefont [uifont systemfontofsize:15]
#define njtextfont [uifont systemfontofsize:16]
@interface njweibocell ()
/**
* 头像
*/
@property (nonatomic, weak) uiimageview *iconview;
/**
* vip
*/
@property (nonatomic, weak) uiimageview *vipview;
/**
* 配图
*/
@property (nonatomic, weak) uiimageview *pictureview;
/**
* 昵称
*/
@property (nonatomic, weak) uilabel *namelabel;
/**
* 正文
*/
@property (nonatomic, weak) uilabel *introlabel;
@end
@implementation njweibocell
+ (instancetype)cellwithtableview:(uitableview *)tableview
{
// nslog(@"cellforrowatindexpath");
static nsstring *identifier = @"status";
// 1.缓存中取
njweibocell *cell = [tableview dequeuereusablecellwithidentifier:identifier];
// 2.创建
if (cell == nil) {
cell = [[njweibocell alloc]initwithstyle:uitableviewcellstyledefault reuseidentifier:identifier];
}
return cell;
}
/**
* 构造方法(在初始化对象的时候会调用)
* 一般在这个方法中添加需要显示的子控件
*/
- (id)initwithstyle:(uitableviewcellstyle)style reuseidentifier:(nsstring *)reuseidentifier
{
self = [super initwithstyle:style reuseidentifier:reuseidentifier];
if (self) {
// 让自定义cell和系统的cell一样, 一创建出来就拥有一些子控件提供给我们使用
// 1.创建头像
uiimageview *iconview = [[uiimageview alloc] init];
[self.contentview addsubview:iconview];
self.iconview = iconview;
// 2.创建昵称
uilabel *namelabel = [[uilabel alloc] init];
namelabel.font = njnamefont;
// namelabel.backgroundcolor = [uicolor redcolor];
[self.contentview addsubview:namelabel];
self.namelabel = namelabel;
// 3.创建vip
uiimageview *vipview = [[uiimageview alloc] init];
vipview.image = [uiimage imagenamed:@"vip"];
[self.contentview addsubview:vipview];
self.vipview = vipview;
// 4.创建正文
uilabel *introlabel = [[uilabel alloc] init];
introlabel.font = njtextfont;
introlabel.numberoflines = 0;
// introlabel.backgroundcolor = [uicolor greencolor];
[self.contentview addsubview:introlabel];
self.introlabel = introlabel;
// 5.创建配图
uiimageview *pictureview = [[uiimageview alloc] init];
[self.contentview addsubview:pictureview];
self.pictureview = pictureview;
}
return self;
}
- (void)setweiboframe:(njweiboframe *)weiboframe
{
_weiboframe = weiboframe;
// 1.给子控件赋值数据
[self settingdata];
// 2.设置frame
[self settingframe];
}
/**
* 设置子控件的数据
*/
- (void)settingdata
{
njweibo *weibo = self.weiboframe.weibo;
// 设置头像
self.iconview.image = [uiimage imagenamed:weibo.icon];
// 设置昵称
self.namelabel.text = weibo.name;
// 设置vip
if (weibo.vip) {
self.vipview.hidden = no;
self.namelabel.textcolor = [uicolor redcolor];
}else
{
self.vipview.hidden = yes;
self.namelabel.textcolor = [uicolor blackcolor];
}
// 设置内容
self.introlabel.text = weibo.text;
// 设置配图
if (weibo.picture) {// 有配图
self.pictureview.image = [uiimage imagenamed:weibo.picture];
self.pictureview.hidden = no;
}else
{
self.pictureview.hidden = yes;
}
}
/**
* 设置子控件的frame
*/
- (void)settingframe
{
// 设置头像的frame
self.iconview.frame = self.weiboframe.iconf;
// 设置昵称的frame
self.namelabel.frame = self.weiboframe.namef;
// 设置vip的frame
self.vipview.frame = self.weiboframe.vipf;
// 设置正文的frame
self.introlabel.frame = self.weiboframe.introf;
// 设置配图的frame
if (self.weiboframe.weibo.picture) {// 有配图
self.pictureview.frame = self.weiboframe.pictruef;
}
}
/**
* 计算文本的宽高
*
* @param str 需要计算的文本
* @param font 文本显示的字体
* @param maxsize 文本显示的范围
*
* @return 文本占用的真实宽高
*/
- (cgsize)sizewithstring:(nsstring *)str font:(uifont *)font maxsize:(cgsize)maxsize
{
nsdictionary *dict = @{nsfontattributename : font};
// 如果将来计算的文字的范围超出了指定的范围,返回的就是指定的范围
// 如果将来计算的文字的范围小于指定的范围, 返回的就是真实的范围
cgsize size = [str boundingrectwithsize:maxsize options:nsstringdrawinguseslinefragmentorigin attributes:dict context:nil].size;
return size;
}
@end
njweiboframe.h文件
// 专门用来保存每一行数据的frame, 计算frame
#import <foundation/foundation.h>
@class njweibo;
@interface njweiboframe : nsobject
/**
* 头像的frame
*/
@property (nonatomic, assign) cgrect iconf;
/**
* 昵称的frame
*/
@property (nonatomic, assign) cgrect namef;
/**
* vip的frame
*/
@property (nonatomic, assign) cgrect vipf;
/**
* 正文的frame
*/
@property (nonatomic, assign) cgrect introf;
/**
* 配图的frame
*/
@property (nonatomic, assign) cgrect pictruef;
/**
* 行高
*/
@property (nonatomic, assign) cgfloat cellheight;
/**
* 模型数据
*/
@property (nonatomic, strong) njweibo *weibo;
@end
njweiboframe.m文件
#import "njweiboframe.h"
#import "njweibo.h"
#define njnamefont [uifont systemfontofsize:15]
#define njtextfont [uifont systemfontofsize:16]
@implementation njweiboframe
- (void)setweibo:(njweibo *)weibo
{
_weibo = weibo;
// 间隙
cgfloat padding = 10;
// 设置头像的frame
cgfloat iconviewx = padding;
cgfloat iconviewy = padding;
cgfloat iconvieww = 30;
cgfloat iconviewh = 30;
self.iconf = cgrectmake(iconviewx, iconviewy, iconvieww, iconviewh);
// 设置昵称的frame
// 昵称的x = 头像最大的x + 间隙
cgfloat namelabelx = cgrectgetmaxx(self.iconf) + padding;
// 计算文字的宽高
cgsize namesize = [self sizewithstring:_weibo.name font:njnamefont maxsize:cgsizemake(maxfloat, maxfloat)];
cgfloat namelabelh = namesize.height;
cgfloat namelabelw = namesize.width;
cgfloat namelabely = iconviewy + (iconviewh - namelabelh) * 0.5;
self.namef = cgrectmake(namelabelx, namelabely, namelabelw, namelabelh);
// 设置vip的frame
cgfloat vipviewx = cgrectgetmaxx(self.namef) + padding;
cgfloat vipviewy = namelabely;
cgfloat vipvieww = 14;
cgfloat vipviewh = 14;
self.vipf = cgrectmake(vipviewx, vipviewy, vipvieww, vipviewh);
// 设置正文的frame
cgfloat introlabelx = iconviewx;
cgfloat introlabely = cgrectgetmaxy(self.iconf) + padding;
cgsize textsize = [self sizewithstring:_weibo.text font:njtextfont maxsize:cgsizemake(300, maxfloat)];
cgfloat introlabelw = textsize.width;
cgfloat introlabelh = textsize.height;
self.introf = cgrectmake(introlabelx, introlabely, introlabelw, introlabelh);
// 设置配图的frame
cgfloat cellheight = 0;
if (_weibo.picture) {// 有配图
cgfloat pictureviewx = iconviewx;
cgfloat pictureviewy = cgrectgetmaxy(self.introf) + padding;
cgfloat picturevieww = 100;
cgfloat pictureviewh = 100;
self.pictruef = cgrectmake(pictureviewx, pictureviewy, picturevieww, pictureviewh);
// 计算行高
self.cellheight = cgrectgetmaxy(self.pictruef) + padding;
}else
{
// 没有配图情况下的行高
self.cellheight = cgrectgetmaxy(self.introf) + padding;
}
}
/**
* 计算文本的宽高
*
* @param str 需要计算的文本
* @param font 文本显示的字体
* @param maxsize 文本显示的范围
*
* @return 文本占用的真实宽高
*/
- (cgsize)sizewithstring:(nsstring *)str font:(uifont *)font maxsize:(cgsize)maxsize
{
nsdictionary *dict = @{nsfontattributename : font};
// 如果将来计算的文字的范围超出了指定的范围,返回的就是指定的范围
// 如果将来计算的文字的范围小于指定的范围, 返回的就是真实的范围
cgsize size = [str boundingrectwithsize:maxsize options:nsstringdrawinguseslinefragmentorigin attributes:dict context:nil].size;
return size;
}
@end
主控制器
njviewcontroller.m文件
#import "njviewcontroller.h"
#import "njweibo.h"
#import "njweibocell.h"
#import "njweiboframe.h"
@interface njviewcontroller ()
@property (nonatomic, strong) nsarray *statusframes;
@end
@implementation njviewcontroller
#pragma mark - 数据源方法
- (nsinteger)tableview:(uitableview *)tableview numberofrowsinsection:(nsinteger)section
{
return self.statusframes.count;
}
- (uitableviewcell *)tableview:(uitableview *)tableview cellforrowatindexpath:(nsindexpath *)indexpath
{
njweibocell *cell = [njweibocell cellwithtableview:tableview];
// 3.设置数据
cell.weiboframe = self.statusframes[indexpath.row];
// 4.返回
return cell;
}
#pragma mark - 懒加载
- (nsarray *)statusframes
{
if (_statusframes == nil) {
nsstring *fullpath = [[nsbundle mainbundle] pathforresource:@"statuses.plist" oftype:nil];
nsarray *dictarray = [nsarray arraywithcontentsoffile:fullpath];
nsmutablearray *models = [nsmutablearray arraywithcapacity:dictarray.count];
for (nsdictionary *dict in dictarray) {
// 创建模型
njweibo *weibo = [njweibo weibowithdict:dict];
// 根据模型数据创建frame模型
njweiboframe *wbf = [[njweiboframe alloc] init];
wbf.weibo = weibo;
[models addobject:wbf];
}
self.statusframes = [models copy];
}
return _statusframes;
}
#pragma mark - 代理方法
- (cgfloat)tableview:(uitableview *)tableview heightforrowatindexpath:(nsindexpath *)indexpath
{
// nslog(@"heightforrowatindexpath");
// 取出对应航的frame模型
njweiboframe *wbf = self.statusframes[indexpath.row];
nslog(@"height = %f", wbf.cellheight);
return wbf.cellheight;
}
- (bool) prefersstatusbarhidden
{
return yes;
}
@end
四、补充说明
由于系统提供的tableview可能并不能满足我们的开发需求,所以经常要求我们能够自定义tableview。
自定义tableview有两种方式,一种是使用xib创建,一种是使用纯代码的方式创建。
对于样式一样的tableview,通常使用xib进行创建,对于高度不一样,内容也不完全一致的通常使用纯代码进行自定义。

