uiscrollview控件实现图片轮播
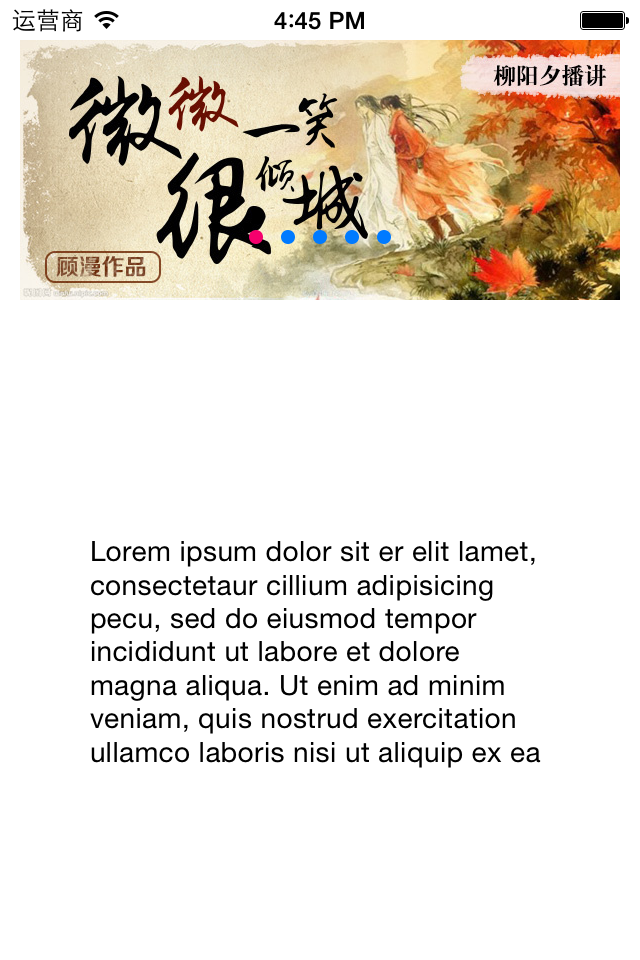
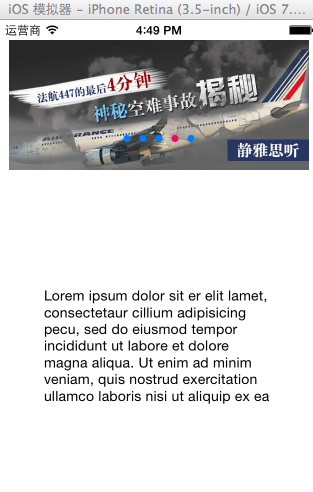
一、实现效果
实现图片的自动轮播
二、实现代码
storyboard中布局
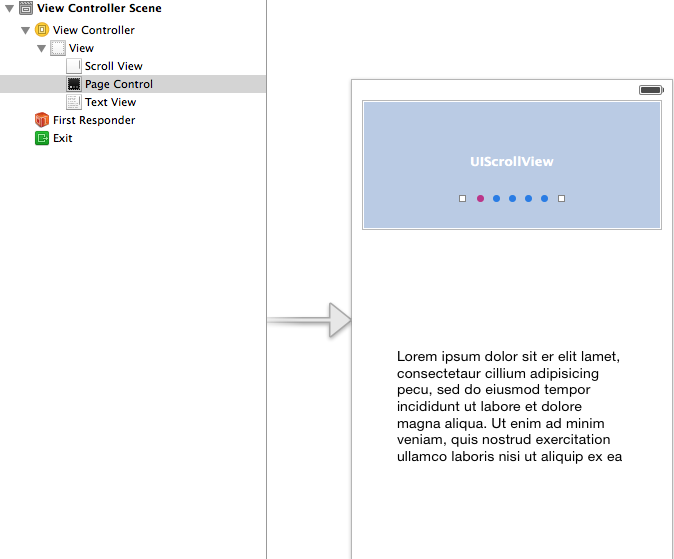
代码:
#import "yyviewcontroller.h"
@interface yyviewcontroller () <uiscrollviewdelegate>
@property (weak, nonatomic) iboutlet uiscrollview *scrollview;
/**
* 页码
*/
@property (weak, nonatomic) iboutlet uipagecontrol *pagecontrol;
@property (nonatomic, strong) nstimer *timer;
@end
@implementation yyviewcontroller
- (void)viewdidload
{
[super viewdidload];
// 图片的宽
cgfloat imagew = self.scrollview.frame.size.width;
// cgfloat imagew = 300;
// 图片高
cgfloat imageh = self.scrollview.frame.size.height;
// 图片的y
cgfloat imagey = 0;
// 图片中数
nsinteger totalcount = 5;
// 1.添加5张图片
for (int i = 0; i < totalcount; i++) {
uiimageview *imageview = [[uiimageview alloc] init];
// 图片x
cgfloat imagex = i * imagew;
// 设置frame
imageview.frame = cgrectmake(imagex, imagey, imagew, imageh);
// 设置图片
nsstring *name = [nsstring stringwithformat:@"img_0%d", i + 1];
imageview.image = [uiimage imagenamed:name];
// 隐藏指示条
self.scrollview.showshorizontalscrollindicator = no;
[self.scrollview addsubview:imageview];
}
// 2.设置scrollview的滚动范围
cgfloat contentw = totalcount *imagew;
//不允许在垂直方向上进行滚动
self.scrollview.contentsize = cgsizemake(contentw, 0);
// 3.设置分页
self.scrollview.pagingenabled = yes;
// 4.监听scrollview的滚动
self.scrollview.delegate = self;
[self addtimer];
}
- (void)nextimage
{
int page = (int)self.pagecontrol.currentpage;
if (page == 4) {
page = 0;
}else
{
page++;
}
// 滚动scrollview
cgfloat x = page * self.scrollview.frame.size.width;
self.scrollview.contentoffset = cgpointmake(x, 0);
}
// scrollview滚动的时候调用
- (void)scrollviewdidscroll:(uiscrollview *)scrollview
{
nslog(@"滚动中");
// 计算页码
// 页码 = (contentoffset.x + scrollview一半宽度)/scrollview宽度
cgfloat scrollvieww = scrollview.frame.size.width;
cgfloat x = scrollview.contentoffset.x;
int page = (x + scrollvieww / 2) / scrollvieww;
self.pagecontrol.currentpage = page;
}
// 开始拖拽的时候调用
- (void)scrollviewwillbegindragging:(uiscrollview *)scrollview
{
// 关闭定时器(注意点; 定时器一旦被关闭,无法再开启)
// [self.timer invalidate];
[self removetimer];
}
- (void)scrollviewdidenddragging:(uiscrollview *)scrollview willdecelerate:(bool)decelerate
{
// 开启定时器
[self addtimer];
}
/**
* 开启定时器
*/
- (void)addtimer{
self.timer = [nstimer scheduledtimerwithtimeinterval:1 target:self selector:@selector(nextimage) userinfo:nil repeats:yes];
106 }
/**
* 关闭定时器
*/
- (void)removetimer
{
[self.timer invalidate];
}
@end
提示:以下两个属性已经和storyboard中的控件进行了连线。
@property (weak, nonatomic) iboutletuiscrollview *scrollview;
@property (weak, nonatomic) iboutletuipagecontrol *pagecontrol;
补充:定时器nstimer
定时器 适合用来隔一段时间做一些间隔比较长的操作
nstimeinterval:多长多件操作一次
target :操作谁
selector : 要操作的方法
userinfo: 传递参数
repeats: 是否重复
self.timer = [nstimer scheduledtimerwithtimeinterval:1 target:self selector:@selector(nextimage) userinfo:nil repeats:yes];
在uitableview中实现加载更多功能
一、实现效果
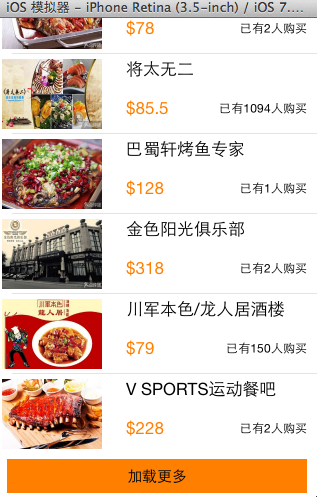
点击加载更多按钮,出现一个加载图示,三秒钟后添加两条新的数据。

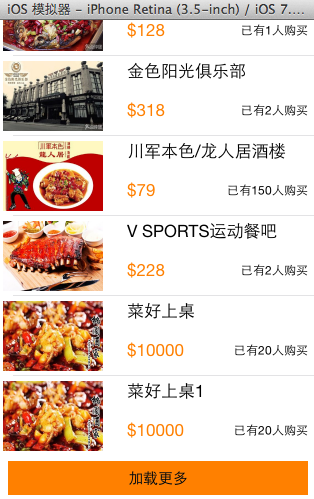
二、实现代码和说明
当在页面(视图部分)点击加载更多按钮的时候,主页面(主控制器)会加载两条数据进来。
视图部分的按钮被点击的时候,要让主控制器加载数据,刷新表格,2b青年会在视图中增加一个主控制器的属性,通过这个属性去调用进行加载,但在开发中通常通过代理模式来完成这个操作。
下面分别是两种实现的代码。
1、项目结构和说明
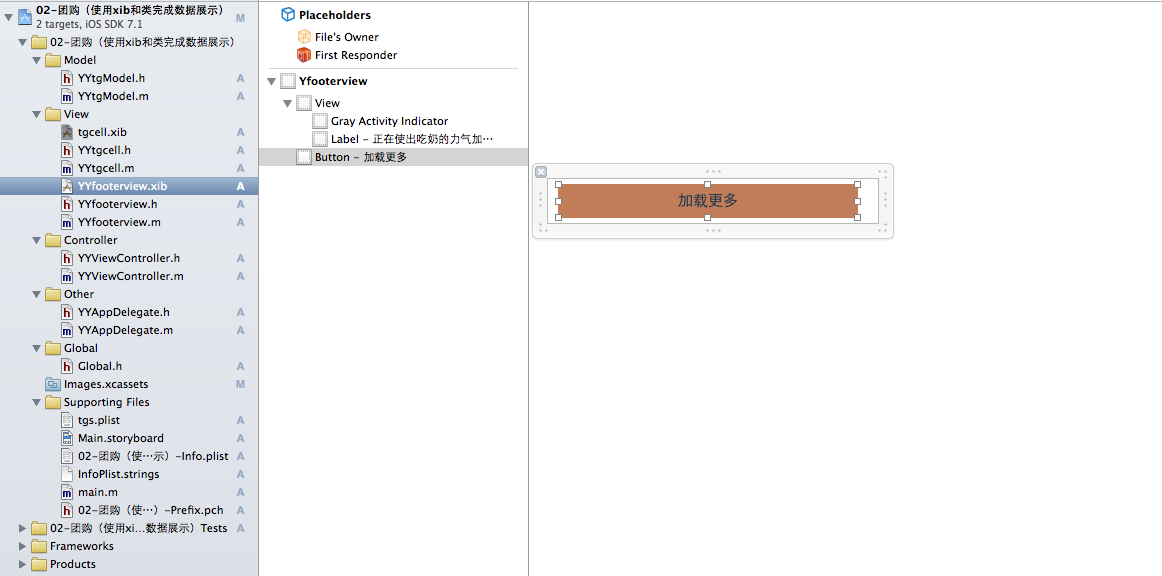
说明:加载更多永远都放在这个tableview的最下端,因此这里设置成了这个tableview的tablefooterview。
self.tableview.tablefooterview=footerview;
在实现上通过xib来进行处理,考虑到左右的留白,以及点击后的要切换到加载按钮和文字,要同时控制图标和文字,因此把加载图标和文字提示放在了一个view中以便控制,这个xib已经和yyfooterview.xib进行了关联,通过这个类来控制xib。
2、实现代码
(1).垃圾代码
数据模型部分
yytg.h文件
//
// yytg.h
// 02-团购(使用xib和类完成数据展示)
//
// created by apple on 14-5-29.
// copyright (c) 2014年 itcase. all rights reserved.
//
#import <foundation/foundation.h>
#import "global.h"
@interface yytgmodel : nsobject
@property(nonatomic,copy)nsstring *icon;
@property(nonatomic,copy)nsstring *buycount;
@property(nonatomic,copy)nsstring *title;
@property(nonatomic,copy)nsstring *price;
//对外接口
yyinith(tg)
@end
yytg.m文件
//
// yytg.m
// 02-团购(使用xib和类完成数据展示)
//
// created by apple on 14-5-29.
// copyright (c) 2014年 itcase. all rights reserved.
//
#import "yytgmodel.h"
@implementation yytgmodel
yyinitm(tg)
@end
注意:对于数据转模型部分的构造方法接口和实现代码已经通过自定义带参数的宏来进行了封装。
封装代码如下:
#ifndef _0____________global_h
#define _0____________global_h
/**
* 自定义带参数的宏
*/
#define yyinith(name) -(instancetype)initwithdict:(nsdictionary *)dict;\
+(instancetype)name##withdict:(nsdictionary *)dict;
#define yyinitm(name) -(instancetype)initwithdict:(nsdictionary *)dict\
{\
if (self=[super init]) {\
[self setvaluesforkeyswithdictionary:dict];\
}\
return self;\
}\
\
+(instancetype)name##withdict:(nsdictionary *)dict\
{\
return [[self alloc]initwithdict:dict];\
}\
#endif
视图部分
yytgcell.h文件
//
// yytgcell.h
// 02-团购(使用xib和类完成数据展示)
//
// created by apple on 14-5-29.
// copyright (c) 2014年 itcase. all rights reserved.
//
#import <uikit/uikit.h>
#import "yytgmodel.h"
@interface yytgcell : uitableviewcell
@property(nonatomic,strong)yytgmodel *yytg;
//把加载数据(使用xib创建cell的内部细节进行封装)
+(instancetype)tgcellwithtableview:(uitableview *)tableview;
@end
yytgcell.m文件
//
// yytgcell.m
// 02-团购(使用xib和类完成数据展示)
//
// created by apple on 14-5-29.
// copyright (c) 2014年 itcase. all rights reserved.
//
#import "yytgcell.h"
//私有扩展
@interface yytgcell()
@property (strong, nonatomic) iboutlet uiimageview *img;
@property (strong, nonatomic) iboutlet uilabel *titlelab;
@property (strong, nonatomic) iboutlet uilabel *pricelab;
@property (strong, nonatomic) iboutlet uilabel *buycountlab;
@end
@implementation yytgcell
#pragma mark 重写set方法,完成数据的赋值操作
-(void)setyytg:(yytgmodel *)yytg
{
_yytg=yytg;
self.img.image=[uiimage imagenamed:yytg.icon];
self.titlelab.text=yytg.title;
self.pricelab.text=[nsstring stringwithformat:@"$%@",yytg.price];
self.buycountlab.text=[nsstring stringwithformat:@"已有%@人购买",yytg.buycount];
}
+(instancetype)tgcellwithtableview:(uitableview *)tableview
{
static nsstring *identifier= @"tg";
yytgcell *cell=[tableview dequeuereusablecellwithidentifier:identifier];
if (cell==nil) {
//如何让创建的cell加个戳
//对于加载的xib文件,可以到xib视图的属性选择器中进行设置
cell=[[[nsbundle mainbundle]loadnibnamed:@"tgcell" owner:nil options:nil]firstobject];
nslog(@"创建了一个cell");
}
return cell;
}
@end
yyfooterview.h文件
//
// yyfooterview.h
// 02-团购(使用xib和类完成数据展示)
//
// created by apple on 14-5-29.
// copyright (c) 2014年 itcase. all rights reserved.
//
#import <uikit/uikit.h>
@class yyviewcontroller;
@interface yyfooterview : uiview
@property(nonatomic,strong) yyviewcontroller *controller;
@end
yyfooterview.m文件
//
// yyfooterview.m
// 02-团购(使用xib和类完成数据展示)
//
// created by apple on 14-5-29.
// copyright (c) 2014年 itcase. all rights reserved.
//
#import "yyfooterview.h"
#import "yyviewcontroller.h"
@interface yyfooterview ()
@property (strong, nonatomic) iboutlet uiactivityindicatorview *loadingview;
@property (strong, nonatomic) iboutlet uibutton *loadbtn;
@end
@implementation yyfooterview
- (ibaction)loadbtclick {
nslog(@"按钮被点击了");
//隐藏按钮
self.loadbtn.hidden=yes;
//显示菊花
self.loadingview.hidden=no;
#warning 模拟发送网络请求, 3秒之后隐藏菊花
dispatch_after(dispatch_time(dispatch_time_now, (int64_t)(3.0 * nsec_per_sec)), dispatch_get_main_queue(), ^{
// 3.调用控制的加载数据方法
[self.controller loadmore];
// 4.隐藏菊花视图
self.loadingview.hidden = yes;
// 5.显示按钮
self.loadbtn.hidden = no;
});
}
@end
主控制器
yyviewcontroller.h文件
//
// yyviewcontroller.h
// 02-团购(使用xib和类完成数据展示)
//
// created by apple on 14-5-29.
// copyright (c) 2014年 itcase. all rights reserved.
//
#import <uikit/uikit.h>
@interface yyviewcontroller : uiviewcontroller
//公开接口
//- (void)loadmore;
@end
yyviewcontroller.m文件
//
// yyviewcontroller.m
// 02-团购(使用xib和类完成数据展示)
//
// created by apple on 14-5-29.
// copyright (c) 2014年 itcase. all rights reserved.
//
#import "yyviewcontroller.h"
#import "yytgmodel.h"
#import "yytgcell.h"
#import "yyfooterview.h"
@interface yyviewcontroller ()<uitableviewdatasource,uitableviewdelegate>
@property (strong, nonatomic) iboutlet uitableview *tableview;
@property(strong,nonatomic)nsmutablearray *tg;
@end
@implementation yyviewcontroller
#pragma mark-加载数据方法
-(void)loadmore
{
//创建模型
yytgmodel *tgmodel=[[yytgmodel alloc]init];
tgmodel.title=@"菜好上桌";
tgmodel.icon=@"5ee372ff039073317a49af5442748071";
tgmodel.buycount=@"20";
tgmodel.price=@"10000";
//将模型添加到数组中
[self.tg addobject:tgmodel];
yytgmodel *tgmodelq=[[yytgmodel alloc]init];
tgmodelq.title=@"菜好上桌1";
tgmodelq.icon=@"5ee372ff039073317a49af5442748071";
tgmodelq.buycount=@"20";
tgmodelq.price=@"10000";
[self.tg addobject:tgmodelq];
//刷新表格
[self.tableview reloaddata];
}
- (void)viewdidload
{
[super viewdidload];
self.tableview.rowheight=80.f;
//加载底部视图
//从xib中获取数据
uinib *nib=[uinib nibwithnibname:@"yyfooterview" bundle:nil];
yyfooterview *footerview=[[nib instantiatewithowner:nil options:nil] firstobject];
self.tableview.tablefooterview=footerview;
//设置控制
footerview.controller=self;
}
#pragma mark- 懒加载
-(nsarray *)tg
{
if (_tg==nil) {
nsstring *fullpath=[[nsbundle mainbundle]pathforresource:@"tgs.plist" oftype:nil];
nsarray *temparray=[nsarray arraywithcontentsoffile:fullpath];
nsmutablearray *arraym=[nsmutablearray arraywithcapacity:temparray.count];
for (nsdictionary *dict in temparray) {
yytgmodel *tg=[yytgmodel tgwithdict:dict];
[arraym addobject:tg];
}
_tg=arraym;
}
return _tg;
}
#pragma mark- xib创建cell数据处理
#pragma mark 多少组
-(nsinteger)numberofsectionsintableview:(uitableview *)tableview
{
return 1;
}
#pragma mark多少行
-(nsinteger)tableview:(uitableview *)tableview numberofrowsinsection:(nsinteger)section
{
return self.tg.count;
}
#pragma mark设置每组每行
-(uitableviewcell *)tableview:(uitableview *)tableview cellforrowatindexpath:(nsindexpath *)indexpath
{
//1.创建cell
yytgcell *cell=[yytgcell tgcellwithtableview:tableview];
//2.获取当前行的模型,设置cell的数据
yytgmodel *tg=self.tg[indexpath.row];
cell.yytg=tg;
//3.返回cell
return cell;
}
#pragma mark- 隐藏状态栏
-(bool)prefersstatusbarhidden
{
return yes;
}
@end
2.通过代理完成
当按钮被点击的时候,视图部分本身不干活,而是通知它的代理(控制器)完成接下来的操作。
该部分代码在1的基础上对下面几个文件进行了修改:
视图部分:
yyfooterview.h文件
//
// yyfooterview.h
// 02-团购(使用xib和类完成数据展示)
//
// created by apple on 14-5-29.
// copyright (c) 2014年 itcase. all rights reserved.
//
#import <uikit/uikit.h>
@class yyviewcontroller ,yyfooterview;
//约定协议
@protocol yyfooterviewdelegate <nsobject>
-(void)footerviewloadmore;
@end
@interface yyfooterview : uiview
//声明一个id类型属性,遵守了协议的“人”即可成为它的代理
@property(nonatomic,strong)id<yyfooterviewdelegate> delegate;
//@property(nonatomic,strong) yyviewcontroller *controller;
@end
yyfooterview.m文件
//
// yyfooterview.m
// 02-团购(使用xib和类完成数据展示)
//
// created by apple on 14-5-29.
// copyright (c) 2014年 itcase. all rights reserved.
//
#import "yyfooterview.h"
#import "yyviewcontroller.h"
@interface yyfooterview ()
@property (strong, nonatomic) iboutlet uiactivityindicatorview *loadingview;
@property (strong, nonatomic) iboutlet uibutton *loadbtn;
@end
@implementation yyfooterview
- (ibaction)loadbtclick {
nslog(@"按钮被点击了");
//隐藏按钮
self.loadbtn.hidden=yes;
//显示菊花
self.loadingview.hidden=no;
#warning 模拟发送网络请求, 3秒之后隐藏菊花
dispatch_after(dispatch_time(dispatch_time_now, (int64_t)(3.0 * nsec_per_sec)), dispatch_get_main_queue(), ^{
// 3.调用控制的加载数据方法
// [self.controller loadmore];
//通知代理
[self.delegate footerviewloadmore];
// 4.隐藏菊花视图
self.loadingview.hidden = yes;
// 5.显示按钮
self.loadbtn.hidden = no;
});
}
@end
主控制器部分
yyviewcontroller.h文件
//
// yyviewcontroller.h
// 02-团购(使用xib和类完成数据展示)
//
// created by apple on 14-5-29.
// copyright (c) 2014年 itcase. all rights reserved.
//
#import <uikit/uikit.h>
@interface yyviewcontroller : uiviewcontroller
//公开接口
//- (void)loadmore;
@end
yyviewcontroller.m文件
//
// yyviewcontroller.m
// 02-团购(使用xib和类完成数据展示)
//
// created by apple on 14-5-29.
// copyright (c) 2014年 itcase. all rights reserved.
//
#import "yyviewcontroller.h"
#import "yytgmodel.h"
#import "yytgcell.h"
#import "yyfooterview.h"
@interface yyviewcontroller ()<uitableviewdatasource,uitableviewdelegate,yyfooterviewdelegate>
@property (strong, nonatomic) iboutlet uitableview *tableview;
@property(strong,nonatomic)nsmutablearray *tg;
@end
@implementation yyviewcontroller
#pragma mark-加载数据方法
-(void)footerviewloadmore
{
//创建模型
yytgmodel *tgmodel=[[yytgmodel alloc]init];
tgmodel.title=@"菜好上桌";
tgmodel.icon=@"5ee372ff039073317a49af5442748071";
tgmodel.buycount=@"20";
tgmodel.price=@"10000";
//将模型添加到数组中
[self.tg addobject:tgmodel];
yytgmodel *tgmodelq=[[yytgmodel alloc]init];
tgmodelq.title=@"菜好上桌1";
tgmodelq.icon=@"5ee372ff039073317a49af5442748071";
tgmodelq.buycount=@"20";
tgmodelq.price=@"10000";
[self.tg addobject:tgmodelq];
//刷新表格
[self.tableview reloaddata];
}
//-(void)loadmore
//{
// //创建模型
// yytgmodel *tgmodel=[[yytgmodel alloc]init];
// tgmodel.title=@"菜好上桌";
// tgmodel.icon=@"5ee372ff039073317a49af5442748071";
// tgmodel.buycount=@"20";
// tgmodel.price=@"10000";
// //将模型添加到数组中
// [self.tg addobject:tgmodel];
//
// yytgmodel *tgmodelq=[[yytgmodel alloc]init];
// tgmodelq.title=@"菜好上桌1";
// tgmodelq.icon=@"5ee372ff039073317a49af5442748071";
// tgmodelq.buycount=@"20";
// tgmodelq.price=@"10000";
//
// [self.tg addobject:tgmodelq];
// //刷新表格
// [self.tableview reloaddata];
//}
- (void)viewdidload
{
[super viewdidload];
self.tableview.rowheight=80.f;
//加载底部视图
//从xib中获取数据
uinib *nib=[uinib nibwithnibname:@"yyfooterview" bundle:nil];
yyfooterview *footerview=[[nib instantiatewithowner:nil options:nil] firstobject];
self.tableview.tablefooterview=footerview;
//设置控制
// footerview.controller=self;
//设置代理
footerview.delegate=self;
}
#pragma mark- 懒加载
-(nsarray *)tg
{
if (_tg==nil) {
nsstring *fullpath=[[nsbundle mainbundle]pathforresource:@"tgs.plist" oftype:nil];
nsarray *temparray=[nsarray arraywithcontentsoffile:fullpath];
nsmutablearray *arraym=[nsmutablearray arraywithcapacity:temparray.count];
for (nsdictionary *dict in temparray) {
yytgmodel *tg=[yytgmodel tgwithdict:dict];
[arraym addobject:tg];
}
_tg=arraym;
}
return _tg;
}
#pragma mark- xib创建cell数据处理
#pragma mark 多少组
-(nsinteger)numberofsectionsintableview:(uitableview *)tableview
{
return 1;
}
#pragma mark多少行
-(nsinteger)tableview:(uitableview *)tableview numberofrowsinsection:(nsinteger)section
{
return self.tg.count;
}
#pragma mark设置每组每行
-(uitableviewcell *)tableview:(uitableview *)tableview cellforrowatindexpath:(nsindexpath *)indexpath
{
//1.创建cell
yytgcell *cell=[yytgcell tgcellwithtableview:tableview];
//2.获取当前行的模型,设置cell的数据
yytgmodel *tg=self.tg[indexpath.row];
cell.yytg=tg;
//3.返回cell
return cell;
}
#pragma mark- 隐藏状态栏
-(bool)prefersstatusbarhidden
{
return yes;
}
@end


