本节主要介绍图的遍历算法BFS和DFS,以及寻找图的(强)连通分量的算法
Traversal就是遍历,主要是对图的遍历,也就是遍历图中的每个节点。对一个节点的遍历有两个阶段,首先是发现(discover),然后是访问(visit)。遍历的重要性自然不必说,图中有几个算法和遍历没有关系?!
[算法导论对于发现和访问区别的非常明显,对图的算法讲解地特别好,在遍历节点的时候给节点标注它的发现节点时间d[v]和结束访问时间f[v],然后由这些时间的一些规律得到了不少实用的定理,本节后面介绍了部分内容,感兴趣不妨阅读下算法导论原书]
图的连通分量是图的一个最大子图,在这个子图中任何两个节点之间都是相互可达的(忽略边的方向)。我们本节的重点就是想想怎么找到一个图的连通分量呢?
一个很明显的想法是,我们从一个顶点出发,沿着边一直走,慢慢地扩大子图,直到子图不能再扩大了停止,我们就得到了一个连通分量对吧,我们怎么确定我们真的是找到了一个完整的连通分量呢?可以看下作者给出的解释,类似上节的Induction,我们思考从i-1到i的过程,只要我们保证增加了这个节点后子图仍然是连通的就对了。
Let'slookatthefollowingrelatedproblem.Showthatyoucanorderthenodesinaconnectedgraph,V1,V2,…Vn,sothatforanyi=1…n,thesubgraphoverV1,…,Viisconnected.Ifwecanshowthisandwecanfigureouthowtodotheordering,wecangothroughallthenodesinaconnectedcomponentandknowwhenthey'reallusedup.
Howdowedothis?Thinkinginductively,weneedtogetfromi-1toi.Weknowthatthesubgraphoverthei-1firstnodesisconnected.Whatnext?Well,becausetherearepathsbetweenanypairofnodes,consideranodeuinthefirsti-1nodesandanodevintheremainder.Onthepathfromutov,considerthelastnodethatisinthecomponentwe'vebuiltsofar,aswellasthefirstnodeoutsideit.Let'scallthemxandy.Clearlytheremustbeanedgebetweenthem,soaddingytothenodesofourgrowingcomponentkeepsitconnected,andwe'veshownwhatwesetouttoshow.
经过上面的一番思考,我们就知道了如何找连通分量:从一个顶点开始,沿着它的边找到其他的节点(或者说站在这个节点上看,看能够发现哪些节点),然后就是不断地向已有的连通分量中添加节点,使得连通分量内部依然满足连通性质。如果我们按照上面的思路一直做下去,我们就得到了一棵树,一棵遍历树,它也是我们遍历的分量的一棵生成树。在具体实现这个算法时,我们要记录“边缘节点”,也就是那些和已得到的连通分量中的节点相连的节点,它们就像是一个个待办事项(to-dolist)一样,而前面加入的节点就是标记为已完成的(checkedoff)待办事项。
这里作者举了一个很有意思的例子,一个角色扮演的游戏,如下图所示,我们可以将房间看作是节点,将房间的门看作是节点之间的边,走过的轨迹就是遍历树。这么看的话,房间就分成了三种:(1)我们已经经过的房间;(2)我们已经经过的房间附近的房间,也就是马上可以进入的房间;(3)“黑屋”,我们甚至都不知道它们是否存在,存在的话也不知道在哪里。
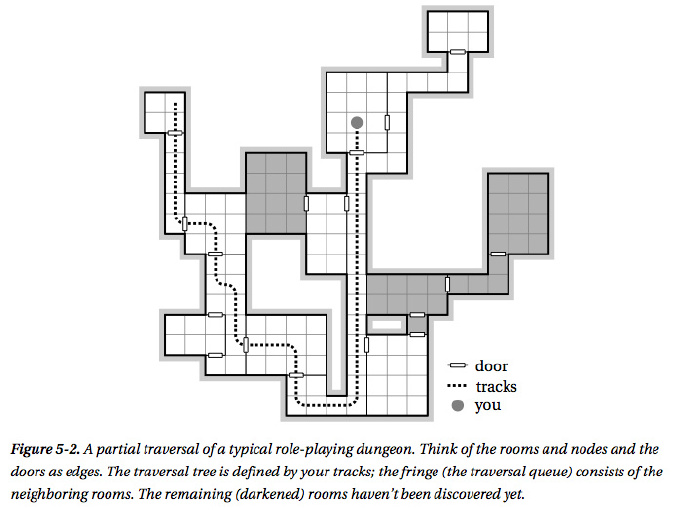
根据上面的分析可以写出下面的遍历函数walk,其中参数S暂时没有用,它在后面求强连通分量时需要,表示的是一个“禁区”(forbidden zone),也就是不要去访问这些节点。
注意下面的difference函数的使用,参数可以是多个,也就是说调用后返回的集合中的元素在各个参数中都不存在,此外,参数也不一定是set,也可以是dict或者list,只要是可迭代的(iterables)即可。可以看下python docs
|
1
2
3
4
5
6
7
8
9
10
11
|
# Walking Through a Connected Component of a Graph Represented Using Adjacency Setsdef walk(G, s, S=set()): # Walk the graph from node s P, Q = dict(), set() # Predecessors + "to do" queue P[s] = None # s has no predecessor Q.add(s) # We plan on starting with s while Q: # Still nodes to visit u = Q.pop() # Pick one, arbitrarily for v in G[u].difference(P, S): # New nodes? Q.add(v) # We plan to visit them! P[v] = u # Remember where we came from return P |
我们可以用下面代码来测试下,得到的结果没有问题
|
1
2
3
4
5
6
7
8
9
10
11
12
13
14
15
16
17
|
def some_graph(): a, b, c, d, e, f, g, h = range(8) N = [ [b, c, d, e, f], # a [c, e], # b [d], # c [e], # d [f], # e [c, g, h], # f [f, h], # g [f, g] # h ] return N G = some_graph()for i in range(len(G)): G[i] = set(G[i])print list(walk(G,0)) #[0, 1, 2, 3, 4, 5, 6, 7] |
上面的walk函数只适用于无向图,而且只能找到一个从参数s出发的连通分量,要想得到全部的连通分量需要修改下
|
1
2
3
4
5
6
7
8
9
|
def components(G): # The connected components comp = [] seen = set() # Nodes we've already seen for u in G: # Try every starting point if u in seen: continue # Seen? Ignore it C = walk(G, u) # Traverse component seen.update(C) # Add keys of C to seen comp.append(C) # Collect the components return comp |
用下面的代码来测试下,得到的结果没有问题
|
1
2
3
4
5
6
7
8
9
10
|
G = { 0: set([1, 2]), 1: set([0, 2]), 2: set([0, 1]), 3: set([4, 5]), 4: set([3, 5]), 5: set([3, 4]) } print [list(sorted(C)) for C in components(G)] #[[0, 1, 2], [3, 4, 5]] |
至此我们就完成了一个时间复杂度为Θ(E+V)的求无向图的连通分量的算法,因为每条边和每个顶点都要访问一次。[这个时间复杂度会经常看到,例如拓扑排序,强连通分量都是它]
[接下来作者作为扩展介绍了欧拉回路和哈密顿回路:前者是经过图中的所有边一次,然后回到起点;后者是经过图中的所有顶点一次,然后回到起点。网上资料甚多,感兴趣自行了解]
下面我们看下迷宫问题,如下图所示,原始问题是一个人在公园中走路,结果走不出来了,即使是按照“左手准则”(也就是但凡遇到交叉口一直向左转)走下去,如果走着走着回到了原来的起点,那么就会陷入无限的循环中!有意思的是,左边的迷宫可以通过“左手准则”转换成右边的树型结构。
[注:具体的转换方式我还未明白,下面是作者给出的构造说明]
Here the “keep one hand on the wall” strategy will work nicely. One way of seeing why it works is to observe that the maze really has only one inner wall (or, to put it another way, if you put wallpaper inside it, you could use one continuous strip). Look at the outer square. As long as you're not allowed to create cycles, any obstacles you draw have to be connected to the it in exactly one place, and this doesn't create any problems for the left-hand rule. Following this traversal strategy, you'll discover all nodes and walk every passage twice (once in either direction).
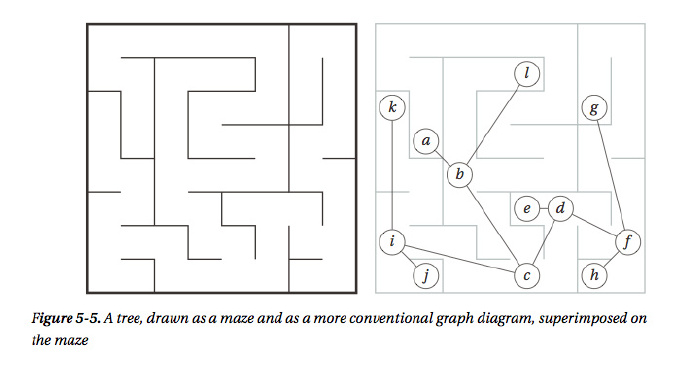
上面的迷宫实际上就是为了引出深度优先搜索(DFS),每次到了一个交叉口的时候,可能我们可以向左走,也可以向右走,选择是有不少,但是我们要向一直走下去的话就只能选择其中的一个方向,如果我们发现这个方向走不出去的话,我们就回溯回来,选择一个刚才没选过的方向继续尝试下去。
基于上面的想法可以写出下面递归版本的DFS
|
1
2
3
4
5
6
7
8
9
10
11
|
def rec_dfs(G, s, S=None): if S is None: S = set() # Initialize the history S.add(s) # We've visited s for u in G[s]: # Explore neighbors if u in S: continue # Already visited: Skip rec_dfs(G, u, S) # New: Explore recursively return S # For testing G = some_graph()for i in range(len(G)): G[i] = set(G[i])print list(rec_dfs(G, 0)) #[0, 1, 2, 3, 4, 5, 6, 7] |
很自然的我们想到要将递归版本改成迭代版本的,下面的代码中使用了Python中的yield关键字,具体的用法可以看下这里IBM Developer Works
|
1
2
3
4
5
6
7
8
9
10
11
12
13
|
def iter_dfs(G, s): S, Q = set(), [] # Visited-set and queue Q.append(s) # We plan on visiting s while Q: # Planned nodes left? u = Q.pop() # Get one if u in S: continue # Already visited? Skip it S.add(u) # We've visited it now Q.extend(G[u]) # Schedule all neighbors yield u # Report u as visited G = some_graph()for i in range(len(G)): G[i] = set(G[i])print list(iter_dfs(G, 0)) #[0, 5, 7, 6, 2, 3, 4, 1] |
上面迭代版本经过一点点的修改可以得到更加通用的遍历函数
|
1
2
3
4
5
6
7
8
9
10
|
def traverse(G, s, qtype=set): S, Q = set(), qtype() Q.add(s) while Q: u = Q.pop() if u in S: continue S.add(u) for v in G[u]: Q.add(v) yield u |
函数traverse中的参数qtype表示队列类型,例如栈stack,下面的代码给出了如何自定义一个stack,以及测试traverse函数
|
1
2
3
4
5
|
class stack(list): add = list.append G = some_graph()print list(traverse(G, 0, stack)) #[0, 5, 7, 6, 2, 3, 4, 1] |
如果还不清楚的话可以看下算法导论中的这幅DFS示例图,节点的颜色后面有介绍
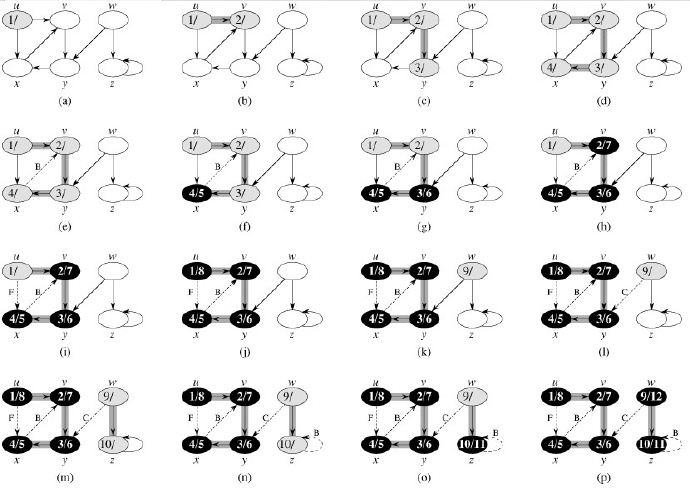
上图在DFS时给节点加上了时间戳,这有什么作用呢?
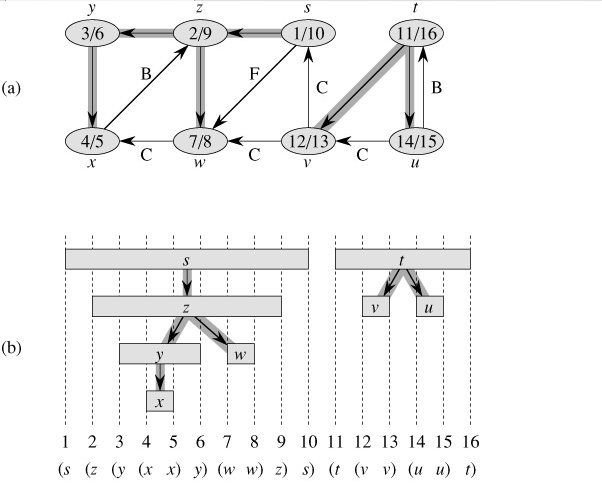
前面提到过,在遍历节点的时候如果给节点标注它的发现节点时间d[v]和结束访问时间f[v]的话,从这些时间我们就能够发现一些信息,比如下图,(a)是图的一个DFS遍历加上时间戳后的结果;(b)是如果给每个节点的d[v]到f[v]区间加上一个括号的话,可以看出在DFS遍历中(也就是后来的深度优先树/森林)中所有的节点 u 的后继节点 v 的区间都在节点 u 的区间内部,如果节点 v 不是节点 u 的后继,那么两个节点的区间不相交,这就是“括号定理”。
加上时间戳的DFS遍历还算比较好写对吧
|
1
2
3
4
5
6
7
8
9
10
|
#Depth-First Search with Timestampsdef dfs(G, s, d, f, S=None, t=0): if S is None: S = set() # Initialize the history d[s] = t; t += 1 # Set discover time S.add(s) # We've visited s for u in G[s]: # Explore neighbors if u in S: continue # Already visited. Skip t = dfs(G, u, d, f, S, t) # Recurse; update timestamp f[s] = t; t += 1 # Set finish time return t # Return timestamp |
除了给节点加上时间戳之外,算法导论在介绍DFS的时候还给节点进行着色,在节点被发现之前是白色的,在发现之后先是灰色的,在结束访问之后才是黑色的,详细的流程可以参考上面给出的算法导论中的那幅DFS示例图。有了颜色有什么用呢?作用大着呢!根据节点的颜色,我们可以对边进行分类!大致可以分为下面四种:

使用DFS对图进行遍历时,对于每条边(u,v),当该边第一次被发现时,根据到达节点 v 的颜色来对边进行分类(正向边和交叉边不做细分):
(1)白色表示该边是一条树边;
(2)灰色表示该边是一条反向边;
(3)黑色表示该边是一条正向边或者交叉边。
下图显示了上面介绍括号定理用时的那个图的深度优先树中的所有边的类型,灰色标记的边是深度优先树的树边
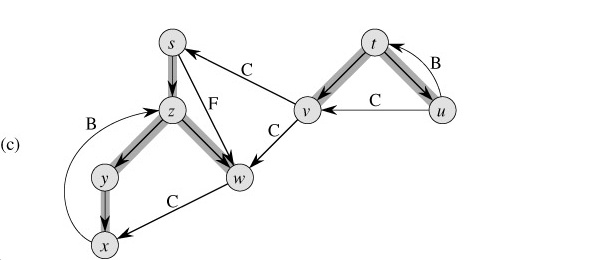
那对边进行分类有什么作用呢?作用多着呢!最常见的作用的是判断一个有向图是否存在环,如果对有向图进行DFS遍历发现了反向边,那么一定存在环,反之没有环。此外,对于无向图,如果对它进行DFS遍历,肯定不会出现正向边或者交叉边。
那对节点标注时间戳有什么用呢?其实,除了可以发现上面提到的那些很重要的性质之外,时间戳对于接下来要介绍的拓扑排序的另一种解法和强连通分量很重要!
我们先看下摘自算法导论的这幅拓扑排序示例图,这是某个教授早上起来后要做的事情,嘿嘿
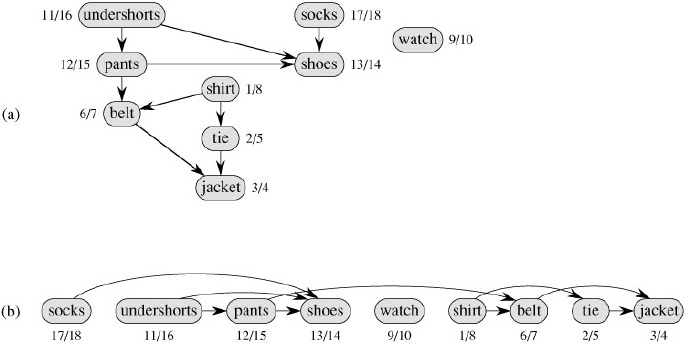
不难发现,最终得到的拓扑排序刚好是节点的完成时间f[v]降序排列的!结合前面的括号定理以及依赖关系不难理解,如果我们按照节点的f[v]降序排列,我们就得到了我们想要的拓扑排序了!这就是拓扑排序的另一个解法![在算法导论中该解法是主要介绍的解法,而我们前面提到的那个解法是在算法导论的习题中出现的]
基于上面的想法就能够得到下面的实现代码,函数recurse是一个内部函数,这样它就可以访问到G和res等变量
|
1
2
3
4
5
6
7
8
9
10
11
12
13
14
15
16
|
#Topological Sorting Based on Depth-First Searchdef dfs_topsort(G): S, res = set(), [] # History and result def recurse(u): # Traversal subroutine if u in S: return # Ignore visited nodes S.add(u) # Otherwise: Add to history for v in G[u]: recurse(v) # Recurse through neighbors res.append(u) # Finished with u: Append it for u in G: recurse(u) # Cover entire graph res.reverse() # It's all backward so far return res G = {'a': set('bf'), 'b': set('cdf'), 'c': set('d'), 'd': set('ef'), 'e': set('f'), 'f': set()}print dfs_topsort(G) |
[接下来作者介绍了一个Iterative Deepening Depth-First Search,没看懂,貌似和BFS类似]
如果我们在遍历图时“一层一层”式地遍历,先发现的节点先访问,那么我们就得到了广度优先搜索(BFS)。下面是作者给出的一个有意思的区别BFS和DFS的例子,遍历过程就像我们上网一样,DFS是顺着网页上的链接一个个点下去,当访问完了这个网页时就点击Back回退到上一个网页继续访问。而BFS是先在后台打开当前网页上的所有链接,然后按照打开的顺序一个个访问,访问完了一个网页就把它的窗口关闭。
One way of visualizing BFS and DFS is as browsing the Web. DFS is what you get if you keep following links and then use the Back button once you're done with a page. The backtracking is a bit like an “undo.” BFS is more like opening every link in a new window (or tab) behind those you already have and then closing the windows as you finish with each page.
BFS的代码很好实现,主要是使用队列
|
1
2
3
4
5
6
7
8
9
10
11
12
13
14
15
|
#Breadth-First Searchfrom collections import deque def bfs(G, s): P, Q = {s: None}, deque([s]) # Parents and FIFO queue while Q: u = Q.popleft() # Constant-time for deque for v in G[u]: if v in P: continue # Already has parent P[v] = u # Reached from u: u is parent Q.append(v) return P G = some_graph()print bfs(G, 0) |
Python的list可以很好地充当stack,但是充当queue则性能很差,函数bfs中使用的是collections模块中的deque,即双端队列(double-ended queue),它一般是使用链表来实现的,这个类有extend、append和pop等方法都是作用于队列右端的,而方法extendleft、appendleft和popleft等方法都是作用于队列左端的,它的内部实现是非常高效的。
Internally, the deque is implemented as a doubly linked list of blocks, each of which is an array of individual elements. Although asymptotically equivalent to using a linked list of individual elements, this reduces overhead and makes it more efficient in practice. For example, the expression d[k] would require traversing the first k elements of the deque d if it were a plain list. If each block contains b elements, you would only have to traverse k//b blocks.
最后我们看下强连通分量,前面的分量是不考虑边的方向的,如果我们考虑边的方向,而且得到的最大子图中,任何两个节点都能够沿着边可达,那么这就是一个强连通分量。
下图是算法导论中的示例图,(a)是对图进行DFS遍历带时间戳的结果;(b)是上图的的转置,也就是将上图中所有边的指向反转过来得到的图;(c)是最终得到的强连通分支图,每个节点内部显示了该分支内的节点。

上面的示例图自然不太好明白到底怎么得到的,我们慢慢来分析三幅图 [原书的分析太多了,我被绕晕了+_+,下面是我结合算法导论的分析过程]
先看图(a),每个灰色区域都是一个强连通分支,我们想想,如果强连通分支 X 内部有一条边指向另一个强连通分支 Y,那么强连通分支 Y 内部肯定不存在一条边指向另一个强连通分支 Y,否则它们能够整合在一起形成一个新的更大气的强连通分支!这也就是说强连通分支图肯定是一个有向无环图!我们从图(c)也可以看出来
再看看图(c),强连通分支之间的指向,如果我们定义每个分支内的任何顶点的最晚的完成时间为对应分支的完成时间的话,那么分支abe的完成时间是16,分支cd是10,分支fg是7,分支h是6,不难发现,分支之间边的指向都是从完成时间大的指向完成时间小的,换句话说,总是由完成时间晚的强连通分支指向完成时间早的强连通分支!
最后再看看图(b),该图是原图的转置,但是得到强连通分支是一样的(强连通分支图是会变的,刚好又是原来分支图的转置),那为什么要将边反转呢?结合前面两个图的分析,既然强连通分支图是有向无环图,而且总是由完成时间晚的强连通分支指向完成时间早的强连通分支,如果我们将边反转,虽然我们得到的强连通分支不变,但是分支之间的指向变了,完成时间晚的就不再指向完成时间早的了!这样的话如果我们对它进行拓扑排序,即按照完成时间的降序再次进行DFS时,我们就能够得到一个个的强连通分支了对不对?因为每次得到的强连通分支都没有办法指向其他分支了,也就是确定了一个强连通分支之后就停止了。[试试画个图得到图(b)的强连通分支图的拓扑排序结果就明白了]
经过上面略微复杂的分析之后我们知道强连通分支算法的流程有下面四步:
1.对原图G运行DFS,得到每个节点的完成时间f[v];
2.得到原图的转置图GT;
3.对GT运行DFS,主循环按照节点的f[v]降序进行访问;
4.输出深度优先森林中的每棵树,也就是一个强连通分支。
根据上面的思路可以得到下面的强连通分支算法实现,其中的函数parse_graph是作者用来方便构造图的函数
|
1
2
3
4
5
6
7
8
9
10
11
12
13
14
15
16
17
18
19
20
21
22
23
24
25
26
27
28
29
30
|
def tr(G): # Transpose (rev. edges of) G GT = {} for u in G: GT[u] = set() # Get all the nodes in there for u in G: for v in G[u]: GT[v].add(u) # Add all reverse edges return GT def scc(G): GT = tr(G) # Get the transposed graph sccs, seen = [], set() for u in dfs_topsort(G): # DFS starting points if u in seen: continue # Ignore covered nodes C = walk(GT, u, seen) # Don't go "backward" (seen) seen.update(C) # We've now seen C sccs.append(C) # Another SCC found return sccs from string import ascii_lowercasedef parse_graph(s): # print zip(ascii_lowercase, s.split("/")) # [('a', 'bc'), ('b', 'die'), ('c', 'd'), ('d', 'ah'), ('e', 'f'), ('f', 'g'), ('g', 'eh'), ('h', 'i'), ('i', 'h')] G = {} for u, line in zip(ascii_lowercase, s.split("/")): G[u] = set(line) return G G = parse_graph('bc/die/d/ah/f/g/eh/i/h')print list(map(list, scc(G)))#[['a', 'c', 'b', 'd'], ['e', 'g', 'f'], ['i', 'h']] |
[最后作者提到了一点如何进行更加高效的搜索,也就是通过分支限界来实现对搜索树的剪枝,具体使用可以看下这个问题顶点覆盖问题Vertext Cover Problem]
问题5.17 强连通分支
In Kosaraju's algorithm, we find starting nodes for the final traversal by descending finish times from an initial DFS, and we perform the traversal in the transposed graph (that is, with all edges reversed). Why couldn't we just use ascending finish times in the original graph?
问题就是说,我们干嘛要对转置图按照完成时间降序遍历一次呢?干嘛不直接在原图上按照完成时间升序遍历一次呢?
Try finding a simple example where this would give the wrong answer. (You can do it with a really small graph.)
总结
以上就是本文关于Python算法之图的遍历的全部内容,希望对大家有所帮助。如有不足之处,欢迎留言指出。
原文链接:http://python.jobbole.com/81457/


