之前装过一次 ELK 7.7,相比之下装 8.7可方便太多了~
CentOS版本
CentOS-8.5.2111-x86_64-dvd1
JAVA
ELK会自己使用内置版本的JDK
ElasticSearch
8.7.0 下载页面 Download Elasticsearch | Elastic
Kinbana
8.7.0 下载地址 Download Kibana Free | Get Started Now | Elastic
Logstash
8.7.0 下载地址 Download Logstash Free | Get Started Now | Elastic
安装ElasticSearch8
加入资源
rpm --import https://artifacts.elastic.co/GPG-KEY-elasticsearch
在/etc/yum.repos.d/位置创建文件elasticsearch.repo
cd /etc/yum.repos.d/

vim elasticsearch.repo
输入如下内容:
[elasticsearch]
name=Elasticsearch repository for 8.x packages
baseurl=https://artifacts.elastic.co/packages/8.x/yum
gpgcheck=1
gpgkey=https://artifacts.elastic.co/GPG-KEY-elasticsearch
enabled=0
autorefresh=1
type=rpm-md
将镜像从 mirror.centos.org 更改为 vault.centos.org (yum可用,则跳过)
进入到 yum 的 repos 目录
cd /etc/yum.repos.d/
修改 centos 文件内容
sed -i 's/mirrorlist/#mirrorlist/g' /etc/yum.repos.d/CentOS-*
sed -i 's|#baseurl=http://mirror.centos.org|baseurl=http://vault.centos.org|g' /etc/yum.repos.d/CentOS-*
生成缓存更新
yum makecache
运行 yum update,并且重新安装 vim
yum update -y
yum -y install vim
执行 yum 命令完成 es 安装
yum install --enablerepo=elasticsearch elasticsearch
安装完记得保存如下信息,便于后续使用
Authentication and authorization are enabled.
TLS for the transport and HTTP layers is enabled and configured.

The generated password for the elastic built-in superuser is : xxxxxxxxx

If this node should join an existing cluster, you can reconfigure this with
'/usr/share/elasticsearch/bin/elasticsearch-reconfigure-node --enrollment-token <token-here>'
after creating an enrollment token on your existing cluster.

You can complete the following actions at any time:

Reset the password of the elastic built-in superuser with
'/usr/share/elasticsearch/bin/elasticsearch-reset-password -u elastic'.

Generate an enrollment token for Kibana instances with
 '/usr/share/elasticsearch/bin/elasticsearch-create-enrollment-token -s kibana'.

Generate an enrollment token for Elasticsearch nodes with
'/usr/share/elasticsearch/bin/elasticsearch-create-enrollment-token -s node'.
添加用户和用户组 es 并未用户组提供文件夹权限
groupadd es
useradd es -g es -p password

chown es:es -R /usr/share/elasticsearch
chown es:es -R /etc/elasticsearch
chown es:es -R /var/lib/elasticsearch
chown es:es -R /var/log/elasticsearch
chown es:es -R /var/
chmod 777 /etc/elasticsearch
chmod 777 /usr/share/elasticsearch/
chmod 777 /etc/sysconfig/elasticsearch
编辑 elasticsearch.yml 配置文件
 cd /etc/elasticsearch
 vim elasticsearch.yml
配置如下:
network.host: 0.0.0.0
http.port: 9200
xpack.security.enabled: false
使用 es 账号启动 ElasticSearch
cd /usr/share/elasticsearch/bin/
su es
bin/elasticsearch -d
关闭防火墙或者开放9200端口,即可通过 IP:9200 访问
# 查看防火墙状态
systemctl status firewalld.service

# 关闭防火墙
systemctl stop firewalld.service
如果遇到安全提示则选择继续访问,并输入用户名密码这个用到的用户名密码是安装Es后我们保存的那个哦

安装 Kibana
在 /etc/yum.repos.d/ 位置创建文件 kibana.repo
cd /etc/yum.repos.d/

vim kibana.repo
输入如下内容
[kibana-8.x]
name=Kibana repository for 8.x packages
baseurl=https://artifacts.elastic.co/packages/8.x/yum
gpgcheck=1
gpgkey=https://artifacts.elastic.co/GPG-KEY-elasticsearch
enabled=1
autorefresh=1
type=rpm-md
执行yum命令完成安装
yum install kibana
修改 kibana 配置文件
vim /etc/kibana/kibana.yml
增加如下内容:
server.host: "0.0.0.0"
server.post: 5601
以root后台启动服务
nohup /usr/share/kibana/bin/kibana --allow-root &
在ES安装目录 执行如下代码获取 token (本文 8.7 版本不需要)
/usr/share/elasticsearch/bin/elasticsearch-create-enrollment-token -s kibana
关闭防火墙或者开启5601端口,并使用浏览器访问 IP:5601
安装 Logstash
在 /etc/yum.repos.d/ 位置创建文件 logstash.repo
cd /etc/yum.repos.d/
vim logstash.repo
输入如下内容:
[logstash-8.x]
name=Elastic repository for 8.x packages
baseurl=https://artifacts.elastic.co/packages/8.x/yum
gpgcheck=1
gpgkey=https://artifacts.elastic.co/GPG-KEY-elasticsearch
enabled=1
autorefresh=1
type=rpm-md
执行yum命令完成安装
yum install logstash
安装完成后的启动目录
/usr/share/logstash/bin/logstash
在 /etc/logstash/ 目录下创建 logstash.conf 配置文件
cd /etc/logstash/
vim logstash.conf
输入如下内容,以搜集 Nginx 的日志
#---------------------------------------------------------------- nginx-----------------------------------------------------------------------
input {
   file {
        type => "nginx-error-log"
        path => "/usr/local/nginx/logs/error.log"
    }
    file {
        type => "nginx-access-log"
        path => "/usr/local/nginx/logs/access.log"
        codec => json
    }
}

filter {
    if [type] =~ "nginx-error-log"
    {
        grok {
            match => {
                "message" => "(?<datetime>\d{4}/\d{2}/\d{2} \d{2}:\d{2}:\d{2}) \[(?<errtype>\w+)\] \S+: \*\d+ (?<errmsg>[^,]+), (?<errinfo>.*$)"
            }
        }

        mutate {
            rename => {
                "message" => "z_message"
                "host" => "fromhost"
            }
        }
    } else if [type] =~ "nginx-access-log"  {
        mutate {
            split => {"upstremtime" => ","}
        }
        mutate {
            convert => { "upstremtime" => "float"}
        }
    }

    if [errinfo]
    {
            ruby {
                code => "
                        new_event = LogStash::Event.new(Hash[event.get('errinfo').split(', ').map{ |l| l.split(': ')  }])
                        new_event.remove('@timestamp')
                        event.append(new_event)
                "
            }

            grok {
                match => {
                    "request" => '"%{WORD:verb} %{URIPATHPARAM:urlpathparam}?(?: HTTP/%{NUMBER:httpversion})"'
                }
                patterns_dir => ["/home/data/logstash/patterns/"]
                remove_field => [ "errinfo","request" ]
            }
     }
}

output {
    #elasticsearch { host => localhost }
    stdout { codec => rubydebug }
    if [type] =~ "nginx-error-log" {
        elasticsearch {
            hosts => ["http://ES的域名或者IP地址"]
            index => "logstash-nginx-error-log-%{+YYYY.MM.dd}"
            document_type => "data"
            user => "es用户名"
            password => "es密码"
        }
    }else if [type] =~ "nginx-access-log"  {
          elasticsearch {
            hosts => ["http://ES的域名或者IP地址"]
            index => "logstash-nginx-access-log-%{+YYYY.MM.dd}"
            document_type => "data"
            user => "es用户名"
            password => "es密码"
        }
    }
}
指定配置文件,启动 logstash
/usr/share/logstash/bin/logstash -f /etc/logstash/logstash.conf
格式化 Nginx 日志
进入 nginx 配置文件(以各自的文件目录、文件名为准)
cd /usr/local/nginx/conf/
vim nginx.conf
在 http 里输入如下内容:
    log_format main '{"@timestamp":"$time_iso8601",'
        '"host":"$server_addr",'
        ' "clientip" : "$remote_addr",'
        ' "size" : "$body_bytes_sent" ,'
        '"respnsetime":"$request_time",'
        '"upstremtime":"$upstream_response_time",'
        '"upstremhost":"$upstream_addr",'
        '"httphost":"$host",'
        '"referer":"$http_referer",'
        '"xff":"$http_x_forwarded_for",'
        '"agent":"$http_user_agent",'
        '"clientip":"$remote_addr",'
        '"request":"$request",'
        '"uri":"$uri",'
        '"status":"$status"}';

    access_log /usr/local/nginx/logs/access.log main;
    error_log /usr/local/nginx/logs/error.log error;
重新加载 Nginx
/usr/local/nginx/sbin/nginx -s reload
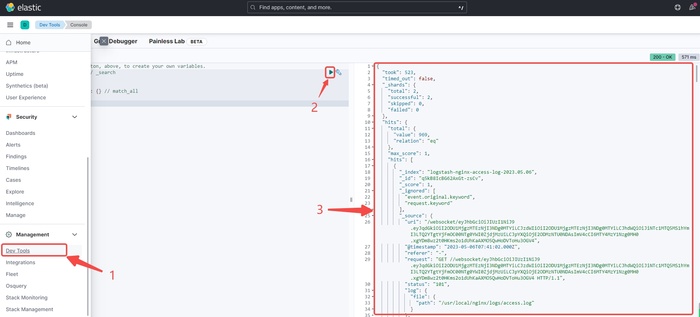
进入 kibana,就能看到推过来的 Nginx 的日志

告辞~


