
一.前面的话
说实话,腾讯云物联网平台一直是我比较喜欢的物联网云太平,除了有腾讯大厂作为品质背书之外,提供的sdk也是相当好用,更有腾讯连连小程序可以帮助做界面,调试功能,后端的API有java,c++,Golang,js,python等等语言版本,非常方便,简直是上云首选.
二.首先下载sdk
我们首先来找官方sdk,茫茫文档中给我看到了那熟悉的身影:
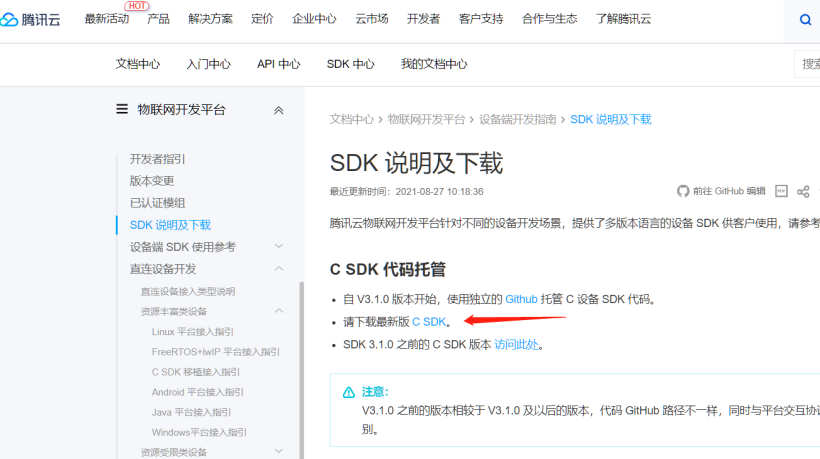
文档地址在这,拿走不谢:
https://cloud.tencent.com/document/product/1081/48356
把sdk下载之后,熟练的放进thirdparty文件夹,
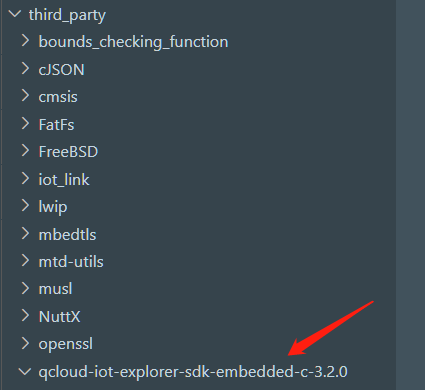
不得不提一下,2.x版本的OpenHarmony比1.x版本的代码结构清晰多了.
1.实现几个重要接口
这个时候依然要看文档,因为有些函数需要自己实现,具体是哪些呢,在这里:
https://cloud.tencent.com/document/product/1081/48389
这篇文档写了,我们要实现里面的这些接口,此处列举一二:
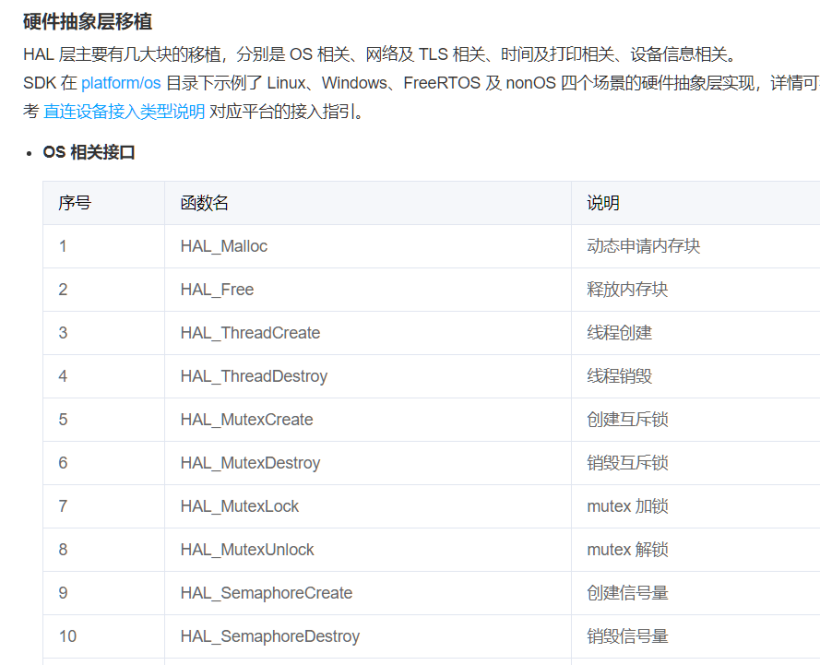
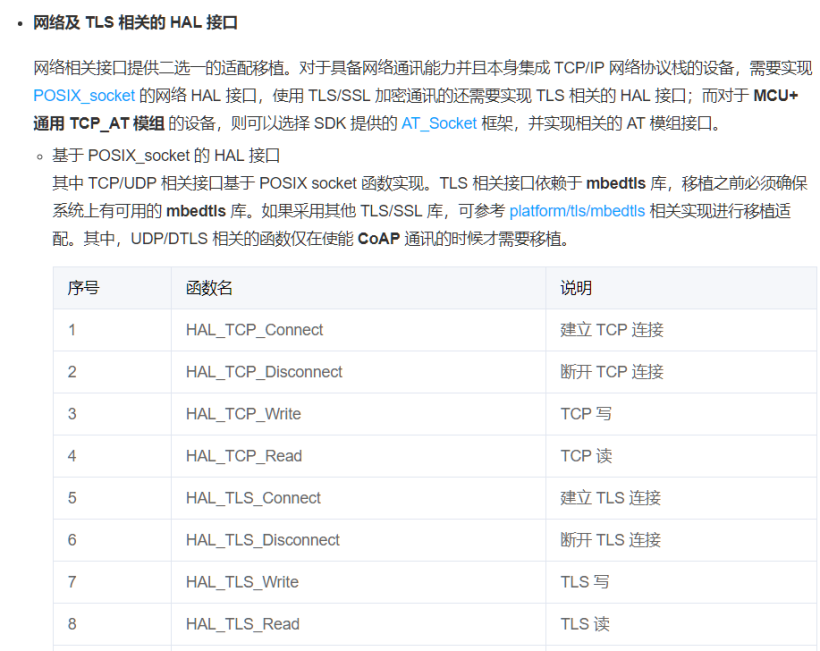
仔细一看,霍,好家伙还不少呢,但是不怕,都是打工人,谁怕谁啊,二话不说我就写,结果就给我给写出来了:
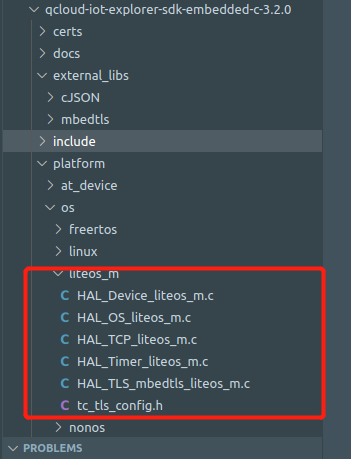
写出来这些后就可以准备编译了吗?
nonono,我们还没做BUILD.gn文件呢,话不多说,直接教你写。
- # Copyright (c) 2020 Huawei Device Co., Ltd.
- # Licensed under the Apache License, Version 2.0 (the "License");
- # you may not use this file except in compliance with the License.
- # You may obtain a copy of the License at
- #
- # http://www.apache.org/licenses/LICENSE-2.0
- #
- # Unless required by applicable law or agreed to in writing, software
- # distributed under the License is distributed on an "AS IS" BASIS,
- # WITHOUT WARRANTIES OR CONDITIONS OF ANY KIND, either express or implied.
- # See the License for the specific language governing permissions and
- # limitations under the License.
- import("//build/lite/config/component/lite_component.gni")
- import("//build/lite/ndk/ndk.gni")
- config("qcloud_sdk_config") {
- include_dirs = [
- "sdk_src/internal_inc",
- "sdk_src/library",
- "include",
- "include/exports",
- "//kernel/liteos_m/kernel/include",
- # "//third_party/cmsis",
- "//third_party/mbedtls/include",
- "//third_party/mbedtls/include/mbedtls",
- ]
- }
- cflags = [ "-Wno-unused-variable" ]
- cflags += [ "-Wno-unused-but-set-variable" ]
- cflags += [ "-Wno-unused-parameter" ]
- cflags += [ "-Wno-sign-compare" ]
- cflags += [ "-Wno-unused-function" ]
- cflags += [ "-Wno-return-type" ]
- qcloud_sdk_sources = [
- "sdk_src/network/socket/network_socket.c",
- "sdk_src/network/tls/network_tls.c",
- "sdk_src/network/network_interface.c",
- "sdk_src/utils/utils_list.c",
- "sdk_src/utils/utils_base64.c",
- "sdk_src/utils/qcloud_iot_ca.c",
- "sdk_src/utils/utils_aes.c",
- "sdk_src/utils/utils_getopt.c",
- "sdk_src/utils/utils_hmac.c",
- "sdk_src/utils/utils_md5.c",
- "sdk_src/utils/utils_sha1.c",
- "sdk_src/utils/json_parser.c",
- "sdk_src/utils/json_token.c",
- "sdk_src/utils/string_utils.c",
- "sdk_src/utils/utils_ringbuff.c",
- "sdk_src/utils/qcloud_iot_log.c",
- "sdk_src/utils/qcloud_iot_device.c",
- "sdk_src/utils/utils_timer.c",
- "sdk_src/protocol/mqtt/mqtt_client_common.c",
- "sdk_src/protocol/mqtt/mqtt_client_connect.c",
- "sdk_src/protocol/mqtt/mqtt_client_net.c",
- "sdk_src/protocol/mqtt/mqtt_client_publish.c",
- "sdk_src/protocol/mqtt/mqtt_client_subscribe.c",
- "sdk_src/protocol/mqtt/mqtt_client_unsubscribe.c",
- "sdk_src/protocol/mqtt/mqtt_client_yield.c",
- "sdk_src/protocol/mqtt/mqtt_client.c",
- "sdk_src/services/data_template/data_template_action.c",
- "sdk_src/services/data_template/data_template_client.c",
- "sdk_src/services/data_template/data_template_client_common.c",
- "sdk_src/services/data_template/data_template_client_json.c",
- "sdk_src/services/data_template/data_template_client_manager.c",
- "sdk_src/services/data_template/data_template_event.c",
- "platform/os/liteos_m/HAL_Device_liteos_m.c",
- "platform/os/liteos_m/HAL_OS_liteos_m.c",
- "platform/os/liteos_m/HAL_TCP_liteos_m.c",
- "platform/os/liteos_m/HAL_Timer_liteos_m.c",
- # "./os/liteos_m/HAL_TLS_mbedtls_liteos_m.c",
- # "./tls/mbedtls/HAL_DTLS_mbedtls.c",
- "platform/tls/mbedtls/HAL_TLS_mbedtls.c",
- ]
- lite_library("qcloud_sdk_static") {
- target_type = "static_library"
- sources = qcloud_sdk_sources
- public_configs = [ ":qcloud_sdk_config" ]
- }
- lite_library("qcloud_sdk_shared") {
- target_type = "shared_library"
- sources = qcloud_sdk_sources
- public_configs = [ ":qcloud_sdk_config" ]
- }
- ndk_lib("qcloud_ndk") {
- if (board_name != "hi3861v100") {
- lib_extension = ".so"
- deps = [
- ":qcloud_sdk_shared"
- ]
- } else {
- deps = [
- ":qcloud_sdk_static"
- ]
- }
- head_files = [
- "//third_party/iot_link/network/mqtt/paho_mqtt/paho"
- ]
- }
整完之后就可以尝试一下有没有错误了.
2.在main里面写逻辑,处理事情
我们把官方sdk里面的点灯demo拿过来,直接新建一个demo文件夹,把文件放进去:
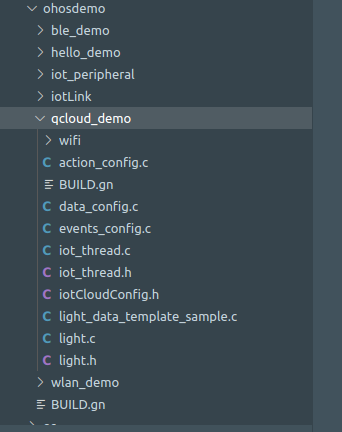
自己写好BUILD.gn,跟之前华为云对接一个套路,大家这么聪明,不用我多说了:
- # Copyright (c) 2020 Nanjing Xiaoxiongpai Intelligent Technology Co., Ltd.
- # Licensed under the Apache License, Version 2.0 (the "License");
- # you may not use this file except in compliance with the License.
- # You may obtain a copy of the License at
- #
- # http://www.apache.org/licenses/LICENSE-2.0
- #
- # Unless required by applicable law or agreed to in writing, software
- # distributed under the License is distributed on an "AS IS" BASIS,
- # WITHOUT WARRANTIES OR CONDITIONS OF ANY KIND, either express or implied.
- # See the License for the specific language governing permissions and
- # limitations under the License.
- static_library("qcloud_demo") {
- sources = [
- # "iot_thread.c",
- "light.c",
- "light_data_template_sample.c"
- ]
- cflags = [ "-Wno-unused-variable" ]
- cflags += [ "-Wno-unused-but-set-variable" ]
- include_dirs = [
- ".",
- "//foundation/communication/softbus_lite/os_adapter/include",
- "//utils/native/lite/include",
- "//kernel/liteos_m/components/cmsis/2.0",
- "//base/iot_hardware/peripheral/interfaces/kits",
- "//third_party"
- ]
- deps = [
- "//third_party/qcloud-iot-explorer-sdk-embedded-c-3.2.0:qcloud_sdk_static",
- # "//third_party/qcloud-iot-explorer-sdk-embedded-c-3.2.0/external_libs/mbedtls:mbedtls_static",
- ]
- }
然后在sample里面的sdk把这个文件夹开启编译:
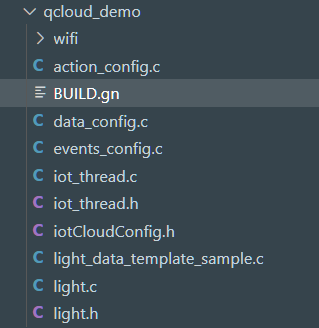
这样就完成了代码的编写了,很快乐有木有。
三.在云平台上创建设备
其实创建设备的过程官方文档也的确挺详细的,几乎不用再另外加工,这里给出官方的智能灯接入指南:
https://cloud.tencent.com/document/product/1081/41155
官方定义了许多的物模型,其实我们的产品可能是官方物模型没有定义的,此时我们就需要自己定义产品的属性,事件和动作等,这块自己仔细阅读官方文档就能搞懂
https://cloud.tencent.com/document/product/1081/34916
搞定了物模型,创建一个设备,记录下设备的产品id,设备id和连接秘钥
这点跟华为云平台不太一样,腾讯云的产品秘钥是平台生成的,而华为云平台是你自己定义好设备的秘钥,在创建设备的时候传上去
四.编译,运行
编译的过程倒是很顺利,这里就不过多废话了.
不过在运行的时候出现一个情况,就是mutex不够用了
自己折腾了一晚上也没找不解决办法,后面经过请教猴哥才搞明白:

阿不对,下面这个候哥才对,大家可以去他主页关注一下:
https://harmonyos.51cto.com/user/posts/13519852
候哥真大神也,短短一两句话就帮我搞定了,在此特别感谢侯哥的帮助:
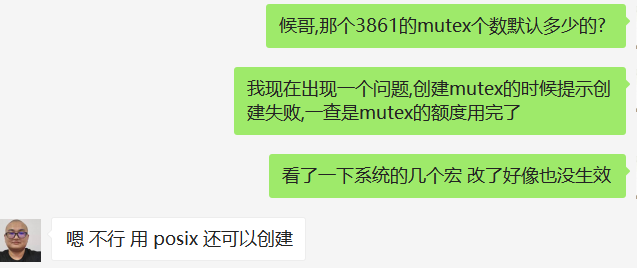
然后我就把我的mutex相关代码改成posix接口,这是修改之前的:
- void *HAL_MutexCreate(void)
- {
- osMutexAttr_t attr;
- osMutexId_t mutex;
- char mutexName[RT_NAME_MAX];
- static uint32_t mutex_v;
- attr.name = mutexName;
- attr.cb_mem = &mutex_v;
- attr.cb_size = 4;
- mutex = osMutexNew(&attr);
- if (NULL == mutex) {
- HAL_Printf("create mutex failed");
- }
- return mutex;
- }
- void HAL_MutexDestroy(_IN_ void *mutex)
- {
- int err_num;
- err_num = osMutexDelete((osMutexId_t)mutex);
- if (0 != err_num) {
- HAL_Printf("destroy mutex failed");
- }
- }
- void HAL_MutexLock(_IN_ void *mutex)
- {
- int err_num;
- err_num = osMutexAcquire((osMutexId_t)mutex, osWaitForever);
- if (0 != err_num) {
- HAL_Printf("lock mutex failed");
- }
- }
- void HAL_MutexUnlock(_IN_ void *mutex)
- {
- int err_num;
- err_num = osMutexRelease((osMutexId_t)mutex);
- if (0 != err_num) {
- HAL_Printf("unlock mutex failed");
- }
- }
- int HAL_MutexTryLock(_IN_ void *mutex)
- {
- int err_num;
- err_num = osMutexAcquire((osMutexId_t)mutex, osNoWait);
- if (0 != err_num) {
- HAL_Printf("trylock mutex failed");
- }
- return err_num;
- }
改完之后是这样:
- void *HAL_MutexCreate(void)
- {
- // osMutexAttr_t attr;
- // osMutexId_t mutex;
- char mutexName[RT_NAME_MAX];
- static uint32_t mutex_v;
- pthread_mutex_t * mutex = HAL_Malloc(sizeof(pthread_mutex_t));
- pthread_mutexattr_t attr;
- int ret = pthread_mutex_init(mutex, &attr); // osMutexNew(&attr);
- // if (NULL == mutex) {
- if (ret != 0) {
- HAL_Printf("create mutex failed ");
- }
- return mutex;
- }
- void HAL_MutexDestroy(_IN_ void *mutex)
- {
- int err_num;
- err_num = pthread_mutex_destroy(mutex);
- if (0 != err_num) {
- HAL_Printf("destroy mutex failed");
- }
- }
- void HAL_MutexLock(_IN_ void *mutex)
- {
- int err_num;
- err_num = pthread_mutex_lock(mutex);
- if (0 != err_num) {
- HAL_Printf("lock mutex failed");
- }
- }
- void HAL_MutexUnlock(_IN_ void *mutex)
- {
- int err_num;
- err_num = pthread_mutex_unlock(mutex);
- if (0 != err_num) {
- HAL_Printf("unlock mutex failed");
- }
- }
- int HAL_MutexTryLock(_IN_ void *mutex)
- {
- int err_num;
- struct timespec absTimeout={0,0};
- err_num = pthread_mutex_timedlock(mutex, &absTimeout);
- if (0 != err_num) {
- HAL_Printf("trylock mutex failed");
- }
- return err_num;
- }
使用的时候记得加上头文件: #include
处理完这个异常情况,接下来就很顺利的登录腾讯云平台收发数据了
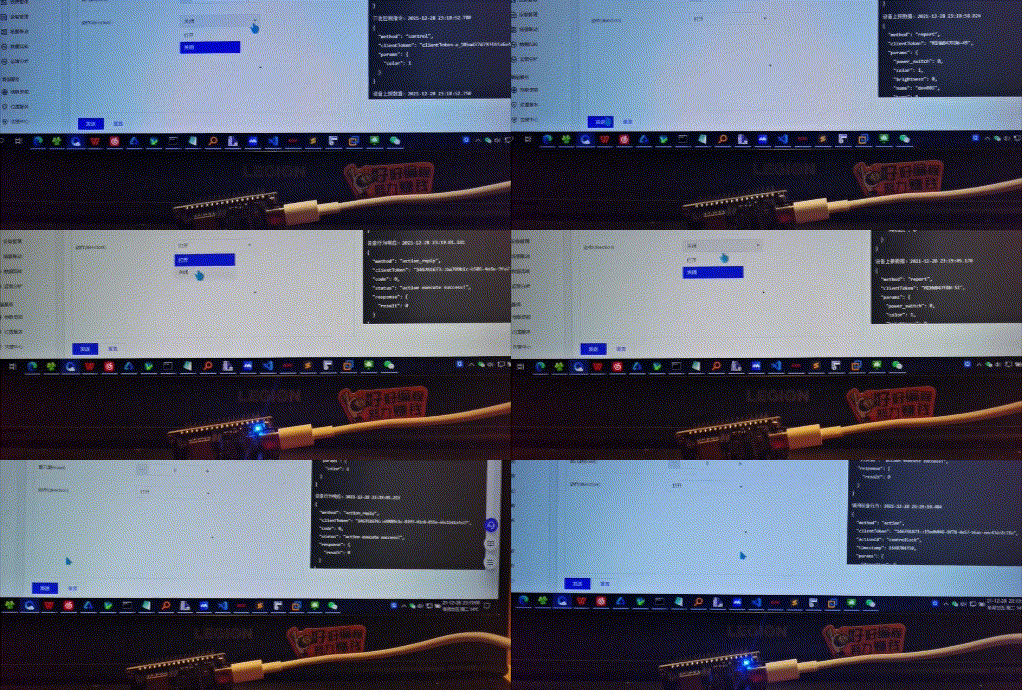
五.云平台控制展示
直接查看动图,控制还是很及时的:
六.总结
其实对接腾讯云还是蛮简单的,最新版的sdk在打印上也比以前好多了.OpenHarmony的2.x版本优化了不少东西,记得去年这时候用1.x版本对接的时候还是很费劲的,给OpenHarmony团队点赞,也给腾讯云团队点赞
大家赶紧玩起来吧
原文链接:https://harmonyos.51cto.com


