现在面试,基本上都是面试造火箭,工作拧螺丝。而且是喜欢问一些 spring 相关的知识点,比如 @autowired 和 @resource 之间的区别。魔高一丈,道高一尺。很快不少程序员学会了背诵面试题,那我反过来问“spring 中的注解 @autowired是如何实现的?”,“说说 @autowired 的实现原理?”等等,背诵面试题的就露馅了。基于此,今天我们来说一说 @autowired 背后的故事!
前言
使用 spring 开发时,进行配置主要有两种方式,一是 xml 的方式,二是 java config 的方式。spring 技术自身也在不断的发展和改变,从当前 springboot 的火热程度来看,java config 的应用是越来越广泛了,在使用 java config 的过程当中,我们不可避免的会有各种各样的注解打交道,其中,我们使用最多的注解应该就是 @autowired 注解了。这个注解的功能就是为我们注入一个定义好的 bean。那么,这个注解除了我们常用的属性注入方式之外还有哪些使用方式呢?它在代码层面又是怎么实现的呢?这是本篇文章着重想讨论的问题。
@autowired 注解用法
在分析这个注解的实现原理之前,我们不妨先来回顾一下 @autowired 注解的用法。
将 @autowired 注解应用于构造函数,如以下示例所示
|
1
2
3
4
5
6
7
8
|
`public class movierecommender {` `private final customerpreferencedao customerpreferencedao;` `@autowired` `public movierecommender(customerpreferencedao customerpreferencedao) {` `this.customerpreferencedao = customerpreferencedao;` `}` `// ...``}` |
将 @autowired 注释应用于 setter 方法
|
1
2
3
4
5
6
7
8
|
`public class simplemovielister {` `private moviefinder moviefinder;` `@autowired` `public void setmoviefinder(moviefinder moviefinder) {` `this.moviefinder = moviefinder;` `}` `// ...``}` |
将 @autowired 注释应用于具有任意名称和多个参数的方法
|
1
2
3
4
5
6
7
8
9
10
11
|
`public class movierecommender {` `private moviecatalog moviecatalog;` `private customerpreferencedao customerpreferencedao;` `@autowired` `public void prepare(moviecatalog moviecatalog,` `customerpreferencedao customerpreferencedao) {` `this.moviecatalog = moviecatalog;` `this.customerpreferencedao = customerpreferencedao;` `}` `// ...``}` |
您也可以将 @autowired 应用于字段,或者将其与构造函数混合,如以下示例所示
|
1
2
3
4
5
6
7
8
9
10
|
`public class movierecommender {` `private final customerpreferencedao customerpreferencedao;` `@autowired` `private moviecatalog moviecatalog;` `@autowired` `public movierecommender(customerpreferencedao customerpreferencedao) {` `this.customerpreferencedao = customerpreferencedao;` `}` `// ...``}` |
直接应用于字段是我们使用的最多的一种方式,但是使用构造方法注入从代码层面却是更加好的,具体原因我就不细说了,有不懂的可以留言区评论。除此之外,还有以下不太常见的几种方式。
将 @autowired 注释添加到需要该类型数组的字段或方法,则 spring 会从applicationcontext 中搜寻符合指定类型的所有 bean,如以下示例所示:
|
1
2
3
4
5
|
`public class movierecommender {` `@autowired` `private moviecatalog[] moviecatalogs;` `// ...``}` |
数组可以,我们可以马上举一反三,那容器也可以吗,答案是肯定的,下面是 set 以及 map 的例子:
|
1
2
3
4
5
6
7
8
9
10
11
12
13
|
`public class movierecommender {` `private set<moviecatalog> moviecatalogs;` `private map<string, moviecatalog> moviecatalogs;` `@autowired` `public void setmoviecatalogs(set<moviecatalog> moviecatalogs) {` `this.moviecatalogs = moviecatalogs;` `}` `@autowired` `public void setmoviecatalogs(map<string, moviecatalog> moviecatalogs) {` `this.moviecatalogs = moviecatalogs;` `}` `// ...``}` |
以上就是 @autowired 注解的主要使用方式,经常使用 spring 的话应该对其中常用的几种不会感到陌生。
@autowired 注解的作用到底是什么
@autowired 这个注解我们经常在使用,现在,我想问的是,它的作用到底是什么呢?
首先,我们从所属范围来看,事实上这个注解是属于 spring 的容器配置的一个注解,与它同属容器配置的注解还有:@required, @primary, @qualifier 等等。因此 @autowired 注解是一个用于容器(container)配置的注解。
其次,我们可以直接从字面意思来看,@autowired 注解来源于英文单词 autowire,这个单词的意思是自动装配的意思。自动装配又是什么意思?这个词语本来的意思是指的一些工业上的用机器代替人口,自动将一些需要完成的组装任务,或者别的一些任务完成。而在 spring 的世界当中,自动装配指的就是使用将 spring 容器中的 bean 自动的和我们需要这个 bean 的类组装在一起。
因此,笔者个人对这个注解的作用下的定义就是:将 spring 容器中的 bean 自动的和我们需要这个 bean 的类组装在一起协同使用。
接下来,我们就来看一下这个注解背后到底做了些什么工作。
@autowired 注解是如何实现的
事实上,要回答这个问题必须先弄明白的是 java 是如何支持注解这样一个功能的。
java 的注解实现的核心技术是反射,让我们通过一些例子以及自己实现一个注解来理解它工作的原理。
例子注解 @override
@override 注解的定义如下:
|
1
2
3
4
|
`@target(elementtype.method)``@retention(retentionpolicy.source)``public @interface override {``}` |
@override 注解使用 java 官方提供的注解,它的定义里面并没有任何的实现逻辑。注意,所有的注解几乎都是这样的,「注解只能是被看作元数据,它不包含任何业务逻辑」。「注解更像是一个标签,一个声明,表面被注释的这个地方,将具有某种特定的逻辑」。
那么,问题接踵而至,注解本身不包含任何逻辑,那么注解的功能是如何实现的呢?答案必然是别的某个地方对这个注解做了实现。以 @override 注解为例,他的功能是重写一个方法,而他的实现者就是 jvm,java 虚拟机,java 虚拟机在字节码层面实现了这个功能。
但是对于开发人员,虚拟机的实现是无法控制的东西,也不能用于自定义注解。所以,如果是我们自己想定义一个独一无二的注解的话,则我们需要自己为注解写一个实现逻辑,「换言之,我们需要实现自己注解特定逻辑的功能」。
自己实现一个注解
在自己写注解之前我们有一些基础知识需要掌握,那就是我们写注解这个功能首先是需要 java 支持的,java 在 jdk5 当中支持了这一功能,「并且在 java.lang.annotation 包中提供了四个注解,仅用于编写注解时使用」,他们是:
注解
作用
「@documented」
表明是否在java doc中添加annotation
「@retention」
定义注释应保留多长时间,即有效周期。有以下几种策略:
「retentionpolicy.source」 - 在编译期间丢弃。编译完成后,这些注释没有任何意义,因此它们不会写入字节码。示例@override,@ suppresswarnings
「retentionpolicy.class 」- 在类加载期间丢弃。在进行字节码级后处理时很有用。有点令人惊讶的是,这是默认值。
「retentionpolicy.runtime」 - 不要丢弃。注释应该可以在运行时进行反射。这是我们通常用于自定义注释的内容。
「@target」
指定可以放置注解的位置。如果不指定,则可以将注解放在任何位置。若我们只想要其中几个,则需要定义对应的几个。
下面是这8个属性:
elementtype.type(类,接口,枚举)
elementtype.field(实例变量)
elementtype.method
elementtype.parameter
elementtype.constructor
elementtype.local_variable
elementtype.annotation_type(在另一个注释上)
elementtype.package(记住package-info.java)
「@inherited」
控制注解是否对子类产生影响。
下面我们开始自己实现一个注解,注解仅支持 primitives,string和 enumerations 这三种类型。注解的所有属性都定义为方法,也可以提供默认值。我们先实现一个最简单的注解。
|
1
2
3
4
5
6
7
8
9
|
`import java.lang.annotation.elementtype;``import java.lang.annotation.retention;``import java.lang.annotation.retentionpolicy;``import java.lang.annotation.target;``@target(elementtype.method)``@retention(retentionpolicy.runtime)``public @interface simpleannotation {` `string value();``}` |
上面这个注释里面只定义了一个字符传,它的目标注释对象是方法,保留策略是在运行期间。下面我们定义一个方法来使用这个注解:
|
1
2
3
4
5
6
|
`public class useannotation {` `@simpleannotation("teststringvalue")` `public void testmethod(){` `//do something here` `}``}` |
我们在这里使用了这个注解,并把字符串赋值为:teststringvalue,到这里,定义一个注解并使用它,我们就已经全部完成。
简单的不敢相信。但是,细心一想的话,我们虽然写了一个注解也用了它,可是它并没有产生任何作用啊。也没有对我们这里方法产生任何效果啊。是的现在确实是这样的,原因在于我们前面提到的一点,我们还没有为这个注解实现它的逻辑,现在我们就来为这个注解实现逻辑。
应该怎么做呢?我们不妨自己来想一想。首先,我想给标注了这个注解的方法或字段实现功能,我们必须得知道,到底有哪些方法,哪些字段使用了这个注解吧,因此,这里我们很容易想到,这里应该会用到反射。其次,利用反射,我们利用反射拿到这样目标之后,得为他实现一个逻辑,这个逻辑是这些方法本身逻辑之外的逻辑,这又让我们想起了代理,aop 等知识,我们相当于就是在为这些方法做一个增强。事实上的实现主借的逻辑也大概就是这个思路。梳理一下大致步骤如下:
- 利用反射机制获取一个类的 class 对象
- 通过这个 class 对象可以去获取他的每一个方法 method,或字段 field 等等
- method,field 等类提供了类似于 getannotation 的方法来获取这个一个字段的所有注解
- 拿到注解之后,我们可以判断这个注解是否是我们要实现的注解,如果是则实现注解逻辑
现在我们来实现一下这个逻辑,代码如下:
|
1
2
3
4
5
6
7
8
9
10
11
|
`private static void annotationlogic() {` `class useannotationclass = useannotation.class;` `for(method method : useannotationclass.getmethods()) {` `simpleannotation simpleannotation = (simpleannotation)method.getannotation(simpleannotation.class);` `if(simpleannotation != null) {` `system.out.println(" method name : " + method.getname());` `system.out.println(" value : " + simpleannotation.value());` `system.out.println(" --------------------------- ");` `}` `}``}` |
在这里我们实现的逻辑就是打印几句话。从上面的实现逻辑我们不能发现,借助于 java 的反射我们可以直接拿到一个类里所有的方法,然后再拿到方法上的注解,当然,我们也可以拿到字段上的注解。借助于反射我们可以拿到几乎任何属于一个类的东西。
一个简单的注解我们就实现完了。现在我们再回过头来,看一下 @autowired 注解是如何实现的。
@autowired 注解实现逻辑分析
知道了上面的知识,我们不难想到,上面的注解虽然简单,但是 @autowired 和他最大的区别应该仅仅在于注解的实现逻辑,其他利用反射获取注解等等步骤应该都是一致的。先来看一下 @autowired 这个注解在 spring 的源代码里的定义是怎样的,如下所示:
|
1
2
3
4
5
6
7
8
9
10
11
12
|
`package org.springframework.beans.factory.annotation;``import java.lang.annotation.documented;``import java.lang.annotation.elementtype;``import java.lang.annotation.retention;``import java.lang.annotation.retentionpolicy;``import java.lang.annotation.target;``@target({elementtype.constructor, elementtype.method, elementtype.parameter, elementtype.field, elementtype.annotation_type})``@retention(retentionpolicy.runtime)``@documented``public @interface autowired {` `boolean required() default true;``}` |
阅读代码我们可以看到,autowired 注解可以应用在构造方法,普通方法,参数,字段,以及注解这五种类型的地方,它的保留策略是在运行时。下面,我们不多说直接来看 spring 对这个注解进行的逻辑实现.
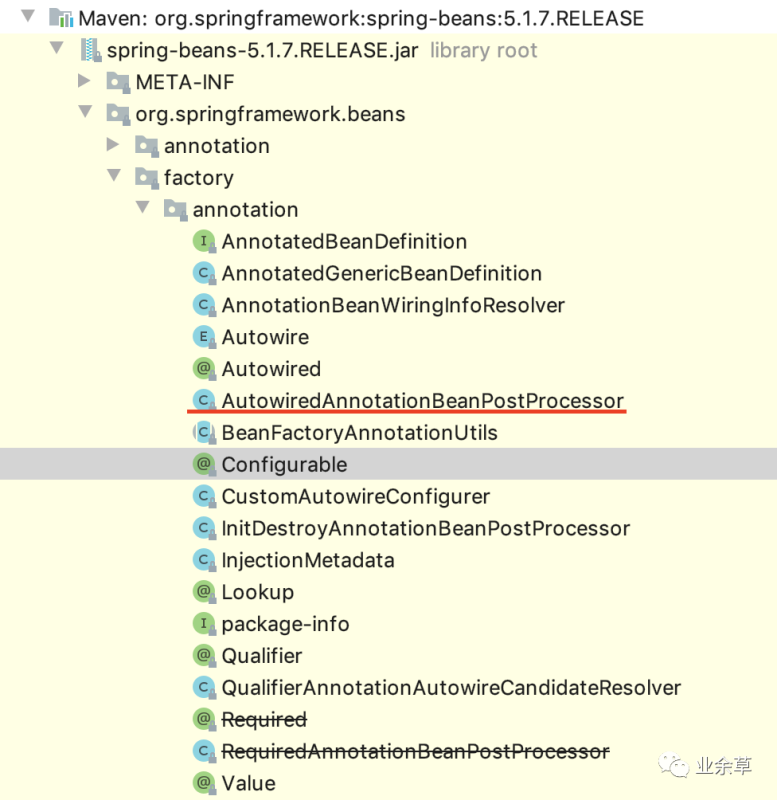
在 spring 源代码当中,autowired 注解位于包 org.springframework.beans.factory.annotation 之中,该包的内容如下:

经过分析,不难发现 spring 对 autowire 注解的实现逻辑位于类:autowiredannotationbeanpostprocessor 之中,已在上图标红。其中的核心处理代码如下:
|
1
2
3
4
5
6
7
8
9
10
11
12
13
14
15
16
17
18
19
20
21
22
23
24
25
26
27
28
29
30
31
32
33
34
35
36
37
38
39
40
41
42
43
44
45
46
47
48
49
50
51
52
|
`private injectionmetadata buildautowiringmetadata(final class<?> clazz) {` `linkedlist<injectionmetadata.injectedelement> elements = new linkedlist<>();` `class<?> targetclass = clazz;//需要处理的目标类` `do {` `final linkedlist<injectionmetadata.injectedelement> currelements = new linkedlist<>();` `/*通过反射获取该类所有的字段,并遍历每一个字段,并通过方法findautowiredannotation遍历每一个字段的所用注解,并如果用autowired修饰了,则返回auotowired相关属性*/` `reflectionutils.dowithlocalfields(targetclass, field -> {` `annotationattributes ann = findautowiredannotation(field);` `if (ann != null) {//校验autowired注解是否用在了static方法上` `if (modifier.isstatic(field.getmodifiers())) {` `if (logger.iswarnenabled()) {` `logger.warn("autowired annotation is not supported on static fields: " + field);` `}` `return;` `}//判断是否指定了required` `boolean required = determinerequiredstatus(ann);` `currelements.add(new autowiredfieldelement(field, required));` `}` `});` `//和上面一样的逻辑,但是是通过反射处理类的method` `reflectionutils.dowithlocalmethods(targetclass, method -> {` `method bridgedmethod = bridgemethodresolver.findbridgedmethod(method);` `if (!bridgemethodresolver.isvisibilitybridgemethodpair(method, bridgedmethod)) {` `return;` `}` `annotationattributes ann = findautowiredannotation(bridgedmethod);` `if (ann != null && method.equals(classutils.getmostspecificmethod(method, clazz))) {` `if (modifier.isstatic(method.getmodifiers())) {` `if (logger.iswarnenabled()) {` `logger.warn("autowired annotation is not supported on static methods: " + method);` `}` `return;` `}` `if (method.getparametercount() == 0) {` `if (logger.iswarnenabled()) {` `logger.warn("autowired annotation should only be used on methods with parameters: " +` `method);` `}` `}` `boolean required = determinerequiredstatus(ann);` `propertydescriptor pd = beanutils.findpropertyformethod(bridgedmethod, clazz);` `currelements.add(new autowiredmethodelement(method, required, pd));` `}` `});` `//用@autowired修饰的注解可能不止一个,因此都加在currelements这个容器里面,一起处理` `elements.addall(0, currelements);` `targetclass = targetclass.getsuperclass();` `}` `while (targetclass != null && targetclass != object.class);` `return new injectionmetadata(clazz, elements);` `}` |
博主在源代码里加了注释,结合注释就能看懂它做的事情了,最后这个方法返回的就是包含所有带有 autowire 注解修饰的一个 injectionmetadata 集合。这个类由两部分组成:
|
1
2
3
4
|
`public injectionmetadata(class<?> targetclass, collection<injectedelement> elements) {` `this.targetclass = targetclass;` `this.injectedelements = elements;``}` |
一是我们处理的目标类,二就是上述方法获取到的所以 elements 集合。
有了目标类,与所有需要注入的元素集合之后,我们就可以实现 autowired 的依赖注入逻辑了,实现的方法如下:
|
1
2
3
4
5
6
7
8
9
10
11
12
13
14
15
|
`@override``public propertyvalues postprocesspropertyvalues(` `propertyvalues pvs, propertydescriptor[] pds, object bean, string beanname) throws beancreationexception {` `injectionmetadata metadata = findautowiringmetadata(beanname, bean.getclass(), pvs);` `try {` `metadata.inject(bean, beanname, pvs);` `}` `catch (beancreationexception ex) {` `throw ex;` `}` `catch (throwable ex) {` `throw new beancreationexception(beanname, "injection of autowired dependencies failed", ex);` `}` `return pvs;``}` |
它调用的方法是 injectionmetadata 中定义的 inject 方法,如下
|
1
2
3
4
5
6
7
8
9
10
11
12
13
|
`public void inject(object target, @nullable string beanname, @nullable propertyvalues pvs) throws throwable {` `collection<injectedelement> checkedelements = this.checkedelements;` `collection<injectedelement> elementstoiterate =` `(checkedelements != null ? checkedelements : this.injectedelements);` `if (!elementstoiterate.isempty()) {` `for (injectedelement element : elementstoiterate) {` `if (logger.istraceenabled()) {` `logger.trace("processing injected element of bean '" + beanname + "': " + element);` `}` `element.inject(target, beanname, pvs);` `}` `}``}` |
其逻辑就是遍历,然后调用 inject 方法,inject 方法其实现逻辑如下:
|
1
2
3
4
5
6
7
8
9
10
11
12
13
14
15
16
17
18
19
20
21
22
23
24
|
`/**` `* either this or {@link #getresourcetoinject} needs to be overridden.` `*/``protected void inject(object target, @nullable string requestingbeanname, @nullable propertyvalues pvs)` `throws throwable {` `if (this.isfield) {` `field field = (field) this.member;` `reflectionutils.makeaccessible(field);` `field.set(target, getresourcetoinject(target, requestingbeanname));` `}` `else {` `if (checkpropertyskipping(pvs)) {` `return;` `}` `try {` `method method = (method) this.member;` `reflectionutils.makeaccessible(method);` `method.invoke(target, getresourcetoinject(target, requestingbeanname));` `}` `catch (invocationtargetexception ex) {` `throw ex.gettargetexception();` `}` `}``}` |
在这里的代码当中我们也可以看到,是 inject 也使用了反射技术并且依然是分成字段和方法去处理的。在代码里面也调用了 makeaccessible 这样的可以称之为暴力破解的方法,但是反射技术本就是为框架等用途设计的,这也无可厚非。
对于字段的话,本质上就是去 set 这个字段的值,即对对象进行实例化和赋值,例如下面代码:
|
1
2
|
`@autowired``objecttest objecttest;` |
那么在这里实现的就相当于给这个 objectest 引用赋值了。
对于方法的话,本质就是去调用这个方法,因此这里调用的是 method.invoke。
getresourcetoinject 方法的参数就是要注入的 bean 的名字,这个方法的功能就是根据这个 bean 的名字去拿到它。
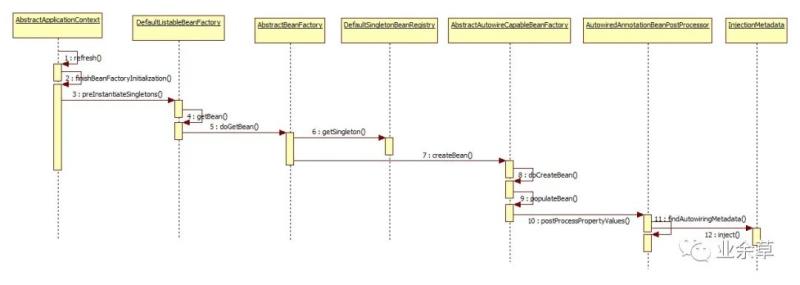
以上,就是 @autowire 注解实现逻辑的全部分析。结合源代码再看一遍的话,会更加清楚一点。下面是 spring 容器如何实现 @autowired 自动注入的过程的图:

总结起来一句话:使用 @autowired 注入的 bean 对于目标类来说,从代码结构上来讲也就是一个普通的成员变量,@autowired 和 spring 一起工作,通过反射为这个成员变量赋值,也就是将其赋为期望的类实例。
衍生问题
注解的有效周期是什么?
各种注释之间的第一个主要区别是,它们是在编译时使用,然后被丢弃(如@override),还是被放在编译的类文件中,并在运行时可用(如 spring 的@component)。这是由注释的“@retention”策略决定的。如果您正在编写自己的注释,则需要决定该注释在运行时(可能用于自动配置)还是仅在编译时(用于检查或代码生成)有用。
当用注释编译代码时,编译器看到注释就像看到源元素上的其他修饰符一样,比如访问修饰符(public / private)。当遇到注释时,它运行一个注释处理器,就像一个插件类,表示对特定的注释感兴趣。注释处理器通常使用反射api来检查正在编译的元素,并且可以简单地对它们执行检查、修改它们或生成要编译的新代码。@override 是一个示例;它使用反射 api 来确保能够在其中一个超类中找到方法签名的匹配,如果不能,则使用 @override 会导致编译错误。
注入的 bean 和用它的 bean 的关系是如何维护的?
无论以何种方式注入,注入的 bean 就相当于类中的一个普通对象应用,这是它的实例化是 spring 去容器中找符合的 bean 进行实例化,并注入到类当中的。他们之间的关系就是普通的一个对象持有另一个对象引用的关系。只是这些对象都是 spring 当中的 bean 而已。
为什么注入的 bean 不能被定义为 static 的?
从设计的角度来说 ,使用静态字段会鼓励使用静态方法。静态方法是 evil 的。依赖注入的主要目的是让容器为您创建对象并进行连接。而且,它使测试更加容易。
一旦开始使用静态方法,您就不再需要创建对象的实例,并且测试变得更加困难。同样,您不能创建给定类的多个实例,每个实例都注入不同的依赖项(因为该字段是隐式共享的,并且会创建全局状态)。
静态变量不是 object 的属性,而是 class 的属性。spring 的 autowire 是在对象上完成的,这样使得设计很干净。 在 spring 当中我们也可以将 bean 对象定义为单例,这样就能从功能上实现与静态定义相同的目的。
但是从纯粹技术的层面,我们可以这样做:
将 @autowired 可以与 setter 方法一起使用,然后可以让 setter 修改静态字段的值。但是这种做法非常不推荐。
到此这篇关于spring中的注解@autowired实现过程全解的文章就介绍到这了,更多相关spring注解@autowired内容请搜索服务器之家以前的文章或继续浏览下面的相关文章希望大家以后多多支持服务器之家!
到此这篇关于spring中的注解@autowired实现过程全解(@autowired 背后的故事)的文章就介绍到这了,更多相关spring注解@autowired内容请搜索服务器之家以前的文章或继续浏览下面的相关文章希望大家以后多多支持服务器之家!
原文链接:https://blog.csdn.net/hnjsjsac/article/details/118540683


