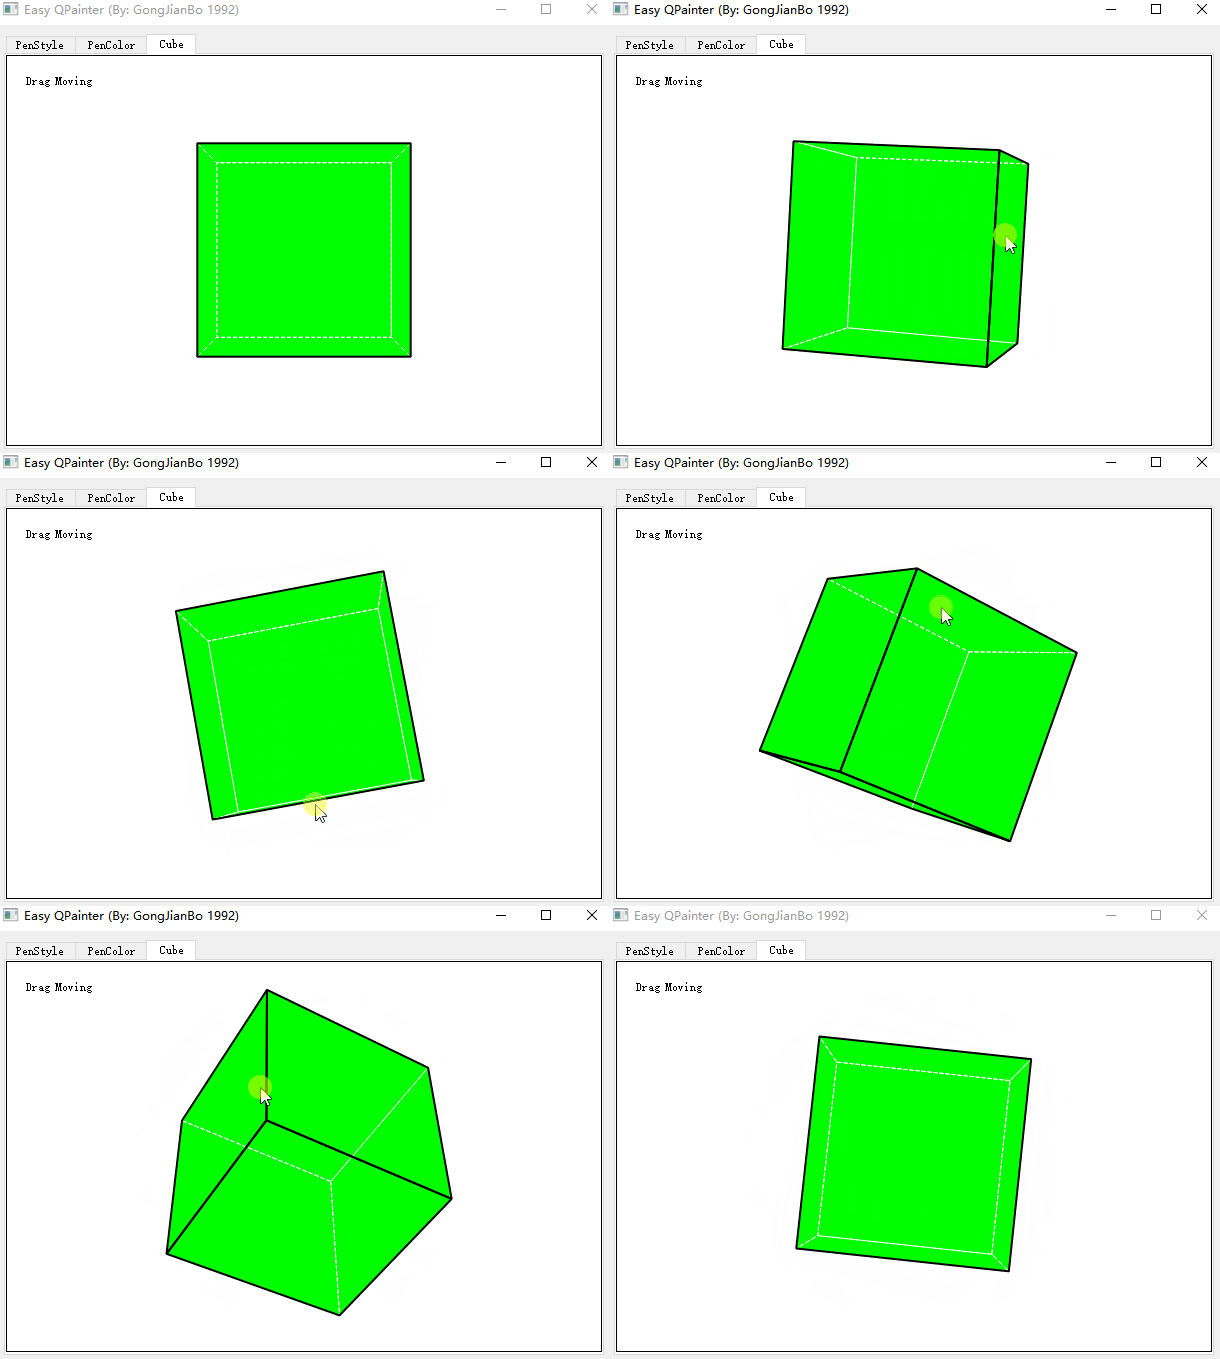
本文实例为大家分享了使用qpainter绘制3d立方体的具体代码,供大家参考,具体内容如下
1.实现思路
(网上有类似的另一篇,不过他不是用的 qt 自带的矩阵运算类)
实现思路有点类似使用 opengl 画立方体,先准备顶点数据:
|
1
2
3
4
5
6
7
8
9
10
11
12
13
14
15
16
17
18
19
20
|
//立方体前后四个顶点,从右上角开始顺时针vertexarr=qvector<qvector3d>{ qvector3d{1,1,1}, qvector3d{1,-1,1}, qvector3d{-1,-1,1}, qvector3d{-1,1,1}, qvector3d{1,1,-1}, qvector3d{1,-1,-1}, qvector3d{-1,-1,-1}, qvector3d{-1,1,-1} }; //六个面,一个面包含四个顶点 elementarr=qvector<qvector<int>>{ {0,1,2,3}, {4,5,6,7}, {0,4,5,1}, {1,5,6,2}, {2,6,7,3}, {3,7,4,0} }; |
然后再和旋转矩阵、透视矩阵进行运算,得到 3d 顶点坐标在 2d 平面上的 xy 值。根据顶点 xy 值,得到每个面的路径,然后绘制表面的路径。
这里面比较麻烦的是判断哪些是表面,单个立方体还好,可以遍历比较 z 值,如果是多个物体运算量就大了,还是直接 opengl 吧,毕竟我这个只是画着玩的。
2.实现代码
代码 github 链接
实现效果 gif 动图:

主要代码:
|
1
2
3
4
5
6
7
8
9
10
11
12
13
14
15
16
17
18
19
20
21
22
23
24
25
26
27
28
29
30
31
32
|
#ifndef mycube_h#define mycube_h #include <qwidget>#include <qmouseevent> #include <qvector3d>#include <qmatrix4x4> class mycube : public qwidget{ q_objectpublic: explicit mycube(qwidget *parent = nullptr); protected: void paintevent(qpaintevent *event) override; void mousepressevent(qmouseevent *event) override; void mousemoveevent(qmouseevent *event) override; void mousereleaseevent(qmouseevent *event) override; qpointf getpoint(const qvector3d &vt,int w) const; private: qvector<qvector3d> vertexarr; //八个顶点 qvector<qvector<int>> elementarr; //六个面 qmatrix4x4 rotatemat; //旋转矩阵 qpoint mousepos; //鼠标位置 bool mousepressed=false; //鼠标按下标志位}; #endif // mycube_h |
|
1
2
3
4
5
6
7
8
9
10
11
12
13
14
15
16
17
18
19
20
21
22
23
24
25
26
27
28
29
30
31
32
33
34
35
36
37
38
39
40
41
42
43
44
45
46
47
48
49
50
51
52
53
54
55
56
57
58
59
60
61
62
63
64
65
66
67
68
69
70
71
72
73
74
75
76
77
78
79
80
81
82
83
84
85
86
87
88
89
90
91
92
93
94
95
96
97
98
99
100
101
102
103
104
105
106
107
108
109
110
111
112
113
114
115
116
117
118
119
120
121
122
123
124
125
126
127
128
129
130
131
132
133
134
135
136
137
138
139
140
141
142
143
144
145
146
147
148
149
150
151
152
153
154
155
156
157
158
159
160
161
162
163
164
165
166
167
168
169
170
171
172
173
174
175
176
177
178
179
180
181
182
183
184
185
186
187
188
189
190
191
192
193
194
195
196
197
198
199
200
201
202
203
204
205
206
207
208
|
#include "mycube.h" #include <qpainter>#include <qtmath>#include <qdebug> mycube::mycube(qwidget *parent) : qwidget(parent){ // 7------------------4 // / / | // 3------------------0 | // | | | // | | | // | | | // | | | // | 6 | 5 // | | / // 2------------------1 //立方体前后四个顶点,从右上角开始顺时针 vertexarr=qvector<qvector3d>{ qvector3d{1,1,1}, qvector3d{1,-1,1}, qvector3d{-1,-1,1}, qvector3d{-1,1,1}, qvector3d{1,1,-1}, qvector3d{1,-1,-1}, qvector3d{-1,-1,-1}, qvector3d{-1,1,-1} }; //六个面,一个面包含四个顶点 elementarr=qvector<qvector<int>>{ {0,1,2,3}, {4,5,6,7}, {0,4,5,1}, {1,5,6,2}, {2,6,7,3}, {3,7,4,0} }; setfocuspolicy(qt::clickfocus); //widget默认没有焦点} void mycube::paintevent(qpaintevent *event){ q_unused(event) qpainter painter(this); //先画一个白底黑框 painter.fillrect(this->rect(),qt::white); qpen pen(qt::black); painter.setpen(pen); painter.drawrect(this->rect().adjusted(0,0,-1,-1)); //右下角会超出范围 //思路,找到z值最高的顶点,然后绘制该顶点相邻的面 // 根据z值计算,近大远小 //(此外,qt是屏幕坐标系,原点在左上角) //矩形边框参考大小 const int cube_width=(width()>height()?height():width())/4; //投影矩阵 //(奇怪,为什么只是平移了z轴,没用perspective函数就有远小近大的效果, //在我的想象中默认不该是正交投影么) qmatrix4x4 perspective_mat; perspective_mat.translate(0.0f,0.0f,-0.1f); //计算顶点变换后坐标,包含z值max点就是正交表面可见的, //再计算下远小近大的透视投影效果齐活了 qlist<qvector3d> vertex_list; //和矩阵运算后的顶点 qlist<int> vertex_max_list; //top顶点在arr的位置 float vertex_max_value; //top值 //根据旋转矩阵计算每个顶点 for(int i=0;i<vertexarr.count();i++) { qvector3d vertex=vertexarr.at(i)*rotatemat*perspective_mat; vertex_list.push_back(vertex); //找出z值max的顶点 if(i==0){ vertex_max_list.push_back(0); vertex_max_value=vertex.z(); }else{ if(vertex.z()>vertex_max_value){ vertex_max_list.clear(); vertex_max_list.push_back(i); vertex_max_value=vertex.z(); }else if(abs(vertex.z()-vertex_max_value)<(1e-7)){ vertex_max_list.push_back(i); } } } //把原点移到中间来 painter.save(); painter.translate(width()/2,height()/2); //绘制front和back六个面,先计算路径再绘制 qlist<qpainterpath> element_path_list; //每个面路径 qlist<float> element_z_values; //每个面中心点的z值 qlist<qpointf> element_z_points; //每个面中心点在平面对应xy值 qlist<int> element_front_list; //elementarr中表面的index for(int i=0;i<elementarr.count();i++) { const qvector3d vt0=vertex_list.at(elementarr.at(i).at(0)); const qvector3d vt1=vertex_list.at(elementarr.at(i).at(1)); const qvector3d vt2=vertex_list.at(elementarr.at(i).at(2)); const qvector3d vt3=vertex_list.at(elementarr.at(i).at(3)); //单个面的路径 qpainterpath element_path; element_path.moveto(getpoint(vt0,cube_width)); element_path.lineto(getpoint(vt1,cube_width)); element_path.lineto(getpoint(vt2,cube_width)); element_path.lineto(getpoint(vt3,cube_width)); element_path.closesubpath(); //包含zmax点的就是正交表面可见的 bool is_front=true; for(int vertex_index:vertex_max_list){ if(!elementarr.at(i).contains(vertex_index)){ is_front=false; break; } } if(is_front){ element_front_list.push_back(i); } element_path_list.push_back(element_path); element_z_values.push_back((vt0.z()+vt2.z())/2); element_z_points.push_back((getpoint(vt0,cube_width)+getpoint(vt2,cube_width))/2); } //远小近大,还要把包含max但是被近大遮盖的去掉 qlist<int> element_front_remove; for(int i=0;i<element_front_list.count();i++) { for(int j=0;j<element_front_list.count();j++) { if(i==j) continue; const int index_i=element_front_list.at(i); const int index_j=element_front_list.at(j); if(element_z_values.at(index_i)>element_z_values.at(index_j) &&element_path_list.at(index_i).contains(element_z_points.at(index_j))){ element_front_remove.push_back(index_j); } } } for(int index:element_front_remove){ element_front_list.removeone(index); } //根据计算好的路径绘制 painter.setrenderhint(qpainter::antialiasing,true); //画表面 for(auto index:element_front_list){ painter.fillpath(element_path_list.at(index),qt::green); } //画被遮盖面的边框虚线 painter.setpen(qpen(qt::white,1,qt::dashline)); for(int i=0;i<element_path_list.count();i++){ if(element_front_list.contains(i)) continue; painter.drawpath(element_path_list.at(i)); } //画表面边框 painter.setpen(qpen(qt::black,2)); for(auto index:element_front_list){ painter.drawpath(element_path_list.at(index)); } painter.restore(); painter.drawtext(20,30,"drag moving");} void mycube::mousepressevent(qmouseevent *event){ mousepressed=true; mousepos=event->pos(); qwidget::mousepressevent(event);} void mycube::mousemoveevent(qmouseevent *event){ if(mousepressed){ const qpoint posoffset=event->pos()-mousepos; mousepos=event->pos(); //旋转矩阵 x和y分量 //rotatemat.rotate(posoffset.x(),qvector3d(0.0f,-0.5f,0.0f)); //rotatemat.rotate(posoffset.y(),qvector3d(0.5f,0.0f,0.0f)); rotatemat.rotate(1.1f,qvector3d(0.5f*posoffset.y(),-0.5f*posoffset.x(),0.0f)); update(); } qwidget::mousemoveevent(event);} void mycube::mousereleaseevent(qmouseevent *event){ mousepressed=false; qwidget::mousereleaseevent(event);} qpointf mycube::getpoint(const qvector3d &vt,int w) const{ //可以用z来手动计算远小近大,也可以矩阵运算 //const float z_offset=vt.z()*0.1; //return qpointf{ vt.x()*w*(1+z_offset), vt.y()*w*(1+z_offset) }; return qpointf{ vt.x()*w, vt.y()*w };} |
以上就是本文的全部内容,希望对大家的学习有所帮助,也希望大家多多支持服务器之家。
原文链接:https://blog.csdn.net/gongjianbo1992/article/details/106165578


