前言
在ios开发中,开发"表单"界面,字段稍微多一点的一般都用uitableview来做,而xlform就是这样一个框架,它是创建动态表格视图最牛逼的ios库, 用它实现表单功能,非常简单,省心省力。但是很可惜,搜索了很多文章都只是翻译官方文档,很多人在使用该库的时候可能都被官方文档带走远了,不知道如何具体使用。正好最近也要用到这个库,所以写个入门使用文章供大家参考。
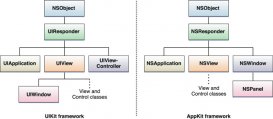
以下是这个库一个简单的结构图:

一、 导入项目
使用cocoapods或者手动导入库文件,本人选择直接导入项目源文件的方式。

导入项目
二、改造表单viewcontroller
让viewcontroller继承自xlformviewcontroller,并重写下面的两个方法
|
1
2
3
4
5
6
7
8
9
10
11
12
13
14
15
16
17
18
19
|
@interface oneviewcontroller : xlformviewcontroller@end@implementation oneviewcontroller- (instancetype)initwithnibname:(nsstring *)nibnameornil bundle:(nsbundle *)nibbundleornil { self = [super initwithnibname:nibnameornil bundle:nibbundleornil]; if (self){ [self initializeform]; } return self;}- (id)initwithcoder:(nscoder *)adecoder { self = [super initwithcoder:adecoder]; if (self){ [self initializeform]; } return self;}@end |
三、构造表单
|
1
2
3
4
5
6
7
8
9
10
11
12
13
14
15
16
17
18
19
20
21
22
23
24
25
26
27
28
29
30
31
32
33
34
35
36
37
38
39
40
41
42
43
44
45
46
47
48
49
50
51
52
53
54
55
56
57
58
59
60
61
62
63
64
65
66
67
68
69
70
71
72
73
74
75
76
77
78
79
80
81
82
83
84
85
86
87
88
89
90
91
|
- (void)initializeform { // 设置是否显示cell之间分界线 //self.tableview.separatorstyle = uitableviewcellseparatorstylenone; // 设置section的高度 self.tableview.sectionheaderheight = 30; xlformdescriptor * form;//form,一个表单只有一个 xlformsectiondescriptor * section;//section,一个表单可能有多个 xlformrowdescriptor * row; //row,每个section可能有多个row // form form = [xlformdescriptor formdescriptor]; // first section section = [xlformsectiondescriptor formsection]; section.title = @"用户"; [form addformsection:section]; // 普通文本 row = [xlformrowdescriptor formrowdescriptorwithtag:@"username" rowtype:xlformrowdescriptortypetext]; // 设置placeholder [row.cellconfig setobject:@"用户名" forkey:@"textfield.placeholder"]; // 设置文本颜色 [row.cellconfig setobject:[uicolor redcolor] forkey:@"textfield.textcolor"]; [section addformrow:row]; // 密码 row = [xlformrowdescriptor formrowdescriptorwithtag:@"password" rowtype:xlformrowdescriptortypepassword]; // 设置placeholder的颜色 nsattributedstring *attrstring = [[nsattributedstring alloc] initwithstring:@"密码" attributes: @{nsforegroundcolorattributename:[uicolor greencolor], }]; [row.cellconfig setobject:attrstring forkey:@"textfield.attributedplaceholder"]; [section addformrow:row]; // second section section = [xlformsectiondescriptor formsection]; section.title = @"日期"; [form addformsection:section]; // 日期选择器 row = [xlformrowdescriptor formrowdescriptorwithtag:@"birthday" rowtype:xlformrowdescriptortypedate title:@"出生日期"]; row.value = [nsdate datewithtimeintervalsincenow:60*60*24]; [section addformrow:row]; // third section section = [xlformsectiondescriptor formsection]; section.title = @"头像"; [form addformsection:section]; // 图片选择 row = [xlformrowdescriptor formrowdescriptorwithtag:@"userpic" rowtype:xlformrowdescriptortypeimage]; [section addformrow:row]; // fourth section section = [xlformsectiondescriptor formsection]; section.title = @"选择器"; [form addformsection:section]; // 选择器 row = [xlformrowdescriptor formrowdescriptorwithtag:@"sex" rowtype:xlformrowdescriptortypeselectorpush]; row.novaluedisplaytext = @"暂无"; row.selectortitle = @"性别选择"; row.selectoroptions = @[@"男",@"女",@"其他"]; row.title = @"性别"; [row.cellconfigforselector setobject:[uicolor redcolor] forkey:@"textlabel.textcolor"]; [row.cellconfigforselector setobject:[uicolor greencolor] forkey:@"detailtextlabel.textcolor"]; [section addformrow:row]; // fifth section section = [xlformsectiondescriptor formsection]; section.title = @"加固"; [form addformsection:section]; // 开关 row = [xlformrowdescriptor formrowdescriptorwithtag:@"enforce" rowtype:xlformrowdescriptortypebooleanswitch title:@"加固"]; [section addformrow:row]; // sixth section section = [xlformsectiondescriptor formsection]; [form addformsection:section]; // 按钮 row = [xlformrowdescriptor formrowdescriptorwithtag:@"conform" rowtype:xlformrowdescriptortypebutton]; row.title = @"确定"; [section addformrow:row]; self.form = form;}-(void)didselectformrow:(xlformrowdescriptor *)formrow{ // 判断是不是点击了确定按钮 if([formrow.tag isequaltostring:@"conform"] && formrow.rowtype == xlformrowdescriptortypebutton){ //获取表单所有到的值 nsdictionary *values = [self formvalues]; nslog(@"%@", values); } [super didselectformrow:formrow];}//重写改该方法 上面的方法就不会调用了//-(void)tableview:(uitableview *)tableview didselectrowatindexpath:(nsindexpath *)indexpath{//// nslog(@"%s", __func__);////}@end |
四、效果图

五、总结
前面两步是官方文档中可以找到的,也很简单,关键在于initializeform方法中具体构造表单的过程,这里有必要强调几点:
1、xlformviewcontroller实现了uitableviewdatasource, uitableviewdelegate,并且持有一个uitableview,这个从该类的声明可以看出来,所以uitableview 、uitableviewdatasource, uitableviewdelegate中的方法都可以正常使用。
|
1
|
@interface xlformviewcontroller : uiviewcontroller<uitableviewdatasource, uitableviewdelegate,xlformdescriptordelegate, uitextfielddelegate, uitextviewdelegate, xlformviewcontrollerdelegate> |
2、xlform将表单抽象为form,section,row三个层次,分别对应三个类
|
1
2
3
|
xlformdescriptor * form;//form,一个表单只有一个xlformsectiondescriptor * section;//section,一个表单可能有多个xlformrowdescriptor * row; //row,每个section可能有多个row |
3、每个表单中的具体信息最后都落脚到xlformrowdescriptor中,通过它可以配置不同样式的表单项,通过构造函数的rowtype指定具体的表单类型,该框架提供了非常丰富的rowtype,具体可以参考官方文档说明。
4、更细化配置表单项就需要借助于xlformrowdescriptor中的属性进行配置,常用的有
|
1
2
|
@property (nonatomic, readonly, nonnull) nsmutabledictionary * cellconfig;@property (nonatomic, readonly, nonnull) nsmutabledictionary * cellconfigforselector; |
这个配置的时候,往往有同学不知道具体如何才能设置属性,比如怎么设置表单输入框的placeholder?更进一步如何设置placeholder 的颜色。其实它用到了kvc,因为它们两个都是uitextfield类中的属性,那么直接进入uitextfield查找,发现如下信息:
|
1
2
|
@property(nullable, nonatomic,copy) nsstring *placeholder; @property(nullable, nonatomic,copy) nsattributedstring *attributedplaceholder ns_available_ios(6_0); |
那么设置起来就是
|
1
2
|
[row.cellconfig setobject:@"用户名" forkey:@"textfield.placeholder"];[row.cellconfig setobject:attrstring forkey:@"textfield.attributedplaceholder"]; |
注意这里的key的写法,就是kvc的写法。其他的属性依此类推。
5、如何获取设置好的表单的值?其实非常简单,该框架提供一个方法formvalues,它的返回类型是一个nsdictionary,其中key就是xlformrowdescriptor设置时的tag。可以直接在控制器中调用该方法获取表单值,上面的效果图设置后的表单信息如下:

总结
以上就是这篇文章的全部内容了,希望本文的内容对大家的学习或者工作具有一定的参考学习价值,如果有疑问大家可以留言交流,谢谢大家对服务器之家的支持。
原文链接:https://www.jianshu.com/p/41799fddb211


