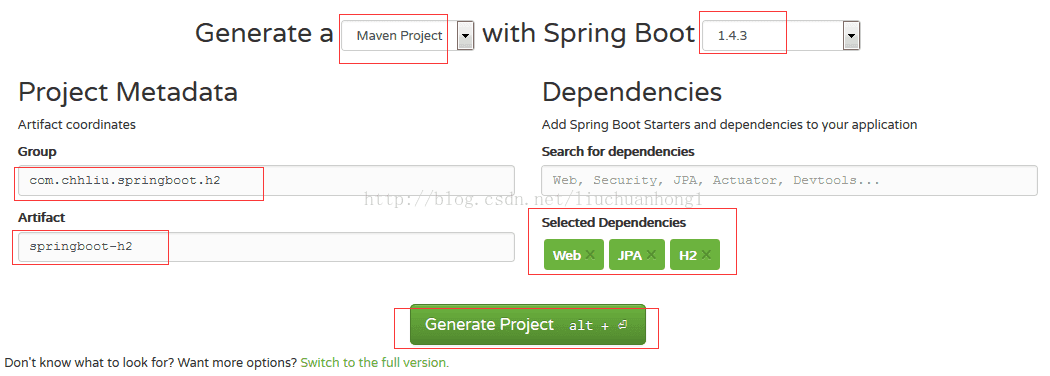
一、新建spring boot工程
新建工程的时候,需要加入jpa,h2依赖

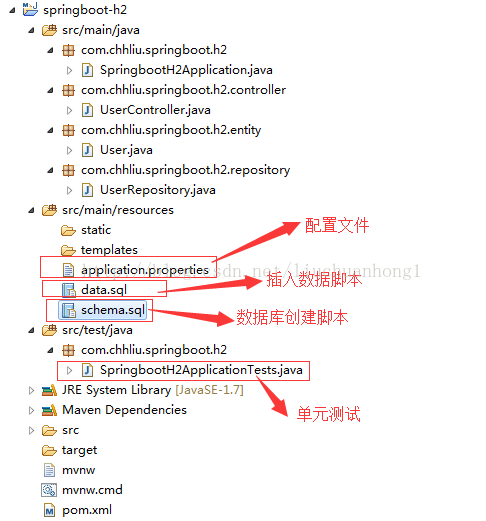
二、工程结构

pom文件依赖如下:
|
1
2
3
4
5
6
7
8
9
10
11
12
13
14
15
16
17
18
19
20
21
22
23
24
25
26
27
28
29
30
31
32
33
34
35
36
37
38
39
40
41
42
43
44
45
46
47
48
49
50
51
52
53
54
55
56
57
|
<?xml version="1.0" encoding="utf-8"?> <project xmlns="http://maven.apache.org/pom/4.0.0" xmlns:xsi="http://www.w3.org/2001/xmlschema-instance" xsi:schemalocation="http://maven.apache.org/pom/4.0.0 http://maven.apache.org/xsd/maven-4.0.0.xsd"> <modelversion>4.0.0</modelversion> <groupid>com.chhliu.springboot.h2</groupid> <artifactid>springboot-h2</artifactid> <version>0.0.1-snapshot</version> <packaging>jar</packaging> <name>springboot-h2</name> <description>demo project for spring boot h2</description> <parent> <groupid>org.springframework.boot</groupid> <artifactid>spring-boot-starter-parent</artifactid> <version>1.4.3.release</version> <relativepath/> <!-- lookup parent from repository --> </parent> <properties> <project.build.sourceencoding>utf-8</project.build.sourceencoding> <project.reporting.outputencoding>utf-8</project.reporting.outputencoding> <java.version>1.7</java.version> </properties> <dependencies> <dependency> <groupid>org.springframework.boot</groupid> <artifactid>spring-boot-starter-data-jpa</artifactid> </dependency> <dependency> <groupid>org.springframework.boot</groupid> <artifactid>spring-boot-starter-web</artifactid> </dependency> <dependency> <groupid>com.h2database</groupid> <artifactid>h2</artifactid> <scope>runtime</scope> </dependency> <dependency> <groupid>org.springframework.boot</groupid> <artifactid>spring-boot-starter-test</artifactid> <scope>test</scope> </dependency> </dependencies> <build> <plugins> <plugin> <groupid>org.springframework.boot</groupid> <artifactid>spring-boot-maven-plugin</artifactid> </plugin> </plugins> </build> </project> |
三、编写实体类
|
1
2
3
4
5
6
7
8
9
10
11
12
13
14
15
16
17
18
19
20
21
22
23
24
25
26
27
28
|
package com.chhliu.springboot.h2.entity; import java.math.bigdecimal; import javax.persistence.column; import javax.persistence.entity; import javax.persistence.generatedvalue; import javax.persistence.generationtype; import javax.persistence.id; @entitypublic class user { @id @generatedvalue(strategy = generationtype.auto) private long id; @column private string username; @column private string name; @column private short age; @column private bigdecimal balance; ……省略gettter和setter方法 } |
四、编写dao
|
1
2
3
4
5
6
7
8
|
package com.chhliu.springboot.h2.repository; import org.springframework.data.jpa.repository.jparepository; import org.springframework.stereotype.repository; import com.chhliu.springboot.h2.entity.user; @repositorypublic interface userrepository extends jparepository<user, long> { } |
五、编写controller
|
1
2
3
4
5
6
7
8
9
10
11
12
13
14
15
16
17
18
19
20
|
package com.chhliu.springboot.h2.controller; import org.springframework.beans.factory.annotation.autowired; import org.springframework.web.bind.annotation.getmapping; import org.springframework.web.bind.annotation.pathvariable; import org.springframework.web.bind.annotation.restcontroller; import com.chhliu.springboot.h2.entity.user; import com.chhliu.springboot.h2.repository.userrepository; @restcontrollerpublic class usercontroller { @autowired private userrepository userrepository; @getmapping("/user/{id}")// 注意,此处使用的是getmapping注解,该注解的作用类似与@requestmapping(value="/user/{id}" ,method=requestmethod.get),@postmapping注解同理 public user findbyid(@pathvariable long id) { return this.userrepository.findone(id); } } |
六、配置文件
|
1
2
3
4
5
6
7
8
9
10
11
12
13
14
15
16
17
18
19
20
|
# 服务器端口号 server.port=7900# 是否生成ddl语句 spring.jpa.generate-ddl=false# 是否打印sql语句 spring.jpa.show-sql=true# 自动生成ddl,由于指定了具体的ddl,此处设置为none spring.jpa.hibernate.ddl-auto=none # 使用h2数据库 spring.datasource.platform=h2 # 指定生成数据库的schema文件位置 spring.datasource.schema=classpath:schema.sql # 指定插入数据库语句的脚本位置 spring.datasource.data=classpath:data.sql # 配置日志打印信息 logging.level.root=info logging.level.org.hibernate=info logging.level.org.hibernate.type.descriptor.sql.basicbinder=trace logging.level.org.hibernate.type.descriptor.sql.basicextractor=trace logging.level.com.itmuch=debug |
七、启动程序
在浏览器中输入如下url:http://localhost:7900/user/4
可以看到测试结果
{"id":4,"username":"user4","name":"马六","age":20,"balance":100.00}
说明,我们的整合是ok的
八、测试dao层
|
1
2
3
4
5
6
7
8
9
10
11
12
13
14
15
16
17
18
19
20
21
22
|
package com.chhliu.springboot.h2; import org.junit.assert; import org.junit.test; import org.junit.runner.runwith; import org.springframework.beans.factory.annotation.autowired; import org.springframework.boot.test.context.springboottest; import org.springframework.test.context.junit4.springrunner; import com.chhliu.springboot.h2.entity.user; import com.chhliu.springboot.h2.repository.userrepository; @runwith(springrunner.class) @springboottestpublic class springbooth2applicationtests { @autowired private userrepository repository; @test public void test(){ user u = repository.findone(1l); assert.assertequals("成功的测试用例", "张三", u.getname()); } } |
发现测试是ok的!
九、总结
由于h2是关系内存数据库,当程序启动的时候,会在内存中创建表,并将数据存储在内存中,当重启程序后,会自动删除内存中的数据,从而可以很好的用来做dao层的单元测试和service层的单元测试,使整个程序不会依赖具体的数据库,同时也提高了单元测试的效率。
以上就是本文的全部内容,希望对大家的学习有所帮助,也希望大家多多支持服务器之家。
原文链接:http://blog.csdn.net/liuchuanhong1/article/details/54629967


