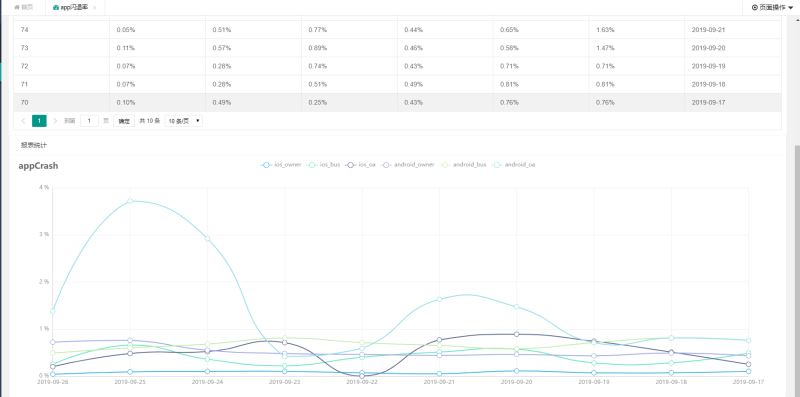
效果图:

该效果主要实现一个table展示数据,并在下方生成一个折线图。
实现方式:
1、首先需要对表格进行一个数据加载,这里用到了layui的table.render,具体用法可以参考
https://www.layui.com/doc/modules/table.html
html部分:
|
1
|
<table class="layui-hide" id="reportTableId" lay-filter="currentTableFilter"></table> |
js部分:
|
1
2
3
4
5
6
7
8
9
10
11
12
13
14
15
16
17
18
19
20
21
22
23
24
25
26
27
28
29
30
31
32
33
34
35
36
37
38
39
40
41
42
43
44
45
46
47
48
49
50
51
52
53
54
55
56
57
58
59
60
61
62
63
64
65
66
67
68
69
70
71
72
73
74
75
76
77
|
<script> var $ = layui.jquery, form = layui.form, table = layui.table; echarts = layui.echarts; //table.render()方法返回一个对象:var tableIns = table.render(options),可用于对当前表格进行“重载”等操作 tableIns = table.render({ elem: '#reportTableId', url: '/api/dataFactory/onlineReport/searchAppCrash', method: 'post', toolbar: '#toolbarDemo', defaultToolbar: ['filter', 'exports', 'print', { //自定义头部工具栏右侧图标。如无需自定义,去除该参数即可 title: '提示' , layEvent: 'LAYTABLE_TIPS' , icon: 'layui-icon-tips' }], request: { pageName: 'page' //页码的参数名称,默认:page , limitName: 'limit', //每页数据量的参数名,默认:limit }, cols: [[ {field: 'id', Width: 80, title: 'ID', sort: true}, { field: 'ios_owner', minWidth: 120, title: '业主-ios', sort: true, templet: function (d) { return d.ios_owner + '%' } }, { field: 'ios_bus', minWidth: 120, title: '商家-ios', sort: true, templet: function (d) { return d.ios_bus + '%' } }, { field: 'ios_oa', minWidth: 100, title: 'OA-ios', templet: function (d) { return d.ios_oa + '%' } }, { field: 'android_owner', minWidth: 100, title: '业主-android', templet: function (d) { return d.android_owner + '%' } }, { field: 'android_bus', minWidth: 100, title: '商家-android', templet: function (d) { return d.android_bus + '%' } }, { field: 'android_oa', minWidth: 130, title: 'OA-android', templet: function (d) { return d.android_oa + '%' } }, {field: 'crash_day', minWidth: 110, title: '统计时间', sort: true}, ]], limits: [10, 15, 20, 25, 50, 100], limit: 10, page: true, }); // 监听搜索操作 form.on('submit(data-search-btn)', function (data) { var form_result = JSON.stringify(data.field); //执行搜索重载 table.reload('reportTableId', { page: { curr: 1 } , where: { searchParams: form_result } }, 'data'); return false; }); </script> |
此时已经基本实现了表格从后台抓取数据实现动态渲染表格。接下来需要实现的是,将表格里面的数据渲染成折线图
2、首先html中写一个放折线图的div,具体的html代码如下:
|
1
2
3
4
5
6
|
<div class="layui-card"> <div class="layui-card-header"><i class="fa fa-line-chart icon"></i>报表统计</div> <div class="layui-card-body"> <div id="echarts-records" style="width: 100%;min-height:500px"></div> </div></div> |
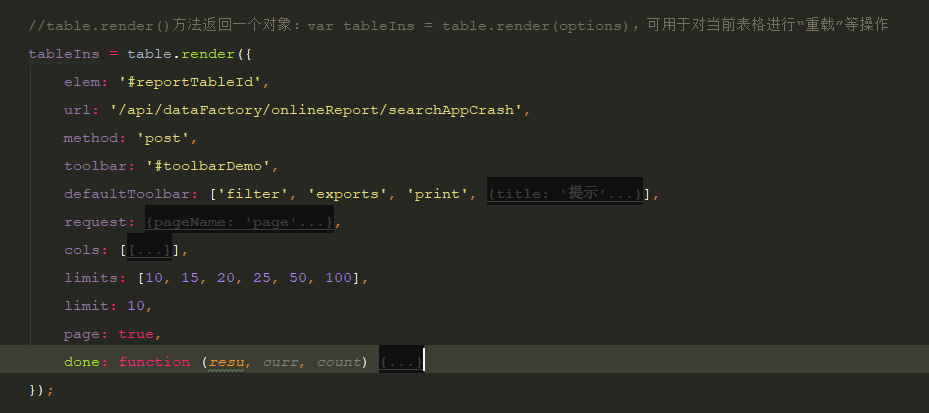
3、然后在表格渲染完成后,渲染一个折线图出来,这个时候需要在table.render()后添加一个回调函数 done: function ,具体用法如下:
|
1
2
3
4
5
6
7
8
9
10
11
12
13
|
table.render({ //其它参数在此省略 done: function(res, curr, count){ //如果是异步请求数据方式,res即为你接口返回的信息。 //如果是直接赋值的方式,res即为:{data: [], count: 99} data为当前页数据、count为数据总长度 console.log(res); //得到当前页码 console.log(curr); //得到数据总量 console.log(count); }}); |
4、然后我们需要将done: function添加到我们已经写到的table.render()中去。

5、此时的resu就是你渲染表格时,拿到的后台返回的数据,但是这个地方需要注意的是,因为表格渲染数据的格式和折线图渲染数据的格式,是不一样的,所以后台需要返回两种格式的数据,以便于一种用于table展示,一种用于折线图展示。

上图中就是在查询接口的最后添加一个操作把数据在转换一份用于折线图展示,并且动态生成横坐标Xtitle
6、此时后台的数据已经准备完毕,需要在前端渲染折线图,具体的echarts的用法,请参考https://www.echartsjs.com/examples/zh/index.html,此处只是描述如何应用折线图。
此处我用的方法是先行在界面上渲染一个横坐标和纵坐标出来,然后在渲染数据进去。代码如下:
|
1
2
3
4
5
6
7
8
9
10
11
12
13
14
15
16
17
18
19
20
21
22
23
24
25
26
27
28
29
30
31
32
33
34
35
36
37
38
39
40
41
42
43
|
/** * 报表功能 */var echartsRecords = echarts.init(document.getElementById('echarts-records'), 'walden');// 显示标题,图例和空的坐标轴echartsRecords.setOption({ title: { text: 'appCrash' }, tooltip: { trigger: 'axis' }, legend: { data: ['ios_owner', 'ios_bus', 'ios_oa', 'android_owner', 'android_bus', 'android_oa'] }, grid: { left: '3%', right: '4%', bottom: '3%', containLabel: true }, toolbox: { feature: { saveAsImage: {} } }, xAxis: { type: 'category', boundaryGap: false, data: [] }, yAxis: [ { //设置类别 type: 'value', //y轴刻度 axisLabel: { //设置y轴数值为% formatter: '{value} %', }, } ],}); |
此处因为我需要的纵坐标是百分比类型的,所以添加了百分号,不需要的可以去掉。此时没有数据的坐标已经渲染好了,然后就是渲染数据
7、渲染数据。
前面在done: function函数中我们得到三个返回值,其中第一个返回值resu就是接口的返回值,我们需要拿到其中的渲染数据进行渲染,代码如下:
|
1
2
3
4
5
6
7
|
//渲染折线图echartsRecords.setOption({ xAxis: { data: resu.Xtitle }, series: resu.appCrashZhexiantu}); |
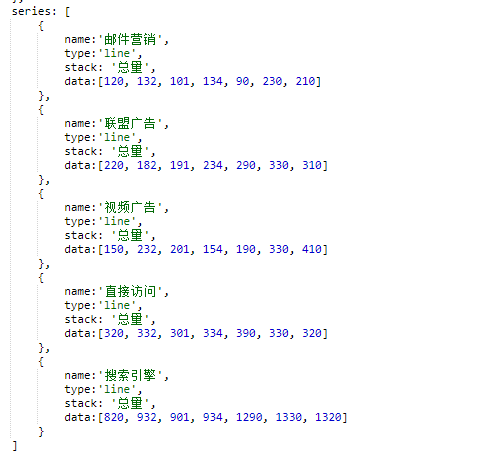
Xtitle代表的是折线图的横坐标,appCrashZhexiantu代表的是具体的数据。数据格式为:

OK,此时所有功能已经完成,界面上已经可以完美的展示出折线图。
综上的所有js:
|
1
2
3
4
5
6
7
8
9
10
11
12
13
14
15
16
17
18
19
20
21
22
23
24
25
26
27
28
29
30
31
32
33
34
35
36
37
38
39
40
41
42
43
44
45
46
47
48
49
50
51
52
53
54
55
56
57
58
59
60
61
62
63
64
65
66
67
68
69
70
71
72
73
74
75
76
77
78
79
80
81
82
83
84
85
86
87
88
89
90
91
92
93
94
95
96
97
98
99
100
101
102
103
104
105
106
107
108
109
110
111
112
113
114
115
116
117
118
119
120
121
122
123
124
125
126
127
128
129
130
131
132
133
|
<script> layui.use(['form', 'table', 'echarts'], function () { var $ = layui.jquery, form = layui.form, table = layui.table; echarts = layui.echarts; //table.render()方法返回一个对象:var tableIns = table.render(options),可用于对当前表格进行“重载”等操作 tableIns = table.render({ elem: '#reportTableId', url: '/api/dataFactory/onlineReport/searchAppCrash', method: 'post', toolbar: '#toolbarDemo', defaultToolbar: ['filter', 'exports', 'print', { //自定义头部工具栏右侧图标。如无需自定义,去除该参数即可 title: '提示' , layEvent: 'LAYTABLE_TIPS' , icon: 'layui-icon-tips' }], request: { pageName: 'page' //页码的参数名称,默认:page , limitName: 'limit', //每页数据量的参数名,默认:limit }, cols: [[ {field: 'id', Width: 80, title: 'ID', sort: true}, { field: 'ios_owner', minWidth: 120, title: '业主-ios', sort: true, templet: function (d) { return d.ios_owner + '%' } }, { field: 'ios_bus', minWidth: 120, title: '商家-ios', sort: true, templet: function (d) { return d.ios_bus + '%' } }, { field: 'ios_oa', minWidth: 100, title: 'OA-ios', templet: function (d) { return d.ios_oa + '%' } }, { field: 'android_owner', minWidth: 100, title: '业主-android', templet: function (d) { return d.android_owner + '%' } }, { field: 'android_bus', minWidth: 100, title: '商家-android', templet: function (d) { return d.android_bus + '%' } }, { field: 'android_oa', minWidth: 130, title: 'OA-android', templet: function (d) { return d.android_oa + '%' } }, {field: 'crash_day', minWidth: 110, title: '统计时间', sort: true}, ]], limits: [10, 15, 20, 25, 50, 100], limit: 10, page: true, done: function (resu, curr, count) { //回调渲染折线图 /** * 报表功能 */ var echartsRecords = echarts.init(document.getElementById('echarts-records'), 'walden'); // 显示标题,图例和空的坐标轴 echartsRecords.setOption({ title: { text: 'appCrash' }, tooltip: { trigger: 'axis' }, legend: { data: ['ios_owner', 'ios_bus', 'ios_oa', 'android_owner', 'android_bus', 'android_oa'] }, grid: { left: '3%', right: '4%', bottom: '3%', containLabel: true }, toolbox: { feature: { saveAsImage: {} } }, xAxis: { type: 'category', boundaryGap: false, data: [] }, yAxis: [ { //设置类别 type: 'value', //y轴刻度 axisLabel: { //设置y轴数值为% formatter: '{value} %', }, } ], }); //渲染折线图 echartsRecords.setOption({ xAxis: { data: resu.Xtitle }, series: resu.appCrashZhexiantu }); } }); // 监听搜索操作 form.on('submit(data-search-btn)', function (data) { var form_result = JSON.stringify(data.field); //执行搜索重载 table.reload('reportTableId', { page: { curr: 1 } , where: { searchParams: form_result } }, 'data'); return false; }); });</script> |
总结
以上所述是小编给大家介绍的flask+layui+echarts实现前端动态图展示数据效果,希望对大家有所帮助,如果大家有任何疑问请给我留言,小编会及时回复大家的。在此也非常感谢大家对服务器之家网站的支持!
如果你觉得本文对你有帮助,欢迎转载,烦请注明出处,谢谢!
原文链接:https://www.cnblogs.com/huxiansheng/p/11611178.html


